2014 Jeep Compass 2.4 Serpentine Belt Diagram
The serpentine belt system in your 2014 Jeep Compass with the 2.4L engine is a critical component responsible for powering various engine accessories. Understanding its layout and function is crucial for maintenance, troubleshooting, and even performance modifications. This article provides a detailed overview of the serpentine belt diagram, offering the knowledge you need to confidently work on your vehicle.
Purpose of the Serpentine Belt Diagram
The serpentine belt diagram serves several vital purposes:
- Repair and Replacement: The primary use is to guide the correct installation of a new serpentine belt. An incorrectly routed belt can lead to accessory failure, belt damage, and even engine damage.
- Troubleshooting: The diagram aids in identifying potential problems, such as a misaligned pulley or a seized accessory, by revealing the belt's intended path.
- Preventative Maintenance: Understanding the diagram allows you to inspect the belt and pulleys for wear, cracks, or misalignment, enabling proactive maintenance.
- Learning and Modification: The diagram is essential for those interested in understanding the overall engine layout and planning modifications that might impact the accessory drive system.
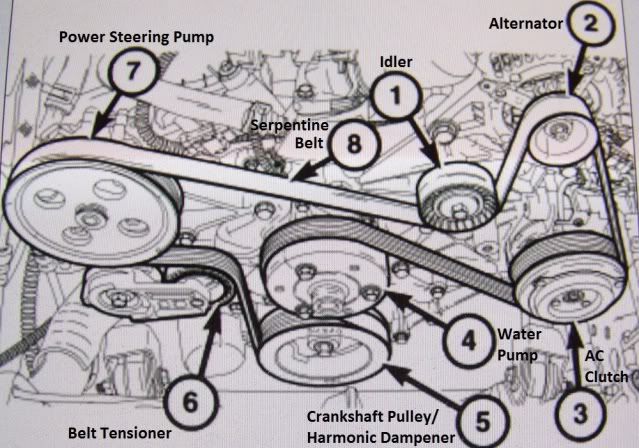
Key Specs and Main Parts of the 2014 Jeep Compass 2.4L Serpentine Belt System
The serpentine belt system for this model comprises several key components:
- Serpentine Belt: A single, long belt made of reinforced rubber that transmits rotational force from the crankshaft to various accessories.
- Crankshaft Pulley (Harmonic Balancer): Connected directly to the engine's crankshaft, providing the initial drive force for the belt.
- Alternator Pulley: Drives the alternator, which charges the battery and powers the electrical system.
- Power Steering Pump Pulley: Operates the power steering pump, providing hydraulic assistance for steering.
- Air Conditioning Compressor Pulley: Engages the air conditioning compressor to cool the cabin.
- Tensioner Pulley: Spring-loaded pulley that maintains proper belt tension, preventing slippage and premature wear. This is a critical component.
- Idler Pulley(s): Smooth pulleys that guide the belt around the engine, ensuring proper routing and clearance. Some diagrams may show one or more idler pulleys.
Key Specs: While specific belt length varies by manufacturer, the standard length for the 2014 Jeep Compass 2.4L serpentine belt is typically between 84 and 85 inches. However, always verify the exact specification for your specific vehicle using the manufacturer's recommendation. Belt width is also important, typically around 0.8 inches (20mm).
Serpentine Belt Diagram Symbols Explained
Understanding the symbols used in a serpentine belt diagram is essential for accurate interpretation:
- Solid Lines: Represent the path of the outer surface of the serpentine belt.
- Dashed Lines: Sometimes used to indicate the inner surface of the belt, especially when it wraps around a pulley in a way that obscures the outer surface.
- Arrows: Indicate the direction of belt rotation around each pulley. Follow these closely!
- Pulley Symbols: Each pulley is depicted as a circle. Some diagrams might label the pulleys (e.g., ALT for alternator, P/S for power steering). The diameter of the circle is not necessarily to scale.
- Tensioner Symbol: The tensioner is often represented as a pulley with an attached spring or arrow indicating the direction of tension application.
- Colors: Some diagrams use different colors to highlight specific components or sections of the belt path. However, color-coding is not standardized.
How the Serpentine Belt System Works
The serpentine belt system operates on a simple principle: rotational force transfer. The engine's crankshaft rotates, turning the crankshaft pulley. The serpentine belt, wrapped tightly around this pulley, is driven by the crankshaft's rotation. As the belt moves, it drives the pulleys attached to the various accessories (alternator, power steering pump, A/C compressor). The tensioner pulley ensures that the belt maintains sufficient tension for efficient power transfer. Without proper tension, the belt will slip, leading to reduced accessory performance and eventual belt failure.
The routing of the belt is carefully designed to maximize contact with each pulley and to provide adequate clearance from other engine components. The idler pulleys play a crucial role in maintaining this optimal routing.
Real-World Use: Basic Troubleshooting Tips
Here are some basic troubleshooting tips related to the serpentine belt system:
- Squealing Noise: A common symptom of a loose or worn serpentine belt. Check the belt for cracks, glazing, or wear. Also, inspect the tensioner to ensure it's functioning correctly. A seized accessory pulley can also cause squealing.
- Reduced Accessory Performance: If you notice dimming headlights (alternator issue), hard steering (power steering issue), or poor A/C cooling (A/C compressor issue), the serpentine belt might be slipping.
- Visible Belt Damage: Inspect the belt regularly for cracks, fraying, or missing chunks. Replace the belt immediately if you find any significant damage.
- Misalignment: Use a straight edge to check the alignment of the pulleys. Misalignment can cause premature belt wear and noise.
- Tensioner Issues: Check the tensioner for smooth movement and proper spring tension. A weak tensioner can lead to belt slippage.
Important Note: Before attempting any work on the serpentine belt system, consult your vehicle's repair manual for specific instructions and torque specifications.
Safety Considerations
Working on the serpentine belt system can be hazardous if proper safety precautions are not followed:
- Disconnect the Battery: Always disconnect the negative battery terminal before working on the electrical system. This prevents accidental shocks and damage to electronic components.
- Engine Off and Cool: Ensure the engine is turned off and has cooled down completely before working on the serpentine belt system. The engine bay can get very hot, and moving parts can cause serious injury.
- Avoid Loose Clothing and Jewelry: Loose clothing and jewelry can get caught in the moving parts of the engine, leading to severe injuries.
- Pulley Hazard: Stay clear of the pulleys when the engine is running. These are moving parts that can cause serious harm.
- Tensioner Spring: The tensioner pulley is spring-loaded and can release suddenly. Use the proper tools to relieve the tension safely.
- Sharp Edges: Be aware of sharp edges on pulleys and other engine components. Wear gloves to protect your hands.
Disclaimer: This article provides general information and guidance. It is not a substitute for professional mechanical advice. Always consult a qualified mechanic if you are unsure about any aspect of working on your vehicle.
Serpentine Belt Replacement: A Quick Overview
While this article focuses on the diagram, here's a simplified process for replacing the belt. Always consult your vehicle's specific repair manual for torque specs and other important details.
- Preparation: Disconnect the negative battery terminal. Locate the serpentine belt diagram (you now know what to do with it!). Gather necessary tools (socket set, wrench for the tensioner, new belt).
- Relieving Tension: Use the appropriate wrench or socket on the tensioner pulley. Rotate the tensioner to relieve tension on the belt.
- Removing the Old Belt: Carefully slide the old belt off each pulley, noting the routing as you go (the diagram should be right in front of you!).
- Installing the New Belt: Route the new belt around all the pulleys according to the diagram, except for one of the easily accessible ones (like the alternator or AC compressor).
- Applying Tension: Use the wrench or socket to again relieve tension on the tensioner pulley. Slide the remaining portion of the belt onto the last pulley.
- Releasing Tension: Slowly release the tensioner, ensuring the belt is properly seated on all pulleys.
- Inspection: Double-check the belt routing against the diagram. Make sure the belt is properly seated and not rubbing against anything.
- Testing: Reconnect the negative battery terminal. Start the engine and listen for any unusual noises. Visually inspect the belt to ensure it is running smoothly.
Important Tip: Before removing the old belt, take a picture of the belt routing with your phone. This can be a lifesaver if you get confused during the reinstallation process. Also, consider replacing the tensioner and idler pulleys when replacing the serpentine belt, especially if they show signs of wear or noise.
We have a high-resolution, downloadable diagram of the 2014 Jeep Compass 2.4L serpentine belt routing for your convenience. Contact us to receive the file.