2014 Jeep Grand Cherokee Serpentine Belt Diagram
The serpentine belt diagram for a 2014 Jeep Grand Cherokee is an invaluable resource for any experienced DIYer or intermediate car owner undertaking repairs, maintenance, or modifications. It serves as a visual roadmap to understanding the complex routing of the serpentine belt, ensuring proper installation and diagnosing potential issues. This guide will dissect the diagram, explaining its components, symbols, and practical application.
Purpose of the Serpentine Belt Diagram
The serpentine belt diagram is not just a pretty picture; it's essential for several key reasons:
- Repair and Replacement: Replacing a worn or damaged serpentine belt requires knowing the correct routing to ensure proper function of all driven accessories. Incorrect routing can lead to belt slippage, damage to components, and eventual failure.
- Troubleshooting: The diagram aids in diagnosing issues such as squealing belts, accessory malfunctions, or unusual vibrations. By visually inspecting the belt path and component alignment, potential problems can be identified.
- Learning and Understanding: For the enthusiastic car owner, studying the diagram offers insight into the engine's accessory drive system, promoting a deeper understanding of its operation.
- Preventative Maintenance: Regularly checking the belt’s condition and comparing it to the diagram helps detect early signs of wear, allowing for timely replacement and preventing costly breakdowns.
Key Specs and Main Parts in the Accessory Drive System
Before diving into the diagram itself, let's review the key components involved in the 2014 Jeep Grand Cherokee's accessory drive system:
- Serpentine Belt: This is the long, winding belt responsible for transferring power from the crankshaft to various engine accessories.
- Crankshaft Pulley: Attached to the crankshaft, this pulley drives the serpentine belt.
- Alternator Pulley: The alternator generates electrical power for the vehicle. Its pulley is driven by the serpentine belt.
- Power Steering Pump Pulley: The power steering pump provides hydraulic assistance for steering.
- Air Conditioning Compressor Pulley: The A/C compressor is responsible for cooling the cabin air.
- Idler Pulley(s): These smooth pulleys provide tension and guide the serpentine belt along its path. They don’t drive any specific accessory.
- Tensioner Pulley: This spring-loaded pulley maintains proper tension on the serpentine belt, preventing slippage and ensuring optimal performance. This is a critical component.
Note: Depending on the engine configuration (e.g., 3.6L V6, 5.7L V8), the exact layout and number of pulleys may vary slightly. Always refer to the specific diagram for your engine type.
Understanding the Diagram Symbols
Serpentine belt diagrams use specific symbols and conventions to represent the components and belt routing. Understanding these symbols is crucial for accurate interpretation:
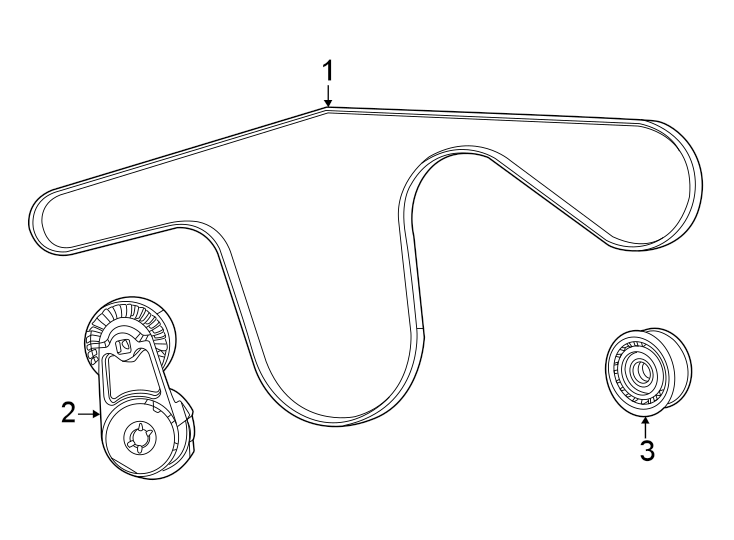
- Solid Lines: These represent the path of the serpentine belt. The thickness of the line doesn't typically convey any specific information.
- Arrows: Arrows indicate the direction of belt travel. Pay close attention to these, as incorrect routing can result in serious damage.
- Circles/Pulleys: Each pulley is represented by a circle. The diagram may label each pulley with its function (e.g., ALT for alternator, P/S for power steering).
- Icons: Some diagrams might include simplified icons representing the components (e.g., a battery icon for the alternator, a steering wheel icon for the power steering pump).
- Colors: While not always present, some diagrams use different colors to highlight specific sections or routing paths. Consult the diagram's legend for color-coding information.
Typically, the diagram will include a top-down or slightly angled view of the engine bay, focusing on the accessory drive system. The orientation of the engine in the diagram should be noted, and you must be able to find the crankshaft pulley relative to the accessories.
How the Serpentine Belt System Works
The serpentine belt system is a relatively simple yet effective method of transferring power. The crankshaft, driven by the engine's combustion process, rotates the crankshaft pulley. The serpentine belt wraps around this pulley and then routes to the various accessory pulleys (alternator, power steering pump, A/C compressor, etc.). As the crankshaft pulley spins, it drives the serpentine belt, which in turn rotates the accessory pulleys, powering their respective components. The tensioner pulley maintains the correct belt tension, preventing slippage and ensuring efficient power transfer. The idler pulleys simply provide the route for the belt to travel and maintain the correct amount of wrap around the pulleys driving accessories.
The routing of the belt is crucial for ensuring each accessory receives the appropriate amount of driving force. The diagram clearly illustrates the correct belt path, preventing incorrect installations that could lead to reduced performance or component damage.
Real-World Use and Basic Troubleshooting
Here are some practical applications of the serpentine belt diagram in real-world scenarios:
- Belt Replacement: Before removing the old belt, carefully study the diagram and note the routing. Take a picture for added insurance. When installing the new belt, follow the diagram precisely, ensuring the belt is properly seated in all pulley grooves.
- Squealing Belt: A squealing belt often indicates slippage. Check the belt tension and condition. The diagram can help identify if the belt is routed correctly, which can sometimes cause unnecessary rubbing and squealing.
- Accessory Malfunction: If an accessory (e.g., alternator) is not functioning correctly, the diagram can help verify that the belt is properly routed to that component and that the pulley is spinning when the engine is running.
- Visual Inspection: Use the diagram as a reference when visually inspecting the belt. Look for signs of wear, cracks, fraying, or glazing. If you find these, the belt needs to be replaced.
Safety Considerations
Working around the serpentine belt system can be hazardous. Here are some important safety precautions:
- Disconnect the Battery: Always disconnect the negative battery terminal before working on the serpentine belt system to prevent accidental electrical shocks.
- Hot Engine: Allow the engine to cool completely before working on the serpentine belt system. Components can become extremely hot during operation, posing a burn risk.
- Moving Parts: Never put your hands or tools near the serpentine belt while the engine is running. The belt can quickly grab and cause serious injury.
- Tensioner Tool: Use the correct tensioner tool to relieve belt tension. Improvising can damage the tensioner or cause injury.
We have the 2014 Jeep Grand Cherokee Serpentine Belt Diagram file readily available for download. It provides a detailed visual guide for your specific engine configuration. Having this resource at your fingertips will empower you to confidently tackle serpentine belt-related tasks and gain a deeper understanding of your vehicle's accessory drive system.