2014 Jeep Wrangler Serpentine Belt Diagram
The 2014 Jeep Wrangler, a vehicle celebrated for its ruggedness and off-road capability, relies on a single serpentine belt to drive several critical engine components. Understanding the serpentine belt diagram for your 2014 Wrangler is crucial for preventative maintenance, troubleshooting issues, and performing essential repairs. This article will provide a detailed explanation of the diagram, its components, and its significance for DIY mechanics and experienced car owners.
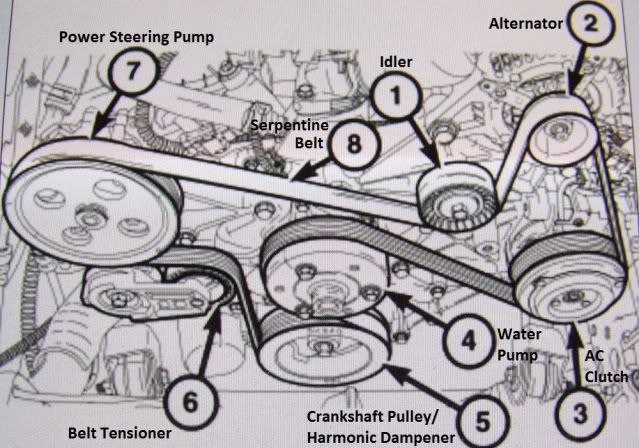
Purpose of the Serpentine Belt Diagram
The serpentine belt diagram serves as a visual roadmap for the routing of the serpentine belt around various engine pulleys. Why is this important?
- Repair and Replacement: The most obvious reason is for belt replacement. Without the correct routing, the engine accessories will not function properly, leading to potential engine damage.
- Troubleshooting: Identifying the belt's path and the components it drives can help diagnose issues such as squealing noises, power steering failure, or charging problems.
- Learning and Understanding: The diagram provides a clear illustration of how different engine components are interconnected and driven, furthering your understanding of your Jeep's engine system.
- Preventative Maintenance: Using the diagram during inspections allows you to check for proper belt alignment and potential wear points.
Essentially, the diagram is your go-to guide for anything related to the serpentine belt system on your 2014 Wrangler.
Key Specs and Main Parts
Before diving into the diagram itself, it’s important to understand the key components involved and some relevant specifications. Note that slight variations might exist depending on your Wrangler's specific engine (3.6L Pentastar V6 being the most common) and options.
Main Components:
- Serpentine Belt: A single, continuous belt made of reinforced rubber that transmits power from the crankshaft to other engine components.
- Crankshaft Pulley (or Damper): Connected directly to the crankshaft, this pulley receives the engine's rotational power.
- Alternator Pulley: The alternator generates electricity to power the vehicle's electrical system and charge the battery. Its pulley is driven by the serpentine belt.
- Power Steering Pump Pulley: The power steering pump provides hydraulic assistance to make steering easier.
- Air Conditioning Compressor Pulley: This pulley drives the A/C compressor, which circulates refrigerant in the air conditioning system.
- Idler Pulley(s): Smooth pulleys used to guide the belt and maintain proper tension. They don't drive any specific components.
- Tensioner Pulley: A spring-loaded pulley that automatically maintains the correct tension on the serpentine belt. This is critical for proper operation and belt longevity.
Typical Serpentine Belt Specs (3.6L Pentastar V6):
- Length: Approximately 91-92 inches (This can vary slightly based on model options. Always verify using your VIN or a reputable parts catalog.)
- Number of Ribs: Typically 6-rib or 7-rib. Always use the correct replacement belt with the same number of ribs.
Understanding the Diagram Symbols
A serpentine belt diagram isn’t just a picture; it's a schematic using standardized symbols and conventions to convey information efficiently. Here's a breakdown of what you'll typically find:
- Solid Lines: Represent the path of the serpentine belt itself. The line shows which direction the belt takes around each pulley.
- Arrows: Indicate the direction of belt travel around each pulley. This is extremely important for proper routing.
- Circles: Represent pulleys. The size of the circle doesn't necessarily reflect the actual size of the pulley.
- Component Labels: Each pulley will be labeled with an abbreviation indicating the component it drives (e.g., ALT for alternator, P/S for power steering, A/C for air conditioning compressor).
- Tensioner Indicator: The tensioner pulley might have a special symbol or note indicating its spring-loaded nature and the direction it moves to apply tension.
- Dashed Lines (Less Common): Sometimes used to indicate the backside of the belt making contact with a pulley (usually the idler pulleys).
How It Works
The serpentine belt system is a relatively simple, yet vital, mechanism. The crankshaft pulley, driven by the engine's combustion process, transfers rotational force to the serpentine belt. The belt, in turn, wraps around and drives the pulleys of the alternator, power steering pump, A/C compressor, and sometimes other accessories. The tensioner pulley ensures that the belt maintains the correct tension to prevent slippage and ensure efficient power transfer.
Think of it as a chain reaction: Engine power -> Crankshaft Pulley -> Serpentine Belt -> Accessory Pulleys. If the belt is too loose (insufficient tension), the pulleys will slip, leading to reduced performance or failure of the affected components. If the belt is too tight (excessive tension), it can cause premature wear on the belt and the bearings of the driven components.
Real-World Use: Basic Troubleshooting Tips
The serpentine belt diagram becomes particularly useful when diagnosing common issues:
- Squealing Noise: A common symptom of a worn, glazed, or loose serpentine belt. Check the belt for cracks, fraying, or glazing (a shiny, hard surface). Use the diagram to inspect the tensioner pulley for proper operation. If the tensioner is weak or seized, it needs replacement.
- Loss of Power Steering: If the power steering suddenly stops working, check the serpentine belt immediately. If the belt is broken or severely damaged, the power steering pump won't be driven.
- Charging Problems (Dead Battery): A malfunctioning alternator can lead to a dead battery. Verify that the serpentine belt is properly driving the alternator pulley. A slipping belt can prevent the alternator from generating enough electricity.
- Air Conditioning Failure: If the A/C stops working, a broken or slipping serpentine belt could be the culprit. Check that the belt is turning the A/C compressor pulley.
- Visual Inspection: Use the diagram to trace the belt path and visually inspect each pulley for damage or misalignment. A wobbly or damaged pulley can cause belt issues.
Important Note: Before replacing the serpentine belt, always inspect the pulleys for wear or damage. A damaged pulley can quickly ruin a new belt.
Safety Considerations
Working on the serpentine belt system involves several safety hazards that should be addressed:
- Hot Engine: Never work on the engine while it is hot. Allow the engine to cool completely before attempting any repairs.
- Moving Parts: The serpentine belt system contains rapidly rotating parts. Never put your hands or tools near the belt or pulleys while the engine is running.
- Battery Disconnection: Disconnect the negative battery cable before working on any electrical components, including the alternator. This prevents accidental short circuits.
- Proper Tools: Use the correct tools for the job. Using incorrect tools can damage components or cause injury. A serpentine belt tool is highly recommended for removing and installing the belt, especially with the tensioner mechanism.
- Belt Tension: Be extremely careful when releasing the tension on the belt. The tensioner is spring-loaded and can snap back forcefully.
The most risky components are the crankshaft pulley (due to its direct connection to the engine) and the tensioner pulley (due to the spring-loaded mechanism). Exercise extreme caution when working near these components.
We have a high-resolution PDF file of the 2014 Jeep Wrangler Serpentine Belt Diagram available for download. This will provide you with a clear and detailed visual aid for your maintenance and repair tasks.