2014 Kia Optima 2.4 Serpentine Belt Diagram
Let's dive deep into the serpentine belt system of the 2014 Kia Optima with the 2.4L engine. This guide will provide a comprehensive understanding of the serpentine belt diagram, its function, and practical troubleshooting tips. Having a solid grasp of this system is invaluable, whether you're performing routine maintenance, diagnosing a squealing noise, or simply aiming to understand your vehicle better.
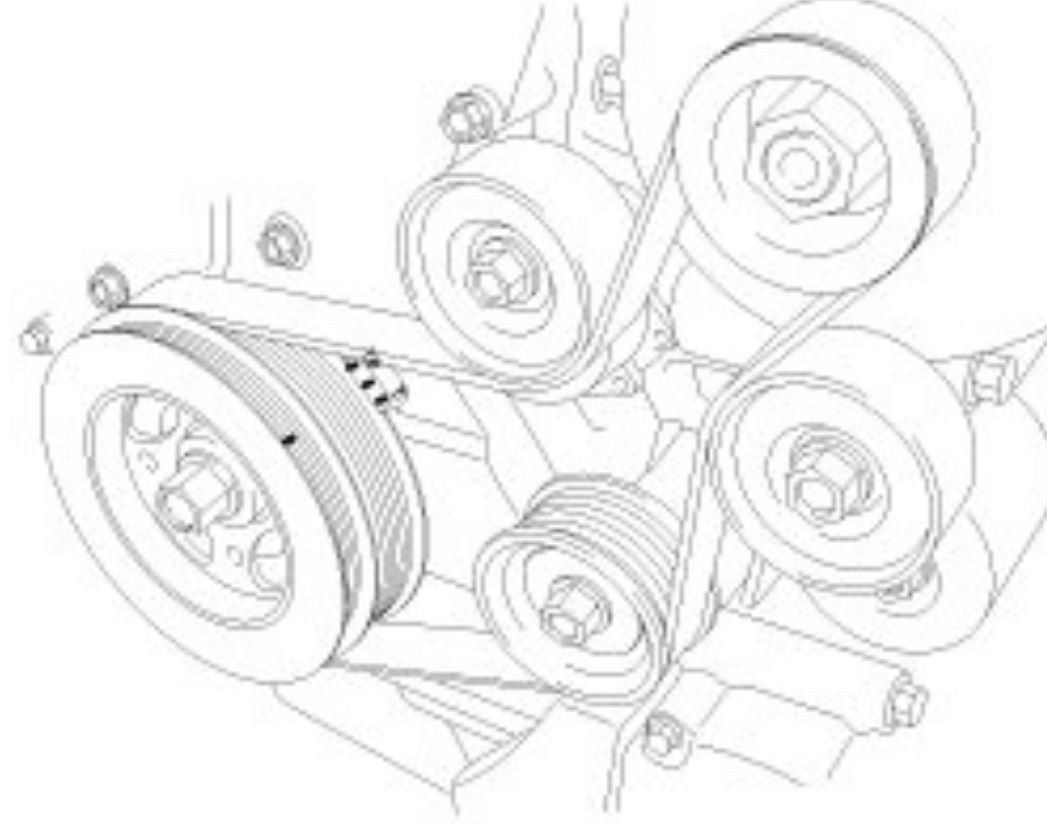
Purpose of the Serpentine Belt Diagram
The serpentine belt diagram is essentially a road map for your engine's accessory drive system. Its purpose is multifaceted:
- Repair & Maintenance: The diagram allows you to correctly route the serpentine belt during replacement. Improper routing can lead to component damage or failure to operate correctly.
- Diagnosis: By understanding the belt's path, you can pinpoint the source of noises, such as squeals or chirps, often indicating a failing component like a worn pulley or bearing.
- Component Identification: The diagram helps you identify each component driven by the belt, such as the alternator, power steering pump, and air conditioning compressor.
- Learning & Understanding: For the DIY enthusiast, the diagram is a valuable tool for understanding the engine's layout and the interrelationships between various components.
Key Specs and Main Parts
The 2014 Kia Optima 2.4L utilizes a single serpentine belt to drive several crucial engine accessories. Here's a breakdown of the main components and key specifications:
Main Components:
- Crankshaft Pulley: The engine's crankshaft drives this pulley, which initiates the belt's rotation.
- Alternator: Driven by the serpentine belt, the alternator generates electrical power to charge the battery and run electrical accessories.
- Power Steering Pump: This pump provides hydraulic pressure to assist steering.
- Air Conditioning (A/C) Compressor: Compresses refrigerant to cool the cabin air.
- Idler Pulley(s): Smooth, bearing-mounted pulleys that guide the belt and maintain proper tension.
- Tensioner Pulley: A spring-loaded pulley that automatically maintains proper belt tension as the belt stretches with age and temperature changes. This is a critical component.
Key Specs (Typical):
- Belt Length: While the exact length varies depending on the manufacturer, it's typically around 82-84 inches. Always use the correct belt specified for your vehicle. Check your owner's manual or a parts retailer for the correct part number.
- Belt Type: Serpentine belts are typically made of EPDM (Ethylene Propylene Diene Monomer) rubber for durability and heat resistance.
- Tension: Proper tension is vital. Too loose, and the belt will slip. Too tight, and it can damage bearings on the driven components. The tensioner pulley handles most of this automatically, but understanding how it functions is important.
Symbols on the Diagram
The diagram uses standard symbols to represent different aspects of the system:
- Solid Lines: These lines depict the path of the belt as it wraps around the pulleys. The thickness of the line often has no particular meaning.
- Arrows: Indicate the direction of rotation for each pulley.
- Component Icons: Simplified drawings represent each component (e.g., a stylized generator for the alternator, a steering wheel for the power steering pump).
- Text Labels: Clearly label each component for easy identification (e.g., "Alternator," "Power Steering Pump").
- Tensioner Indicator: This may show the allowable range of movement for the tensioner arm, indicating proper belt tension. Pay close attention to this when installing a new belt.
How It Works
The serpentine belt system's operation is relatively straightforward:
- The engine's crankshaft rotates, turning the crankshaft pulley.
- The serpentine belt, wrapped around the crankshaft pulley, is driven into motion.
- As the belt rotates, it drives all the accessories it's routed around: the alternator, power steering pump, A/C compressor, and other idler pulleys.
- The tensioner pulley maintains constant tension on the belt, ensuring proper grip on each pulley. This is accomplished by the spring loaded arm of the tensioner.
- Each accessory operates as needed: the alternator charges the battery, the power steering pump assists steering, and the A/C compressor cools the cabin air.
Real-World Use: Basic Troubleshooting
Here are some common issues and how the diagram can assist in troubleshooting:
- Squealing Noise: A squealing noise is often caused by a slipping belt. The diagram helps you inspect the belt's path and check for misalignment, wear, or a glazed surface. Check the tensioner pulley for proper operation. Is it bouncing excessively? This indicates either a worn belt or failing tensioner.
- Chirping Noise: A chirping noise can indicate a misaligned pulley or a failing bearing in one of the accessories. Use the diagram to systematically check each pulley for smooth rotation and proper alignment.
- Battery Not Charging: If the battery isn't charging, the alternator may not be turning properly. The diagram shows you the belt's path to the alternator, allowing you to inspect the belt and pulley for issues.
- Loss of Power Steering: A loss of power steering could be due to a broken or slipping belt. The diagram confirms the belt's routing to the power steering pump.
- A/C Not Working: If the A/C isn't working, the A/C compressor might not be engaging. The diagram verifies the belt's path to the compressor.
- Belt Slippage in Wet Conditions: If the belt slips when wet, it's likely worn and needs replacement.
Safety Considerations
Working on the serpentine belt system can be dangerous if proper precautions aren't taken:
- Engine Off: Always work on the system with the engine OFF and the ignition key removed to prevent accidental starting.
- Hot Components: Be cautious of hot engine components, particularly the exhaust manifold and engine block, which can cause severe burns.
- Moving Parts: Keep hands and clothing away from the serpentine belt and pulleys when the engine is running. The rotating components can cause serious injury.
- Battery Disconnect: For extensive repairs, disconnect the negative battery terminal to prevent electrical shorts.
- Eye Protection: Wear safety glasses to protect your eyes from debris.
- Tensioner Spring: Be very careful when releasing the tensioner. It is under considerable spring pressure and can cause injury if mishandled. Use the correct tool to relieve the tension.
A note about the tensioner. The tensioner pulley is under spring pressure. When removing or installing the belt, a special tool is usually required to relieve this tension. Improper handling can lead to snapped fingers or damage to the tensioner itself. Always refer to your vehicle's service manual or a reputable online resource for specific instructions on using the tensioner tool.
Understanding the serpentine belt system is crucial for maintaining the reliability and performance of your 2014 Kia Optima 2.4L. By carefully studying the diagram and following proper safety procedures, you can confidently tackle a range of maintenance and repair tasks.
We have the high resolution serpentine belt diagram for 2014 Kia Optima 2.4 for your convenience. To download the file, please follow the link at the bottom of the page.