2014 Mercedes E350 Serpentine Belt Diagram
Alright, let's dive into the serpentine belt diagram for your 2014 Mercedes-Benz E350. This guide is designed for those of you who aren't afraid to get your hands dirty, and who want to understand how this essential component works. We'll cover everything from the diagram's purpose to real-world troubleshooting, ensuring you're well-equipped for any maintenance or repairs.
Purpose of the Serpentine Belt Diagram
Why bother understanding this diagram in the first place? Well, a serpentine belt diagram is your roadmap to understanding the belt's routing and the components it drives. It’s crucial for several reasons:
- Replacement: If your belt snaps, cracks, or shows significant wear, you'll need to replace it. The diagram ensures you route the new belt correctly. An improperly routed belt will either immediately come off, or rapidly destroy itself.
- Troubleshooting: Squealing noises, battery charging issues, power steering malfunctions, or AC problems could all stem from a faulty or misaligned serpentine belt. The diagram helps you isolate the source of the issue.
- Maintenance: Routine inspection is key. The diagram lets you verify the belt's condition and ensure it's properly seated on each pulley.
- Learning & Modification: If you are adding a performance part, such as a supercharger, you need to know the way to properly install and change the belt size.
Essentially, this diagram is your go-to resource for anything related to the serpentine belt system.
Key Specs and Main Parts (2014 Mercedes E350)
For the 2014 E350, the serpentine belt system is pretty standard, but let's pinpoint the key components:
- Crankshaft Pulley (Crank Pulley): This pulley is driven directly by the engine's crankshaft. It's the primary driver of the entire serpentine belt system.
- Alternator Pulley: The alternator generates electrical power to charge the battery and run the car's electrical systems. The belt drives the alternator to produce this power.
- Power Steering Pump Pulley: Powers the hydraulic assistance for the steering system. If this belt slips or breaks, you'll notice significantly harder steering.
- Air Conditioning (AC) Compressor Pulley: The AC compressor is responsible for cooling the cabin. The belt powers the compressor to circulate refrigerant.
- Idler Pulley(s): These pulleys don't drive any components. Instead, they guide the belt and maintain proper tension and alignment. Typically they are smooth.
- Tensioner Pulley: The tensioner applies the necessary tension to the serpentine belt, preventing slippage and ensuring all components are driven efficiently. It usually has a spring-loaded mechanism. A failing tensioner is a common cause of belt noise and premature wear.
The specific belt length varies slightly depending on the exact vehicle configuration (e.g., with or without a specific option package), but is generally around 2135mm. Always double-check the correct part number (usually molded into the belt itself or specified in the owner's manual) before purchasing a replacement.
Symbols and Conventions in the Diagram
Understanding the symbols in the diagram is crucial for interpreting the belt's routing correctly. Here's a breakdown of common conventions:
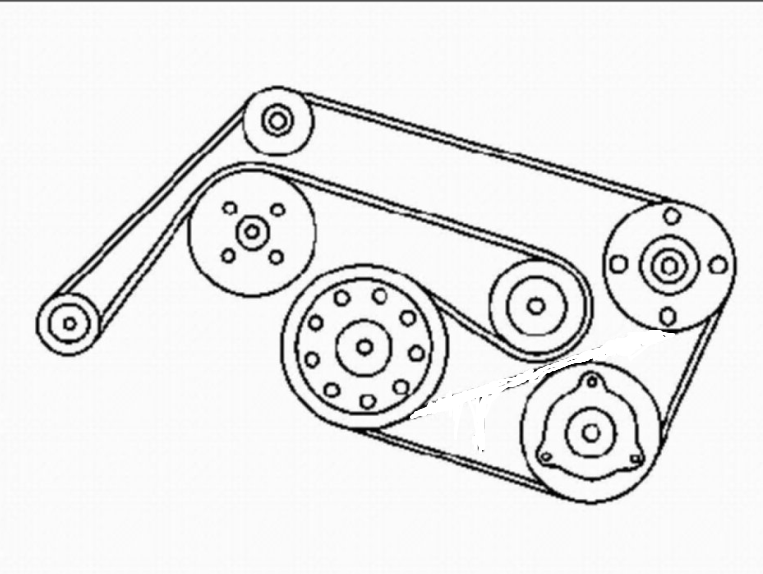
- Solid Lines: These represent the path of the serpentine belt itself. Follow the line to see which pulleys the belt wraps around.
- Dashed Lines: These might indicate the back side (smooth side) of the belt contacting a pulley.
- Arrows: Indicate the direction of rotation of each pulley. This is important for understanding how the belt drives each component.
- Pulley Icons: Each pulley will be represented by a circle, and may include an abbreviation to identify the component it's attached to (e.g., "ALT" for alternator, "AC" for AC compressor, "PS" for power steering).
- Tensioner Icon: The tensioner may have a unique symbol, often showing an arrow indicating the direction of its spring-loaded movement.
Most diagrams are black and white. On some more detailed diagrams, you might see different colors used to distinguish between the front and back of the belt, or to highlight the tensioner. However, for the E350, a simple black and white diagram is usually sufficient. The key is to look for clear labeling of each component and a distinct line showing the belt's path.
How It Works: The Serpentine Belt System
The serpentine belt system is elegantly simple. The crankshaft pulley, directly connected to the engine's rotating crankshaft, spins. This rotation is transferred to the serpentine belt, which snakes its way around the various pulleys attached to the accessories mentioned earlier: the alternator, power steering pump, AC compressor, and so on.
The tensioner pulley plays a critical role. It maintains the correct amount of tension on the belt, preventing it from slipping. Without proper tension, the accessories wouldn't be driven efficiently, leading to issues like a weak charging system, poor power steering assist, or ineffective air conditioning.
The idler pulleys act as guides, ensuring the belt follows the optimal path and avoiding any potential interference with other engine components. Their smooth surface minimizes friction and wear on the belt.
The system's efficiency relies on proper belt tension, pulley alignment, and the condition of the belt itself. Any deviation from these factors can lead to problems.
Real-World Use: Basic Troubleshooting Tips
Here are some common problems and how the serpentine belt diagram can help you diagnose them:
- Squealing Noise: Often indicates a slipping belt due to low tension, a worn belt, or a glazed pulley. The diagram helps you check the belt's routing and identify the tensioner pulley. If the tensioner is near the end of its travel, that's a good sign it needs to be replaced. Also, inspect each pulley surface for excessive smoothness. A ribbed pulley that becomes smooth from wear can also cause squealing.
- Battery Charging Issues: If the alternator isn't being driven efficiently, your battery may not charge properly. Use the diagram to confirm the belt is properly engaged with the alternator pulley.
- Power Steering Problems: Hard steering can be caused by a slipping belt on the power steering pump pulley. The diagram allows you to visually inspect the belt's engagement with the pulley.
- AC Malfunction: If the AC compressor isn't spinning, the AC won't cool. Check the belt's routing to the AC compressor pulley.
- Belt Wear/Damage: Regularly inspect the belt for cracks, fraying, or missing chunks. Use the diagram to ensure the belt is properly seated on each pulley.
Always visually inspect all pulleys for signs of damage or misalignment. A bent or damaged pulley can quickly destroy a new belt. Use a straightedge to verify proper alignment across the pulleys.
Safety Precautions
Working on the serpentine belt system involves working near a running engine, which presents several hazards:
- Moving Parts: The serpentine belt and pulleys are rapidly rotating when the engine is running. Keep your hands, tools, and clothing clear of these components at all times.
- Hot Engine: The engine and exhaust system can get extremely hot. Allow the engine to cool completely before working on the serpentine belt system.
- Battery Disconnect: Disconnecting the negative battery terminal is highly recommended to prevent accidental starting of the engine while you're working.
- Eye Protection: Wear safety glasses to protect your eyes from debris.
- Loose Clothing: Secure any loose clothing or jewelry that could get caught in the moving parts.
The tensioner pulley contains a powerful spring. Always use the correct tool to relieve the tension before removing or installing the belt. Releasing the tensioner without the proper tool can cause serious injury.
By following these safety precautions, you can minimize the risk of injury while working on your serpentine belt system.
You should now have a solid understanding of the 2014 Mercedes E350 serpentine belt system. Remember to always consult your vehicle's repair manual for specific instructions and torque specifications. Having the diagram available can make a world of difference for your diagnostic and repair needs.
We have the high-resolution serpentine belt diagram available for download to make your job easier. Click the link below to access the file.