2014 Nissan Altima 2.5 Serpentine Belt Diagram
For the intermediate DIY mechanic, understanding the serpentine belt system in your 2014 Nissan Altima 2.5 is crucial for maintenance, troubleshooting, and even some performance modifications. The serpentine belt is responsible for powering numerous vital engine components, and knowing its layout can save you time, money, and frustration.
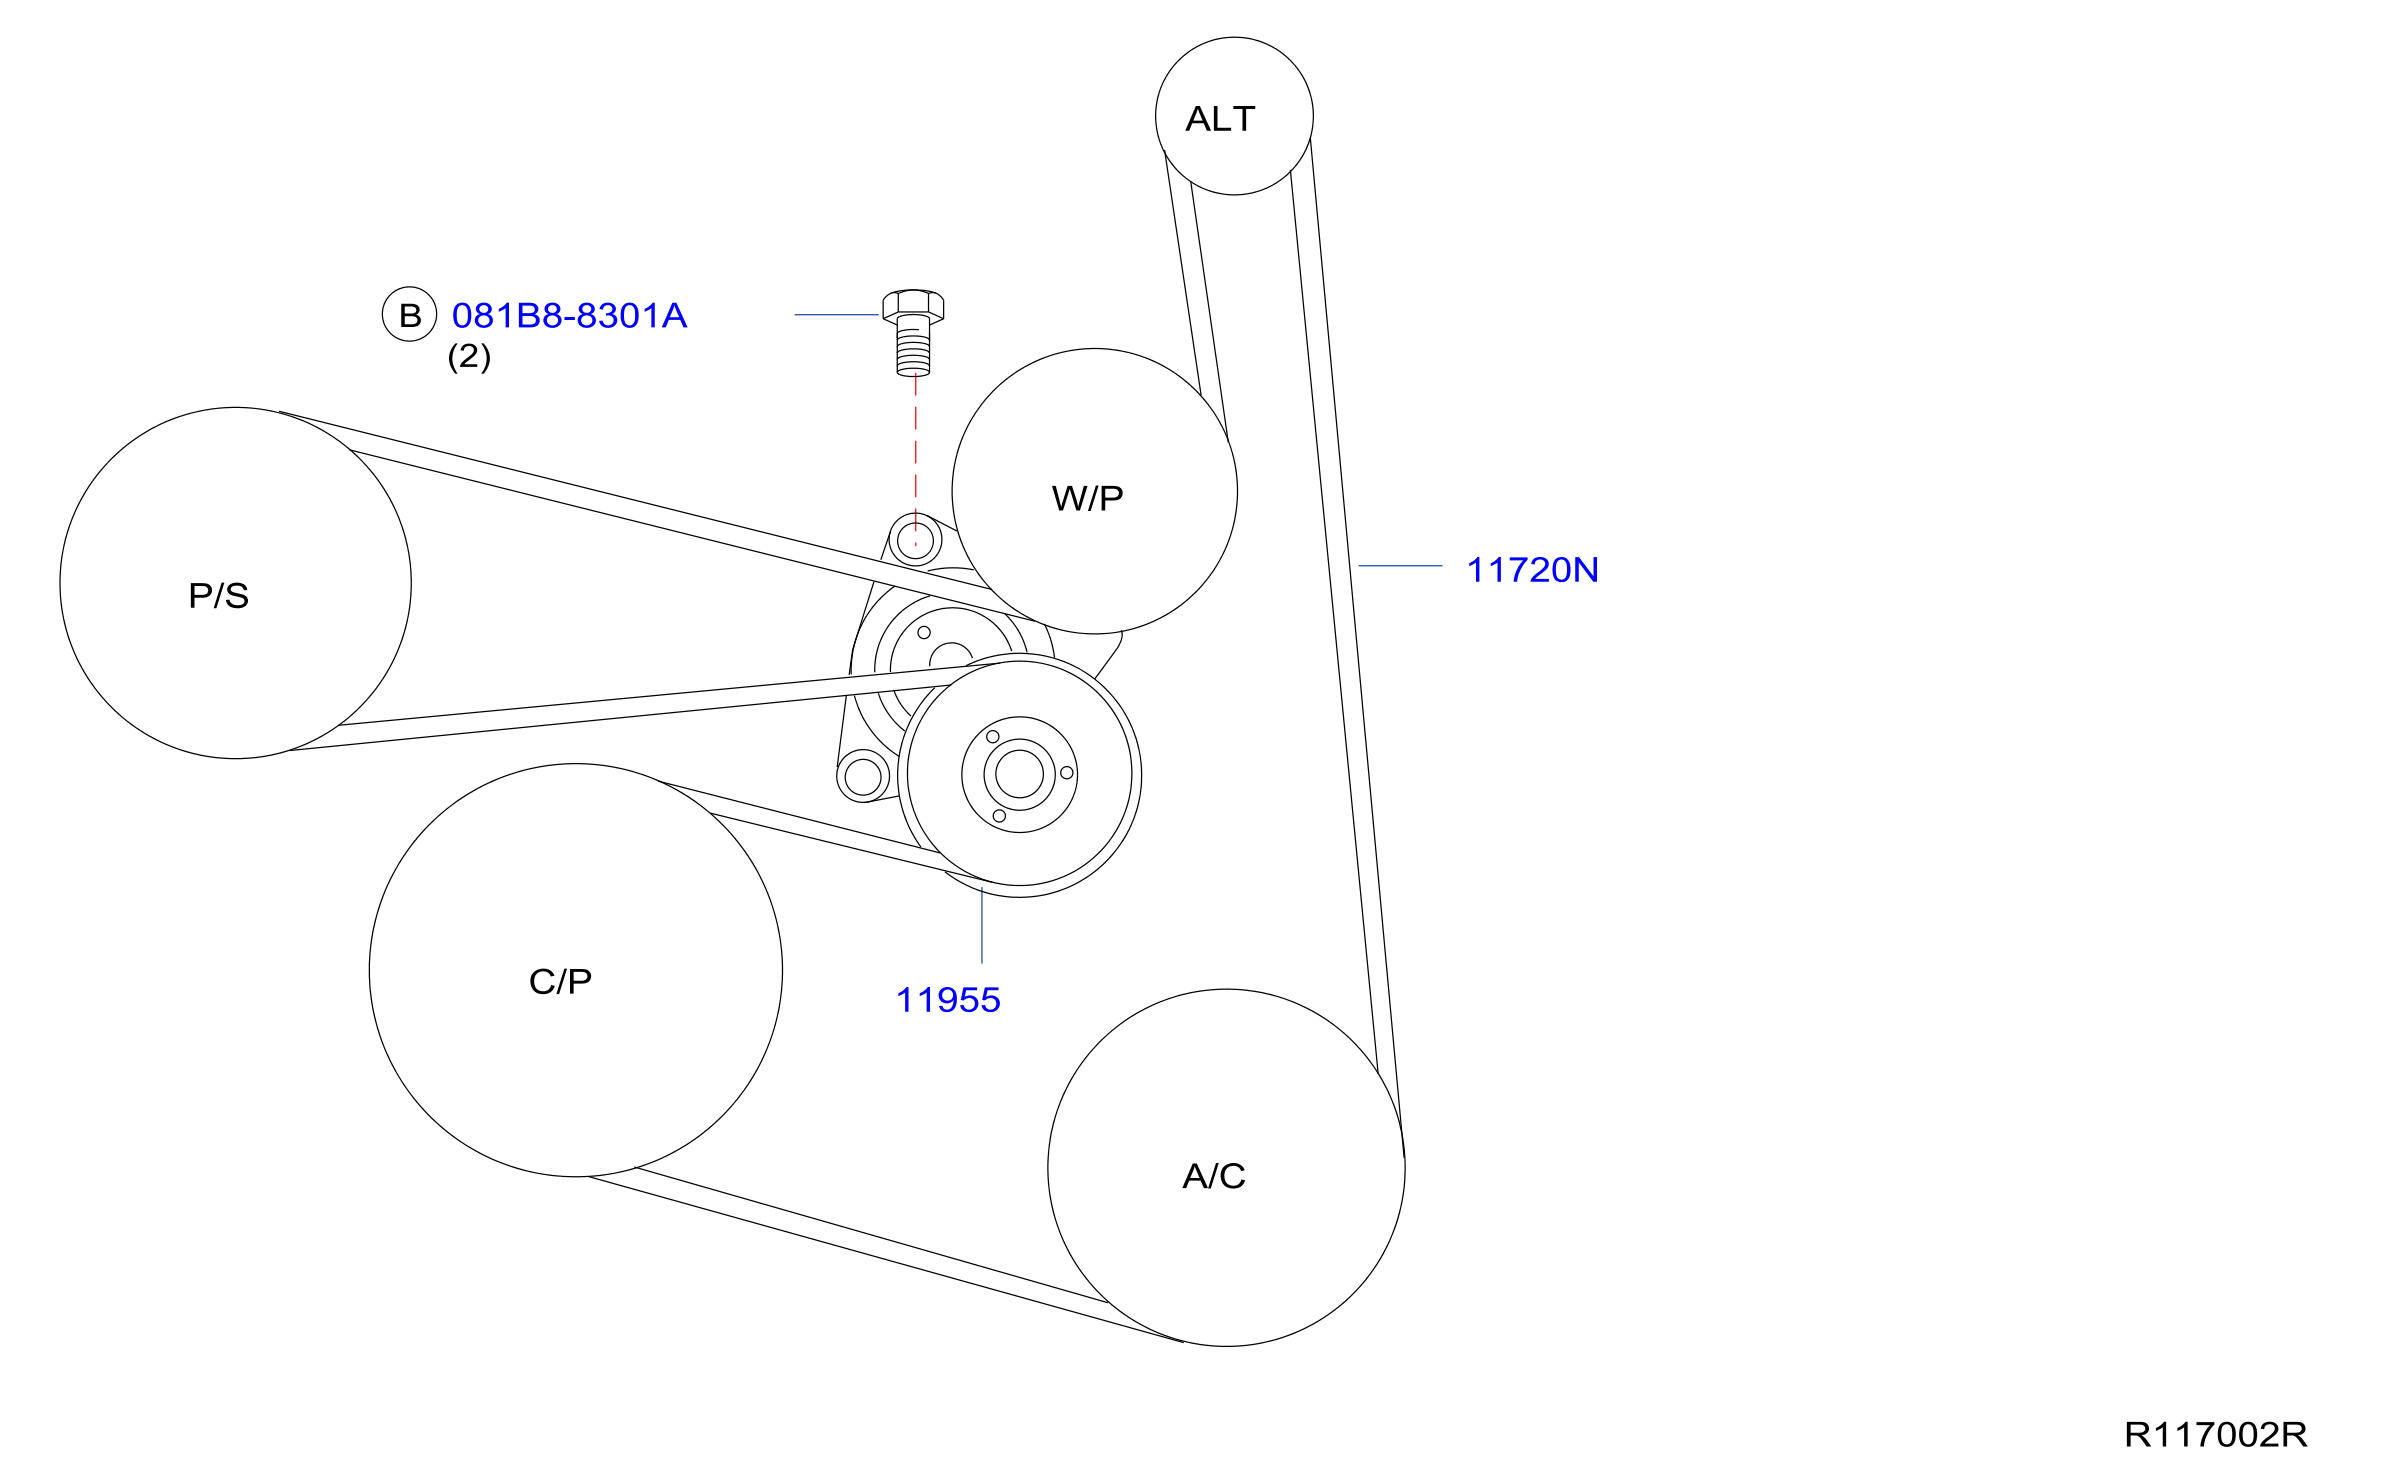
Purpose of the Serpentine Belt Diagram
This diagram isn't just a pretty picture; it's your roadmap to a functional engine. It serves several critical purposes:
- Maintenance and Repair: Quickly identify the belt routing when replacing a worn or broken belt. Incorrect routing can lead to component failure.
- Troubleshooting: Diagnose squealing noises, charging issues, or power steering problems related to belt tension or component malfunctions.
- Component Replacement: Understand the belt's path when replacing components like the alternator, power steering pump, or A/C compressor.
- Learning and Understanding: Gain a deeper understanding of your engine's accessory drive system.
Key Specs and Main Parts
Before diving into the diagram, let's review the key components involved. The 2014 Nissan Altima 2.5 utilizes a multi-ribbed (usually 6-rib) serpentine belt. Specific belt length varies slightly depending on if the vehicle is equipped with A/C, but it's crucial to use the correct replacement. Check your owner's manual or a reputable parts retailer for the precise specification.
Main Components:
- Crankshaft Pulley (Harmonic Balancer): The driving force of the system, powered directly by the engine. It's a key failure point on older vehicles.
- Alternator Pulley: Powers the vehicle's electrical system and charges the battery. Look for smooth rotation.
- Power Steering Pump Pulley: Provides hydraulic pressure for power-assisted steering.
- A/C Compressor Pulley: Compresses refrigerant for the air conditioning system. It only engages when the A/C is turned on (look for clutch engagement).
- Idler Pulley(s): Smooth, unpowered pulleys that guide the belt and maintain optimal routing. Inspect these carefully for bearing wear.
- Tensioner Pulley: A spring-loaded pulley that automatically maintains proper belt tension. This is the most frequent cause of squeals and belt slippage.
Knowing these parts and their functions is essential for interpreting the serpentine belt diagram effectively.
Diagram Symbols and Interpretation
A typical serpentine belt diagram uses several visual cues to convey information. Understanding these symbols is crucial for accurate diagnosis and repair.
- Solid Lines: Represent the path of the front (grooved) side of the serpentine belt.
- Dashed Lines: Represent the path of the back (smooth) side of the serpentine belt.
- Circles: Represent pulleys. Sometimes, these will have a small gear-like icon within them to designate a driven pulley, or a smooth circle to represent an idler.
- Arrows: Indicate the direction of belt rotation on each pulley. Follow these arrows to understand the overall flow.
- Component Labels: Abbreviations like "ALT" (alternator), "P/S" (power steering), "A/C" (air conditioning), "CRANK" (crankshaft), "IDLER", and "TENSIONER" are used to identify each pulley.
The lines indicating belt routing are the most important. Note whether the grooved side of the belt makes contact with a pulley, or if the smooth side is making contact. If you route the belt backwards, it won't grip the pulley and the accessory won't work.
How It Works
The serpentine belt system operates on the principle of transferring rotational energy from the engine's crankshaft to various accessory components. The crankshaft pulley, driven directly by the engine, turns the serpentine belt. The belt, in turn, wraps around various pulleys connected to the alternator, power steering pump, A/C compressor, and other components.
The tensioner pulley plays a crucial role by maintaining consistent pressure on the belt. This prevents slippage and ensures efficient power transfer. A worn or faulty tensioner will cause the belt to slip, resulting in squealing noises, reduced component performance (e.g., weak A/C, low battery voltage), and premature belt wear.
The belt's routing is designed to maximize the contact area between the belt and the pulleys, ensuring optimal grip. Idler pulleys are strategically placed to maintain the correct wrap angle and prevent excessive belt deflection.
Real-World Use and Basic Troubleshooting
Let's consider some common scenarios where the serpentine belt diagram comes in handy:
- Squealing Noise: A squealing noise, especially when the engine is cold or under load (e.g., turning the steering wheel), often indicates a slipping belt. Check the belt's condition for cracks, glazing (shiny surface), or missing ribs. Also, inspect the tensioner pulley. If it's bouncing excessively, it's likely worn. Use the diagram to confirm the proper belt routing after replacement.
- Battery Light On: If the alternator pulley isn't turning properly due to a slipping belt, the battery won't charge, and the battery warning light will illuminate. Check the belt tension and condition.
- Weak A/C: A slipping belt can prevent the A/C compressor from operating at its full capacity, resulting in weak cooling.
- Replacing the Belt: Before removing the old belt, carefully note the belt routing. Taking a picture with your phone can be extremely helpful. Use the serpentine belt diagram to double-check your work after installing the new belt.
Troubleshooting Tip: A simple test is to spray a small amount of belt dressing on the belt while the engine is running (use extreme caution!). If the squealing stops temporarily, it confirms that the belt is slipping.
Safety Considerations
Working on the serpentine belt system involves inherent risks. Always disconnect the negative battery cable before starting any work to prevent accidental electrical shocks. The engine compartment is filled with moving parts, and the serpentine belt itself can cause serious injury if caught in it.
Pay close attention to the following:
- Moving Parts: Keep your hands, clothing, and tools away from the serpentine belt and pulleys while the engine is running.
- Hot Components: The engine can be hot, so avoid touching exhaust manifolds or other heat-sensitive components.
- Tensioner Spring: The tensioner pulley is under spring tension. Use the correct tool (typically a breaker bar or socket with a long extension) to relieve the tension before removing the belt. Releasing the tensioner improperly can cause it to snap back violently.
- Sharp Edges: The belt and pulleys can have sharp edges. Wear gloves to protect your hands.
Special Note: Incorrect belt routing can damage engine components. If you are unsure about any step, consult a qualified mechanic.
We have a high-resolution, printable version of the 2014 Nissan Altima 2.5 serpentine belt diagram available for download. This will provide you with a clear and detailed visual aid for your maintenance and repair tasks.