2014 Nissan Pathfinder Serpentine Belt Diagram
For the experienced DIYer tackling maintenance or repairs on a 2014 Nissan Pathfinder, understanding the serpentine belt system is crucial. This article will provide a detailed breakdown of the serpentine belt diagram, covering its purpose, key components, operational principles, troubleshooting tips, safety considerations, and more. Having a clear understanding and a readily available diagram empowers you to tackle serpentine belt-related issues with confidence and precision. We have a downloadable diagram available for you, so you can follow along while working on your vehicle.
Purpose of the Serpentine Belt Diagram
The serpentine belt diagram serves as a visual roadmap for understanding the routing of the serpentine belt in your 2014 Nissan Pathfinder. Its primary purposes are:
- Repair and Replacement: When replacing a worn or damaged serpentine belt, the diagram ensures you route the new belt correctly. Incorrect routing can lead to component damage, reduced performance, or even belt failure.
- Troubleshooting: Diagnosing issues like squealing belts or non-functioning accessories (e.g., power steering, air conditioning) often requires verifying the belt's condition and routing. The diagram aids in this process.
- Preventive Maintenance: Periodically inspecting the belt's tension and alignment is part of preventive maintenance. The diagram helps you identify the various components the belt drives and their proper orientation.
- Learning and Understanding: Even if you're not actively working on the car, studying the diagram offers valuable insight into the vehicle's accessory drive system and how its components interact.
Key Specs and Main Parts
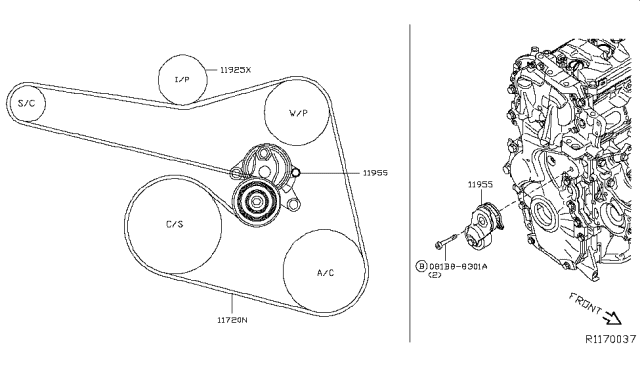
The 2014 Nissan Pathfinder utilizes a single serpentine belt to drive various engine accessories. Here's a breakdown of the key components typically involved:
- Crankshaft Pulley: This pulley, driven directly by the engine's crankshaft, is the source of power for the entire serpentine belt system.
- Alternator Pulley: The alternator generates electrical power to charge the battery and run the vehicle's electrical systems. The serpentine belt spins the alternator.
- Power Steering Pump Pulley: This pump provides hydraulic pressure to assist with steering. The serpentine belt drives the pump.
- Air Conditioning Compressor Pulley: The A/C compressor circulates refrigerant, enabling the air conditioning system. The belt drives this component.
- Idler Pulley(s): These pulleys provide guidance and support to the serpentine belt, ensuring proper alignment and tension. They typically do not drive any specific component.
- Tensioner Pulley: The tensioner, usually spring-loaded, maintains consistent tension on the serpentine belt. This is critical for preventing slippage and ensuring proper accessory function. The pulley is the visible rotating part of the tensioner.
Belt Length: The specific length of the serpentine belt will vary slightly depending on vehicle options, but it's crucial to use the correct length specified for your 2014 Pathfinder's configuration. Consult your owner's manual or a reliable parts database. The belt size is typically printed on the belt itself.
Symbols in the Serpentine Belt Diagram
Serpentine belt diagrams use standard symbols to represent different components and aspects of the belt's routing. Understanding these symbols is vital for interpreting the diagram correctly:
- Solid Lines: These represent the actual path of the serpentine belt as it travels around the various pulleys.
- Arrows: Arrows indicate the direction of rotation for each pulley. This is important for understanding how the belt drives the accessories.
- Pulley Representations: Each pulley is depicted as a circle, sometimes shaded or with specific markings to distinguish between different types (e.g., grooved, smooth).
- Tensioner Symbol: The tensioner is often represented with a spring symbol to indicate its spring-loaded nature.
- Component Labels: Each pulley is typically labeled with its corresponding component (e.g., "ALT" for alternator, "P/S" for power steering).
- Diagram Notes: Some diagrams include notes providing additional information, such as torque specifications for the tensioner or specific instructions for belt installation.
There are no specific color codes typically used in a serpentine belt diagram. Usually, the diagram is black and white.
How It Works
The serpentine belt system is elegantly simple in its operation. The engine's crankshaft provides the rotational power to the crankshaft pulley. This pulley, in turn, drives the serpentine belt. The belt then snakes its way around the various accessory pulleys (alternator, power steering pump, A/C compressor, etc.), transferring rotational force to each. The tensioner pulley maintains the proper belt tension, ensuring adequate grip and preventing slippage.
The correct routing of the belt is critical. The "serpentine" name comes from the winding, snake-like path the belt takes around the pulleys. This path is carefully designed to ensure each accessory receives the necessary power and operates within its specified speed range.
Real-World Use: Basic Troubleshooting Tips
Here are some common serpentine belt-related issues and how the diagram can assist with troubleshooting:
- Squealing Belt: A squealing belt often indicates slippage due to worn belt, incorrect tension, or a misaligned pulley. Use the diagram to check the belt's routing and visually inspect for wear or damage. Ensure the tensioner is functioning correctly.
- Accessory Malfunction: If an accessory (e.g., A/C compressor) is not working, use the diagram to verify the belt is properly routed around its pulley. Check for belt slippage or damage affecting that specific accessory.
- Belt Wear and Tear: Regular inspection using the diagram as a reference point allows you to spot cracks, fraying, or glazing on the belt's surface. Replace the belt proactively to avoid complete failure.
- Tensioner Issues: Use the diagram to locate the tensioner and visually inspect it for proper operation. A seized or weak tensioner can lead to belt slippage and accessory malfunction. A worn tensioner can also cause noise.
Safety Considerations
Working with the serpentine belt system involves inherent risks. Always prioritize safety:
- Disconnect the Battery: Before working on the serpentine belt, disconnect the negative battery cable to prevent accidental starting of the engine.
- Hot Engine Components: The engine and its components (including pulleys) can be extremely hot. Allow sufficient cooling time before attempting any work.
- Moving Parts: The serpentine belt system involves moving parts that can cause serious injury. Never place your hands or tools near the belt while the engine is running.
- Tensioner Spring: The tensioner spring is under significant tension. Use appropriate tools and techniques when releasing the tension to avoid injury. Always refer to the vehicle's service manual for the recommended procedure.
- Eye Protection: Wear safety glasses to protect your eyes from debris or flying particles.
Remember, working on automotive systems can be complex and potentially dangerous. If you're not comfortable performing a particular task, seek professional assistance from a qualified mechanic.
With this information and the accompanying diagram (which you can download from us!), you'll be well-equipped to understand and maintain the serpentine belt system on your 2014 Nissan Pathfinder. Good luck with your project!