2014 Nissan Sentra Fuse Box Diagram
Let's dive into the 2014 Nissan Sentra's fuse box diagram. Understanding this layout is crucial for anyone tackling electrical repairs, installing aftermarket accessories, or simply gaining a deeper understanding of their vehicle's inner workings. This guide will walk you through the diagram, explaining its components, symbols, and practical applications.
Purpose of the Fuse Box Diagram
The fuse box diagram is essentially a roadmap for your car's electrical system. It identifies each fuse and relay, and their corresponding circuits. Why is this important? Consider these scenarios:
- Troubleshooting Electrical Issues: A blown fuse is often the culprit behind malfunctioning components like lights, power windows, or the radio. The diagram pinpoints which fuse to check.
- Installing Aftermarket Accessories: When adding accessories like a new sound system or auxiliary lights, you'll need to tap into existing circuits. The diagram helps you identify appropriate power sources and protect your vehicle from overloads.
- Preventative Maintenance: Familiarity with the fuse box layout can help you quickly diagnose and address potential problems before they escalate into costly repairs.
- Understanding Vehicle Systems: For the mechanically inclined, studying the fuse box diagram provides valuable insight into the overall electrical architecture of the 2014 Sentra.
Key Specs and Main Parts
The 2014 Nissan Sentra typically has two main fuse boxes:
- Interior Fuse Box: Located inside the cabin, usually under the dashboard on the driver's side. This fuse box primarily protects circuits related to interior functions like lights, infotainment, and power accessories.
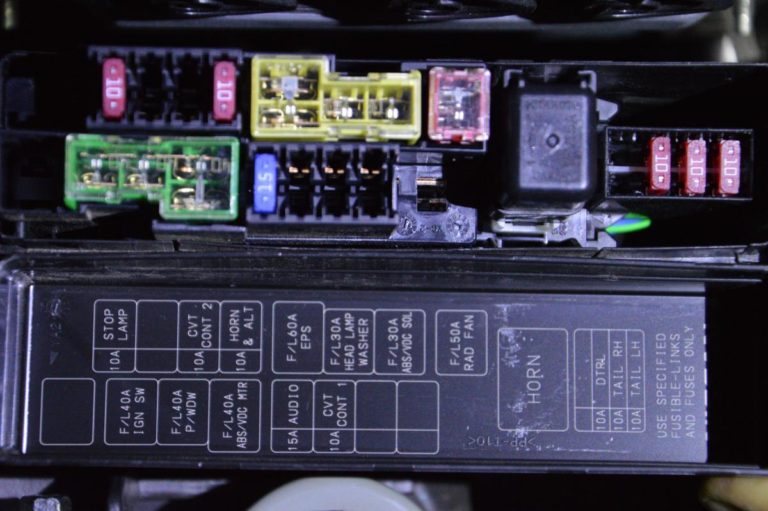
- Engine Compartment Fuse Box: Situated in the engine bay, near the battery. This fuse box safeguards circuits connected to engine management, lighting, and other critical vehicle systems.
The diagram identifies each fuse and relay, often by a numerical or alphanumeric code (e.g., "Fuse #12," "Relay A"). It also includes a description of the circuit each component protects (e.g., "Headlights," "Fuel Pump"). Some diagrams may also specify the amperage rating of each fuse. Knowing the correct amperage is critical, as using a higher amperage fuse can lead to component damage or even a fire.
Here are some key components you'll find referenced in the diagram:
- Fuses: Sacrificial devices designed to protect circuits from overcurrent. They consist of a thin wire that melts and breaks the circuit when the current exceeds a certain limit. Fuses are rated in Amperes (A), indicating the amount of current they can safely carry.
- Relays: Electrically operated switches that control high-current circuits using a low-current signal. They are commonly used to control components like headlights, horns, and fuel pumps. Relays are typically identified by their function (e.g., "Headlight Relay," "Fuel Pump Relay").
- Circuit Breakers: Similar to fuses, but resettable. They interrupt a circuit during an overload, but can be reset manually (or automatically, in some cases) once the fault is cleared. Circuit breakers are less common in modern vehicles than fuses, but may be present for specific high-demand circuits.
Understanding the Symbols
Fuse box diagrams utilize a variety of symbols to represent different components and wiring configurations. While the exact symbols may vary slightly depending on the specific diagram, here are some common conventions:
- Lines: Lines represent wires connecting different components. Solid lines typically indicate a direct connection, while dashed lines may represent a connection through a switch or other device.
- Colors: Wires are often color-coded to help identify their function. The diagram may include a color code legend to explain the meaning of each color (e.g., Red = Positive (+12V), Black = Ground).
- Icons: Icons are used to represent specific components. For example:
- A rectangle with a squiggly line inside usually represents a resistor.
- A circle with a line through it often represents a light bulb.
- A coil symbol typically represents a relay.
- Numerical and Alphanumeric Codes: These codes identify each fuse and relay. They correspond to labels on the fuse box itself.
Pay close attention to the legend or key provided with the diagram. This will explain the specific symbols and color codes used in that particular representation.
How It Works: A Simplified Explanation
Imagine the electrical system as a network of roads, and the fuses as toll booths. Each fuse is designed to allow a certain amount of electrical current (traffic) to flow through it. If too much current tries to pass through the fuse (like a traffic jam), the fuse "blows," preventing damage to the connected circuit (the road). This prevents a surge of electricity from damaging the delicate electronics or wiring of the car.
When a component stops working, the first step is to consult the fuse box diagram. Identify the fuse associated with that component. Then, inspect the fuse. A blown fuse will typically have a broken wire or a dark, burned appearance. Replacing the blown fuse with a new fuse of the same amperage rating should restore functionality. If the fuse blows again immediately, it indicates a more serious problem in the circuit, such as a short circuit or an overloaded component.
Real-World Use: Basic Troubleshooting Tips
Here's a step-by-step guide to troubleshooting common electrical problems using the fuse box diagram:
- Identify the Problem: Determine which component is malfunctioning (e.g., the radio, a headlight, a power window).
- Consult the Diagram: Locate the fuse associated with the malfunctioning component in the fuse box diagram.
- Locate the Fuse: Find the corresponding fuse in the actual fuse box.
- Inspect the Fuse: Visually inspect the fuse for signs of damage (broken wire, burned appearance). You can also use a multimeter to test the fuse for continuity.
- Replace the Fuse: If the fuse is blown, replace it with a new fuse of the same amperage rating.
- Test the Component: Turn on the component to see if it is working again.
- If the Fuse Blows Again: If the new fuse blows immediately or shortly after being replaced, there is a deeper problem in the circuit. Further diagnosis is required, potentially involving checking the wiring, connectors, and the component itself. This might be the time to consult a professional mechanic.
Safety Considerations
Working with electrical systems can be dangerous. Here are some important safety precautions:
- Disconnect the Battery: Before working on any electrical system, disconnect the negative (black) terminal of the battery to prevent accidental shorts or shocks.
- Use the Correct Fuse Rating: Always replace a blown fuse with a new fuse of the same amperage rating. Using a higher amperage fuse can overload the circuit and cause damage or a fire.
- Avoid Working in Wet Conditions: Water is a conductor of electricity. Never work on electrical systems in wet or damp conditions.
- Be Careful with High-Current Circuits: Circuits related to the starting system, charging system, and lighting system carry high currents. Exercise extreme caution when working with these circuits. Especially the ECM (Engine Control Module) circuit. Mishandling the ECM power or ground can cause serious problems.
- When in doubt, seek professional assistance: If you are unsure about any aspect of the electrical system, consult a qualified mechanic.
Understanding the 2014 Nissan Sentra fuse box diagram is a valuable skill for any car owner. It empowers you to diagnose and resolve common electrical problems, install aftermarket accessories, and gain a deeper understanding of your vehicle's electrical system. Remember to prioritize safety and consult a professional when necessary.
We have the full, high-resolution 2014 Nissan Sentra fuse box diagram available for download. This detailed diagram will provide you with the precise information you need to tackle your electrical projects with confidence.