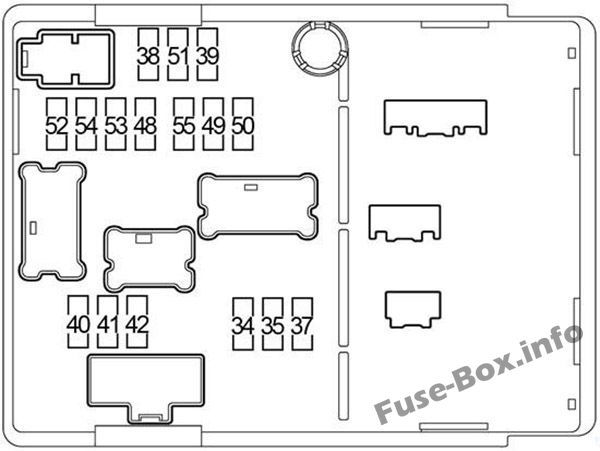
2014 Nissan Versa Fuse Box Diagram
So, you're diving into the electrical heart of your 2014 Nissan Versa? Excellent! Understanding your car's fuse box diagram is crucial whether you're diagnosing a faulty accessory, planning a custom modification, or just trying to save some money on auto repairs. This article will provide a comprehensive breakdown of the 2014 Versa's fuse box layout, functionality, and safe handling procedures. We'll treat this like a hands-on workshop session, equipping you with the knowledge to confidently tackle electrical projects on your vehicle.
Purpose of the Fuse Box Diagram
Why bother with a fuse box diagram? The fuse box is essentially the central nervous system of your Versa's electrical system. It protects sensitive components from overcurrent situations by housing a collection of fuses. Each fuse is designed to blow, or open the circuit, if the current exceeds a predetermined level. Without fuses, a short circuit could easily fry expensive components like your ECU (Engine Control Unit), headlights, or radio. The diagram acts as a roadmap, showing you which fuse controls which circuit. This is indispensable for:
- Troubleshooting Electrical Problems: Quickly identify and replace blown fuses to restore functionality to malfunctioning components.
- Performing Electrical Modifications: Safely tap into existing circuits for installing aftermarket accessories like auxiliary lighting or a new sound system.
- Understanding Your Vehicle: Gain a deeper understanding of your Versa's electrical architecture.
- Preventing Further Damage: Promptly addressing blown fuses can prevent more severe electrical issues.
Key Specs and Main Parts
The 2014 Nissan Versa generally has two fuse box locations:
- Interior Fuse Box: Usually located under the dashboard, often near the driver's side. This box primarily houses fuses for interior components like the radio, interior lights, power windows, and the climate control system.
- Engine Compartment Fuse Box: Found in the engine bay, this box contains fuses for critical engine components like the fuel pump, ignition system, ECU, and headlights. It also typically includes relays.
Here's a breakdown of the key components you'll find within these boxes:
- Fuses: The sacrificial components that protect the electrical circuits. They come in various amperage ratings (measured in Amperes or Amps, denoted by 'A') to match the specific load of each circuit. Common amperage ratings include 5A, 7.5A, 10A, 15A, 20A, 25A, and 30A.
- Relays: Electrically operated switches that control high-current circuits using a low-current signal. Relays are used for components like headlights, starter motors, and fuel pumps. They use electromagnetic induction to open or close a set of contacts.
- Fuse Puller: A small plastic tool designed to safely remove fuses without damaging them or your fingers.
- Spare Fuses: Some fuse boxes have designated locations for spare fuses of different amperage ratings.
Understanding the Fuse Box Diagram Symbols
Fuse box diagrams aren't always intuitively obvious. Here's what you need to know to decipher them:
- Lines: Solid lines represent the electrical circuits. Thicker lines might indicate higher current carrying capacity.
- Colors: While not always consistent across all diagrams, colors can sometimes indicate the type of circuit or the wire gauge used. However, relying solely on color can be misleading, so always cross-reference with the component's function.
- Icons: These are the most important visual cues. Common icons include:
- Headlight Icon: Represents the headlight circuit.
- Radio Icon: Indicates the radio circuit.
- Wiper Icon: Denotes the windshield wiper circuit.
- Cigar Lighter Icon: Refers to the cigarette lighter or accessory power outlet circuit.
- Engine Icon: Often represents circuits related to the engine management system.
- Square/Rectangle: A common way to represent a relay.
- Numbers: Each fuse location is numbered. This number is cross-referenced on the diagram to identify the circuit it protects.
- Amperage Ratings (A): Each fuse location will be labeled with the amperage rating of the required fuse. Always use a fuse with the correct amperage rating. Using a higher amperage fuse can overload the circuit and cause damage or even a fire.
How It Works: Circuit Protection in Action
Imagine a simple circuit powering your car's interior lights. Electricity flows from the battery, through the fuse, to the lights, and back to the battery. The fuse acts as a bottleneck. It's a thin wire designed to melt and break the circuit if the current flowing through it exceeds its rated amperage. This happens when there's a short circuit (an unintended path for electricity to flow) or when a component draws excessive current. When the fuse blows, it stops the flow of electricity, preventing damage to the lights and the wiring. Replacing the blown fuse with one of the correct amperage restores the circuit.
Real-World Use: Basic Troubleshooting Tips
Here's a step-by-step guide to using the fuse box diagram for troubleshooting:
- Identify the Problem: What component isn't working? (e.g., radio, headlights, power windows).
- Consult the Diagram: Locate the fuse box diagram (usually found in your owner's manual or a sticker on the fuse box cover – and of course, the one you can download here!). Identify the fuse associated with the malfunctioning component.
- Inspect the Fuse: Use a fuse puller to carefully remove the fuse. Visually inspect the fuse. A blown fuse will have a broken filament (the thin wire inside the fuse). You can also use a multimeter in continuity mode to test the fuse. A good fuse will show continuity (a beep or a low resistance reading), while a blown fuse will not.
- Replace the Fuse: If the fuse is blown, replace it with a new fuse of the exact same amperage rating.
- Test the Component: Turn on the component to see if it now works.
- If the Fuse Blows Again: If the new fuse immediately blows again, this indicates a more serious problem, such as a short circuit. Do not keep replacing fuses. Seek professional help from a qualified mechanic.
Safety: Handling Risky Components
Working with electrical systems can be dangerous. Here are some crucial safety precautions:
- Disconnect the Battery: Before working on any electrical components, disconnect the negative (-) terminal of your car's battery. This will prevent accidental short circuits and electric shock.
- Use the Right Tools: Always use insulated tools designed for automotive electrical work.
- Never Replace with Higher Amperage: As emphasized earlier, never replace a fuse with one of a higher amperage rating. This can overload the circuit and cause a fire.
- Be Cautious with Relays: Relays can sometimes get hot, especially those controlling high-current circuits. Allow them to cool down before handling them.
- Avoid Working in Wet Conditions: Water and electricity are a dangerous combination. Never work on electrical components in wet conditions.
- Understand the Diagram: If you're unsure about any aspect of the fuse box diagram or the electrical system, seek professional assistance. It's better to be safe than sorry.
By understanding your 2014 Nissan Versa's fuse box diagram and following these guidelines, you'll be well-equipped to troubleshoot electrical problems and perform basic modifications safely and effectively. Remember to always prioritize safety and consult a professional if you're unsure about any aspect of the electrical system.
We have the full, high-resolution 2014 Nissan Versa Fuse Box Diagram available for download. Click the link below to get your copy and keep it handy for future reference!
[Download Link - Placeholder, would be an actual download link in a live setting]