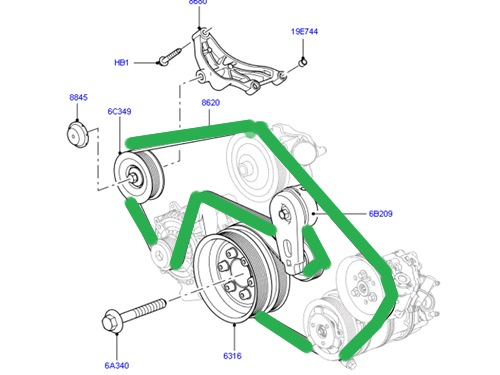
2014 Range Rover 5.0 Supercharged Belt Diagram
Welcome, fellow gearheads! Today, we're diving deep into the serpentine belt system of the 2014 Range Rover 5.0 Supercharged. This isn't just about replacing a worn belt; it's about understanding the intricate dance of power transfer that keeps your Rover purring. We'll explore the belt diagram, its components, and how it all works together. We have the diagram available for download, and knowing how to read and use it can be a lifesaver – both literally and financially.
Purpose of Understanding the Belt Diagram
Why bother with this diagram? Several compelling reasons exist:
- Repairs and Maintenance: The most obvious reason. A snapped belt can leave you stranded. Knowing the belt's routing allows for quick and correct replacement. Misrouting a serpentine belt can cause serious damage to your engine accessories.
- Troubleshooting: Unusual noises, battery charging issues, or a lack of power steering can often be traced back to a faulty belt or a problem with a driven component. The diagram helps you isolate the potential source of the problem.
- Learning Engine Mechanics: Understanding the serpentine belt system is a great way to learn about basic engine mechanics. You'll understand how the crankshaft's rotational energy is used to power various engine accessories.
- Modifications and Upgrades: Planning on adding a supercharger pulley, upgraded alternator, or other accessories? The diagram will help you understand how the new component will integrate into the existing system, especially if different belt lengths are required.
Key Specs and Main Parts
The 2014 Range Rover 5.0 Supercharged engine uses a serpentine belt system designed to efficiently drive multiple engine accessories from a single source of power – the crankshaft. Key components include:
- Crankshaft Pulley (Crank Pulley): The heart of the system. It's connected directly to the engine's crankshaft and provides the rotational force that drives the belt.
- Supercharger Pulley: Unique to the supercharged models, this pulley directly drives the supercharger, forcing more air into the engine for increased power.
- Alternator: Charges the battery and provides electrical power to the vehicle's systems.
- Power Steering Pump: Provides hydraulic assistance to the steering system, making it easier to turn the wheel.
- Air Conditioning Compressor: Compresses refrigerant to cool the cabin air.
- Idler Pulleys: Smooth, unpowered pulleys that guide the belt along its path and prevent excessive vibration.
- Tensioner Pulley: Maintains the correct tension on the belt. This is usually a spring-loaded pulley that automatically adjusts for belt stretch and wear. A failing tensioner is a common cause of belt squeal.
- Serpentine Belt: The long, continuous belt that connects all the pulleys. Made of durable rubber and reinforced with fibers to withstand high tension and heat.
The 5.0 Supercharged engine uses a specific belt length. While exact measurements vary slightly between manufacturers, the length is a critical factor. Using the wrong belt length can lead to improper tension, belt slippage, or even damage to the accessories.
Understanding the Symbols
The diagram isn't just a picture; it's a map! Here's how to decipher it:
- Solid Lines: Represent the path of the serpentine belt.
- Arrows: Indicate the direction of belt rotation around each pulley. This is crucial for ensuring correct installation.
- Circles: Represent pulleys. The size of the circle doesn't necessarily indicate the pulley's actual size, but rather its location in the diagram.
- Text Labels: Clearly identify each pulley and component (e.g., "Crankshaft Pulley," "Alternator," "Tensioner").
- Icons (Optional): Some diagrams might use icons to further clarify the component type (e.g., a battery icon for the alternator).
- Dashed Lines: Usually represent the location of components behind other parts.
Pay close attention to the direction arrows. The belt must be routed so that the grooved side of the belt makes contact with grooved pulleys, and the smooth side makes contact with smooth pulleys. Reversing this can cause slippage and rapid belt wear.
How It Works
The process is relatively straightforward, but understanding the physics involved is essential. The crankshaft pulley, driven by the engine's combustion, rotates the serpentine belt. The belt, in turn, transfers this rotational force to all the other pulleys connected to it.
Here's a breakdown:
- The crankshaft pulley initiates the motion.
- The belt wraps around the supercharger pulley, driving the supercharger to compress air.
- The belt then moves to the alternator, powering its rotor to generate electricity.
- Next, the belt drives the power steering pump, providing hydraulic assistance for steering.
- Finally, the belt powers the A/C compressor to cool the vehicle's interior.
- The idler and tensioner pulleys ensure the belt stays on course and maintains proper tension, preventing slippage and premature wear.
The tensioner pulley is critical. Its spring-loaded mechanism automatically adjusts to maintain the optimal belt tension. If the tensioner is weak or failing, the belt may slip, causing a squealing noise and potentially damaging the driven components.
Real-World Use: Basic Troubleshooting Tips
Here are some common problems and how the belt diagram can help you diagnose them:
- Squealing Noise: Often caused by a loose or worn belt. Check the tensioner pulley for proper operation. Use the diagram to inspect the belt's routing and condition for signs of wear, cracks, or glazing.
- Battery Charging Issues: If the alternator isn't being driven effectively (due to a slipping or broken belt), the battery won't charge properly. Use the diagram to verify the belt's path and tension on the alternator pulley.
- Loss of Power Steering: A slipping belt on the power steering pump pulley will result in a loss of power steering assistance. The diagram will help you isolate the power steering pump and assess the belt's condition in that specific area.
- Overheating: Although less directly related, a slipping belt can affect the water pump (if driven by the serpentine belt on some models - verify in the specific vehicle documentation) and cause the engine to overheat. Use the diagram to check the belt's path to the water pump pulley.
Before replacing any components, always inspect the belt for signs of damage, such as cracks, fraying, or missing chunks. A worn belt can damage the pulleys and accelerate the wear on other components.
Safety First!
Working on the serpentine belt system involves several potential hazards:
- Moving Parts: The engine must be OFF and the ignition key removed before working on the belt system. Accidental engine start-up can cause serious injury.
- Hot Components: The engine and exhaust components can be extremely hot. Allow the engine to cool completely before working on the belt system.
- High Tension: The serpentine belt is under significant tension. Always use the correct tools to release the tension on the tensioner pulley before removing the belt. Do not attempt to pry or force the belt off the pulleys.
The supercharger pulley spins at very high speeds. Ensure the engine is off and cool before working anywhere near the supercharger.
Always wear safety glasses and gloves when working on any automotive system. If you're unsure about any step in the process, consult a qualified mechanic.
Get the Diagram!
We have the full 2014 Range Rover 5.0 Supercharged serpentine belt diagram available for you to download. Having this visual aid will make diagnosing and repairing issues with your belt system much easier. Click the link below to access the file and keep it handy for your next Rover project!
[Insert Download Link Here - Remember, I can't provide actual links, so replace this placeholder]
With this knowledge and the right tools, you'll be well-equipped to handle most serpentine belt-related issues on your 2014 Range Rover 5.0 Supercharged. Happy wrenching!