
2014 Silverado Serpentine Belt Diagram
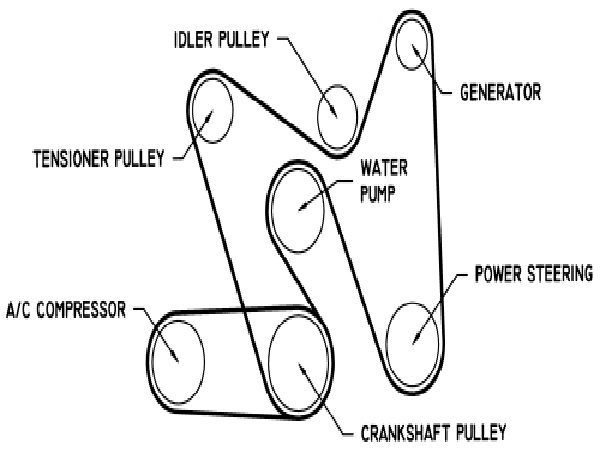
For the experienced DIYer tackling maintenance or repairs on a 2014 Chevrolet Silverado (or its GMC Sierra counterpart), understanding the serpentine belt system is crucial. This article will provide a detailed breakdown of the serpentine belt diagram for the 2014 Silverado, covering its purpose, components, operation, and troubleshooting, all while maintaining safety best practices. We'll explain how to read the diagram, interpret its symbols, and apply that knowledge to real-world scenarios. By the end, you'll have a solid understanding of this vital engine system.
Purpose of the Serpentine Belt Diagram
Why bother with a diagram? The serpentine belt drives multiple engine accessories, including the alternator, power steering pump, air conditioning compressor, and sometimes the water pump. A broken or improperly routed belt can lead to immediate system failures. The diagram serves several key purposes:
- Replacement Assistance: The most common use is to ensure the new belt is routed correctly during replacement. An incorrectly routed belt can slip, wear prematurely, or fail entirely, leading to costly damage.
- Troubleshooting: By comparing the actual belt routing with the diagram, you can quickly identify if the belt has jumped off a pulley or if a pulley has become misaligned.
- Understanding the System: Studying the diagram allows you to understand the function of each component in the system and how they interact. This knowledge is invaluable for diagnosing a wide range of issues.
- Preventative Maintenance: Referencing the diagram during inspection helps you check for proper belt alignment, tension, and signs of wear or damage on the belt and pulleys.
Think of it as your roadmap to a smoothly running engine accessory system. Without it, you're navigating blind.
Key Specs and Main Parts
The 2014 Silverado utilizes a single, long serpentine belt to drive its accessories. The specific belt length will vary slightly depending on the engine (4.3L V6, 5.3L V8, or 6.2L V8) and whether or not the truck is equipped with features like an auxiliary oil cooler. Always consult the correct diagram and belt specification for your specific engine configuration.
Here are the main components you'll find on the diagram:
- Crankshaft Pulley (or Damper): Connected directly to the crankshaft, this pulley provides the rotational force for the entire system. It's typically the largest pulley. Proper function of the harmonic balancer (if equipped) is critical for engine health.
- Alternator Pulley: Driven by the belt, the alternator generates electrical power to charge the battery and run the vehicle's electrical systems.
- Power Steering Pump Pulley: This pulley drives the hydraulic power steering pump, assisting with steering effort.
- Air Conditioning Compressor Pulley: The A/C compressor circulates refrigerant to provide cooling.
- Water Pump Pulley: (Sometimes driven by the serpentine belt): Circulates coolant throughout the engine to maintain optimal temperature. Not always on the belt.
- Idler Pulleys: These smooth, ungrooved pulleys guide the belt and maintain proper tension. They don't drive any accessories.
- Tensioner Pulley: This spring-loaded pulley automatically adjusts the belt tension. A properly functioning tensioner is essential for belt longevity and system performance. A common failure point.
Knowing these components and their locations is the first step in understanding the diagram.
Symbols and Diagram Interpretation
The serpentine belt diagram uses standard automotive symbols to represent the components and their connections. Understanding these symbols is key to interpreting the diagram correctly.
- Solid Lines: The solid line represents the serpentine belt itself. Follow the line carefully to trace the belt's path around each pulley. The thickness of the line doesn't usually have specific meaning; it's just for visual clarity.
- Pulleys: Pulleys are typically represented as circles. Some diagrams might differentiate between grooved pulleys (for driving accessories) and smooth pulleys (idlers) with slight variations in the circle's appearance.
- Arrows: Arrows on the diagram indicate the direction of belt travel. This is crucial for ensuring correct routing.
- Component Labels: Each pulley is labeled with an abbreviation or full name of the component it drives (e.g., ALT for alternator, P/S for power steering, A/C for air conditioning).
- Tensioner Location: The tensioner pulley is often indicated with a spring symbol or labeled specifically as "Tensioner." Pay close attention to its location and the direction of its spring force.
Color-coding is not typically used on serpentine belt diagrams, but in some cases, you might find different line styles (dashed or dotted) to indicate specific belt features or routing nuances. Consult the diagram's legend (if available) for clarification.
How It Works: The Serpentine Belt System in Action
The serpentine belt system is a relatively simple but crucial system. The crankshaft pulley, driven by the engine's rotation, spins the serpentine belt. The belt, in turn, drives the pulleys of the various engine accessories. The tensioner pulley maintains the proper amount of tension on the belt, preventing slippage and ensuring efficient operation. The belt’s route is critical. It's designed to provide enough grip on each pulley to transmit the necessary power. The spring tension in the tensioner absorbs minor variations in belt length and compensates for wear over time.
Essentially, the engine's rotational energy is transferred via the serpentine belt to power all the auxiliary systems necessary for the vehicle to function correctly. A failure in any component of this system can have significant consequences.
Real-World Use: Troubleshooting Tips
Here are some common issues you might encounter and how the diagram can help:
- Squealing Noise: A squealing noise often indicates a slipping belt. Check the belt tension, condition (cracks, wear), and alignment using the diagram as a reference. A worn tensioner can also cause this. Use the diagram to confirm the belt is properly seated on all pulleys.
- Accessory Failure: If an accessory stops working (e.g., no power steering, no A/C), first check the serpentine belt to ensure it's intact and routed correctly. Use the diagram to trace the belt's path and verify it's driving the pulley of the affected accessory.
- Belt Damage: Regularly inspect the belt for cracks, fraying, or missing chunks. These are signs of wear and indicate the need for replacement. Use the diagram to inspect the belt for proper alignment and contact with all pulleys. Misalignment can cause premature wear on one side of the belt.
- Tensioner Issues: A faulty tensioner can cause excessive belt wear, noise, or accessory failure. Visually inspect the tensioner pulley for smooth operation and proper spring tension. Refer to the diagram to confirm the tensioner's location and function.
Remember to always refer to the specific diagram for your 2014 Silverado's engine and options. Don't rely on a generic diagram, as routing may differ.
Safety Precautions
Working on the serpentine belt system can be dangerous if proper precautions aren't taken:
- Disconnect the Battery: Always disconnect the negative battery cable before working on any part of the electrical system. This prevents accidental shorts and electrical shock.
- Engine Off and Cool: Never work on the serpentine belt system while the engine is running or hot. Burns and injuries from moving parts are possible.
- Stay Clear of Moving Parts: Keep your hands, clothing, and tools away from the serpentine belt and pulleys while the engine is running.
- Proper Tools: Use the correct tools for the job. A serpentine belt tool is essential for safely releasing the tension on the belt during removal and installation.
- Eye Protection: Wear safety glasses to protect your eyes from debris.
- The Radiator Fan: Be especially cautious of the radiator fan. It can start unexpectedly, even with the engine off, if the engine is hot or the A/C is engaged. Consider disconnecting the fan motor's electrical connector for added safety.
The tensioner pulley is under significant spring pressure, so use a serpentine belt tool to safely relieve the tension. Releasing it improperly can cause injury.
Taking the time to understand the 2014 Silverado serpentine belt diagram is a worthwhile investment for any DIY mechanic. It empowers you to perform maintenance, troubleshoot problems, and ultimately, keep your truck running smoothly.