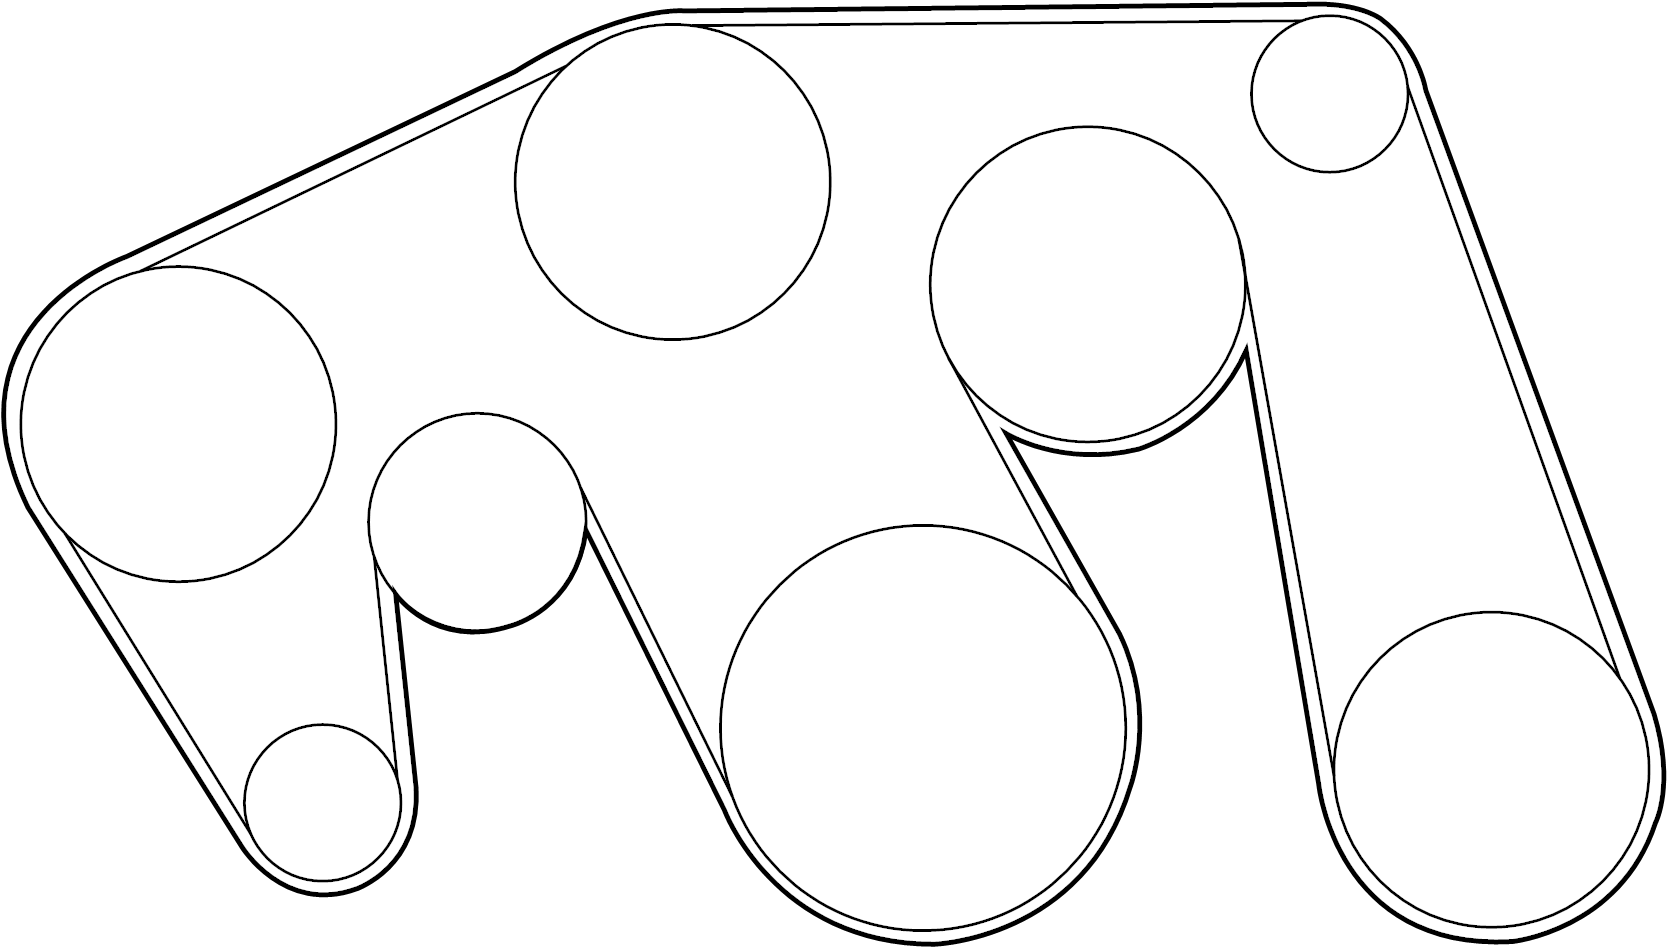
2014 Toyota Tundra Serpentine Belt Diagram
The serpentine belt on your 2014 Toyota Tundra is a critical component responsible for powering numerous engine accessories. A correctly routed serpentine belt ensures the smooth and efficient operation of these systems. This article provides a detailed explanation of the 2014 Toyota Tundra serpentine belt diagram, equipping you with the knowledge needed for maintenance, troubleshooting, and repairs. We'll cover the diagram's key features, how the system functions, common issues, safety precautions, and how to effectively use this information.
Purpose of the Serpentine Belt Diagram
The serpentine belt diagram serves several important purposes:
- Repair and Replacement: The most common reason to consult a diagram is during serpentine belt replacement. Knowing the correct routing is essential to prevent damage to the belt or engine components. An incorrectly routed belt can lead to insufficient tension, causing slippage, noise, and eventual failure of the driven accessories.
- Troubleshooting: When diagnosing problems like alternator failure, power steering issues, or AC malfunctions, the serpentine belt is often the first place to look. A diagram helps you visually inspect the belt's condition, routing, and tensioner function.
- Learning and Understanding: For DIY enthusiasts and those seeking to understand their vehicle's mechanics, the diagram provides a clear illustration of how the engine accessories are interconnected and driven. It allows you to appreciate the simplicity and ingenuity of the serpentine belt system.
- Preventative Maintenance: Regularly checking the serpentine belt based on the diagram can help identify potential issues before they escalate into costly repairs. Look for signs of wear, cracking, glazing, or misalignment.
Key Specs and Main Parts
Understanding the key components of the serpentine belt system is crucial for interpreting the diagram and performing maintenance. While specific dimensions and tolerances might vary slightly, these are the general points applicable to a 2014 Tundra:
- Serpentine Belt: Typically a multi-ribbed belt made of reinforced rubber. Its length and width are specific to the engine and accessory configuration. Part numbers can vary based on engine size (4.0L V6, 4.6L V8, or 5.7L V8).
- Crankshaft Pulley: The main driving pulley connected directly to the engine's crankshaft. It transmits rotational force to the serpentine belt.
- Alternator Pulley: The pulley driven by the serpentine belt that powers the alternator to recharge the battery and supply electricity to the vehicle's electrical system.
- Power Steering Pump Pulley: Provides hydraulic pressure to assist with steering. Driven by the serpentine belt.
- Air Conditioning Compressor Pulley: Engages when the air conditioning system is activated, compressing refrigerant to cool the cabin. Driven by the serpentine belt.
- Idler Pulleys: Smooth pulleys that guide the serpentine belt around the engine, ensuring proper routing and preventing interference. They don't drive any accessories.
- Tensioner Pulley: A spring-loaded pulley that automatically maintains the correct tension on the serpentine belt. Proper tension is critical for preventing slippage and extending belt life. A failing tensioner is a common cause of serpentine belt noise and premature wear.
Belt Material: Serpentine belts are generally made of EPDM rubber (ethylene propylene diene monomer). This material offers excellent resistance to heat, cracking, and ozone degradation, ensuring a long service life. Look for signs of cracking or fraying as an indicator of the belt's condition.
Symbols in the Serpentine Belt Diagram
The diagram uses specific symbols to represent the different components and belt routing. Here's a breakdown:
- Solid Line: Represents the primary path of the serpentine belt around the pulleys. Typically a thick line indicates the belt's outer surface.
- Dashed Line: Usually indicates the *backside* of the belt (the smooth side) contacting a pulley. This is important to distinguish which side of the belt is driving a particular accessory.
- Circles: Represent pulleys. The size of the circle is generally proportional to the pulley's physical size.
- Icons/Abbreviations: Pulley icons will usually be labeled with abbreviations indicating what accessory they drive. Common abbreviations include:
- ALT: Alternator
- P/S: Power Steering
- A/C: Air Conditioning Compressor
- CRANK: Crankshaft
- IDLER: Idler Pulley
- TENS: Tensioner
- Arrows: Indicate the direction of rotation of each pulley. This helps visualize the belt's path and ensures correct installation.
How It Works
The serpentine belt system operates on a simple principle: rotational force from the engine's crankshaft is transferred to various engine accessories via a single, continuous belt. The crankshaft pulley acts as the *driving* pulley, while the other pulleys are *driven*.
The tensioner pulley plays a critical role in maintaining consistent belt tension. It uses a spring-loaded mechanism to automatically adjust for belt stretch and wear. Without proper tension, the belt will slip, reducing the efficiency of the driven accessories and potentially causing damage. The idler pulleys ensure the belt has the correct path and proper contact with each pulley. When the engine is running, the crankshaft turns, driving the serpentine belt, which in turn spins the pulleys of the alternator, power steering pump, AC compressor, and other accessories.
The diagram provides a visual representation of this process, allowing you to trace the belt's path and understand how each accessory is connected to the engine.
Real-World Use: Basic Troubleshooting Tips
Using the serpentine belt diagram for troubleshooting can help you diagnose common issues:
- Squealing Noise: Often caused by a loose or worn serpentine belt. Inspect the belt for cracks, glazing, or missing ribs. Check the tensioner pulley for proper function and spring tension. Compare the belt routing to the diagram to ensure it's correctly installed.
- Accessory Failure: If an accessory like the alternator or power steering pump is not functioning correctly, check the serpentine belt first. Make sure the belt is properly routed and has sufficient tension. A slipping belt can prevent the accessory from operating at its required speed.
- Visual Inspection: Regularly inspect the serpentine belt for signs of wear and tear. Cracks, fraying, glazing (a shiny, hard surface), and missing ribs are all indicators that the belt needs to be replaced. Compare the belt's condition to the specifications outlined in your vehicle's service manual.
- Tensioner Check: Check the tensioner for smooth operation. A worn tensioner can cause the belt to vibrate excessively, leading to premature failure. Look for signs of binding or excessive play in the tensioner pulley.
- Misalignment: Sometimes, pulleys can become misaligned due to worn bearings or damage. Using a straight edge, check to make sure all the pulleys are in alignment. Misalignment can cause premature belt wear and noise.
Safety Precautions
Working on the serpentine belt system can be hazardous if proper precautions are not taken:
- Disconnect the Battery: Always disconnect the negative battery cable before working on any electrical components, including the alternator. This prevents accidental shorts or electrical shocks.
- Hot Engine: Never work on the serpentine belt system when the engine is hot. Allow the engine to cool completely before starting any repairs.
- Moving Parts: Keep hands and clothing away from the serpentine belt and pulleys when the engine is running. The belt can cause serious injury if it catches on clothing or body parts.
- Tensioner Release: Be careful when releasing the tension on the serpentine belt tensioner. The spring-loaded mechanism can snap back forcefully, potentially causing injury. Use the correct tool to slowly and safely release the tension.
- Eye Protection: Wear safety glasses to protect your eyes from debris or flying objects.
- Proper Tools: Use the correct tools for the job. Attempting to use makeshift tools can damage components and increase the risk of injury.
The crankshaft pulley is a particular point of caution. Accidental contact with a rotating crankshaft pulley can cause severe injury. Similarly, the tensioner stores a considerable amount of energy and must be handled with care.
By understanding the serpentine belt diagram and following these safety precautions, you can confidently perform maintenance and repairs on your 2014 Toyota Tundra's serpentine belt system. Remember always to consult your vehicle's service manual for specific instructions and torque specifications.
We have a high-resolution, printable PDF version of the 2014 Toyota Tundra Serpentine Belt Diagram available for download. This diagram provides a clear and detailed visual aid for your repairs and maintenance. Please contact us to receive the link.