2015 Chevy Silverado 4.3 Serpentine Belt Diagram
Understanding the serpentine belt system in your 2015 Chevy Silverado 4.3L is crucial for maintaining its reliable performance. Whether you're planning routine maintenance, troubleshooting a squealing noise, or replacing worn components, having access to a clear and accurate serpentine belt diagram is invaluable. This article aims to provide you with a comprehensive guide to the 2015 Silverado 4.3L serpentine belt diagram, empowering you to tackle these tasks with confidence.
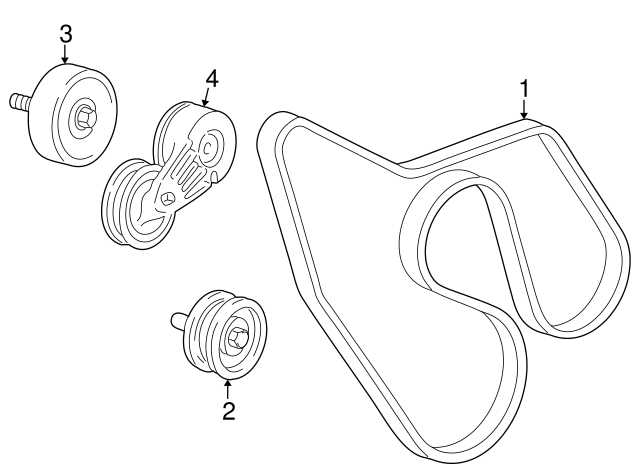
Purpose of the Serpentine Belt Diagram
The serpentine belt diagram serves as a visual roadmap for the belt's routing around various engine components. Its primary purpose is to guide you in the correct installation of a new belt, ensuring that each component receives the necessary power to function correctly. Without a diagram, you risk misrouting the belt, leading to:
- Component failure: Misrouting can prevent components like the alternator or power steering pump from receiving adequate power.
- Belt damage: Incorrect tension or rubbing against other parts can rapidly wear out the belt.
- Engine overheating: If the water pump isn't driven correctly, the engine can overheat.
- Complete system failure: A snapped belt can disable critical engine functions, leaving you stranded.
Furthermore, the diagram aids in identifying potential problems by visually confirming that the belt is correctly aligned and routed. It's also a great tool for educational purposes – understanding how the serpentine belt system works is essential for any DIY mechanic looking to expand their knowledge.
Key Specs and Main Parts of the Serpentine Belt System
The 2015 Chevy Silverado 4.3L utilizes a single serpentine belt to drive multiple engine accessories. Here are the key components involved:
- Crankshaft Pulley: This pulley is driven directly by the engine's crankshaft and serves as the primary power source for the entire serpentine belt system.
- Alternator: The alternator generates electrical power to charge the battery and operate electrical components.
- Water Pump: The water pump circulates coolant throughout the engine to regulate temperature.
- Power Steering Pump: The power steering pump provides hydraulic assistance to ease steering effort.
- Air Conditioning Compressor (A/C Compressor): The A/C compressor circulates refrigerant in the air conditioning system.
- Tensioner Pulley: The tensioner pulley applies constant tension to the serpentine belt, preventing slippage and ensuring optimal performance. This is a spring-loaded component that automatically adjusts.
- Idler Pulley(s): Idler pulleys provide a smooth path for the belt, guiding it around other components and preventing interference. These are typically fixed.
- Serpentine Belt: The belt itself, made of durable rubber, transmits power from the crankshaft pulley to the other components. The 4.3L V6 Silverado usually requires a belt with a specific length and rib count - always refer to your owner's manual or a parts catalog to ensure you get the correct replacement.
Understanding Serpentine Belt Diagram Symbols
Serpentine belt diagrams use standardized symbols to represent the different components and the belt's routing path. Here's a breakdown of common symbols:
- Solid Lines: Represent the path of the front of the serpentine belt, the side making contact with the pulleys.
- Dashed Lines: (Sometimes used) Indicate the path of the back of the serpentine belt, where it rides against idler pulleys or moves between components.
- Arrows: Show the direction of rotation for each pulley. This is critical for ensuring proper belt routing.
- Component Labels: Abbreviations like "ALT" (Alternator), "P/S" (Power Steering), "A/C" (Air Conditioning), and "WP" (Water Pump) clearly identify each component. "CRANK" will indicate the Crankshaft Pulley.
- Pulley Diagrams: Each pulley is depicted with a circular shape, often with a cross-section to show the rib configuration.
Color coding can also be used on some diagrams, although it is not standardized. If color is used, a key should accompany the diagram explaining the meaning of each color.
How the Serpentine Belt System Works
The serpentine belt system operates on a simple principle: rotational force transfer. The crankshaft pulley, driven by the engine, rotates the serpentine belt. The belt, in turn, drives all the other pulleys attached to engine accessories. The tensioner pulley maintains constant tension on the belt, preventing slippage and ensuring efficient power transfer. The idler pulleys guide the belt along the correct path. The key to the system's effectiveness is the friction between the belt and the pulleys. This friction allows the belt to "grip" the pulleys and transmit the rotational force. Proper belt tension is essential for maximizing friction and preventing slippage.
Real-World Use and Basic Troubleshooting
Here are some practical applications of the serpentine belt diagram and basic troubleshooting tips:
- Belt Replacement: Before removing the old belt, carefully study the diagram and note the exact routing. Take a picture for reference! When installing the new belt, follow the diagram meticulously to ensure correct routing.
- Squealing Noise: A squealing noise is often caused by a slipping serpentine belt. Use the diagram to check belt tension and alignment. Inspect the belt for cracks, wear, or glazing. A worn or loose belt should be replaced. Also, a failing tensioner can cause squealing.
- Component Failure: If an accessory like the alternator or power steering pump stops working, use the diagram to verify that the belt is correctly routed and tensioned. A broken or slipping belt could be the cause. If the belt is fine, the component itself may be faulty.
- Visual Inspection: Regularly inspect the serpentine belt for signs of wear and tear. Cracks, fraying, glazing, and missing chunks are all indicators that the belt needs to be replaced. The diagram can help you identify the areas of the belt that are most prone to wear, such as those that wrap tightly around smaller pulleys.
Troubleshooting Tip: If you suspect a specific component is causing problems, you can temporarily remove the serpentine belt (after noting the correct routing!) and manually rotate the pulley of that component. A rough or noisy pulley bearing could indicate a failing component.
Safety Precautions
Working with the serpentine belt system involves several safety considerations:
- Engine Off: Always ensure the engine is completely turned off and the key is removed from the ignition before working on the serpentine belt system.
- Hot Components: Be cautious of hot engine components, such as the exhaust manifold, which can cause burns.
- Moving Parts: Keep your hands and tools clear of moving parts when the engine is running. Never attempt to adjust the belt tension or routing while the engine is running.
- Belt Tension: Be aware that the tensioner pulley is spring-loaded and can release forcefully. Use appropriate tools to relieve tension when removing or installing the belt.
- Battery Disconnect (Recommended): While not always necessary for a simple belt replacement, disconnecting the negative battery terminal can provide an extra layer of safety, especially when working near electrical components like the alternator.
The alternator's electrical system can be dangerous if mishandled. Power steering fluid and coolant can also be harmful if ingested, so always wear gloves and eye protection when working with these fluids.
Getting the Diagram
We have a printable file of the 2015 Chevy Silverado 4.3L Serpentine Belt Diagram available for download. Having this diagram readily accessible will be a great help in your automotive maintenance endeavors. Proper maintenance and a good understanding of your vehicle's systems will ensure reliable operation for years to come.