2015 Chevy Silverado Battery Diagram
Alright, let's dive into the battery diagram for the 2015 Chevy Silverado. This isn't just some piece of paper; it's the roadmap to your truck's electrical power distribution. Whether you're diagnosing a parasitic drain, adding aftermarket accessories, or simply trying to understand how your Silverado's electrical system ticks, having a solid grasp of this diagram is crucial.
Purpose of the 2015 Chevy Silverado Battery Diagram
The battery diagram serves several important purposes:
- Troubleshooting Electrical Issues: When your Silverado has electrical problems, the diagram helps you trace circuits and identify faulty components like relays, fuses, or wiring.
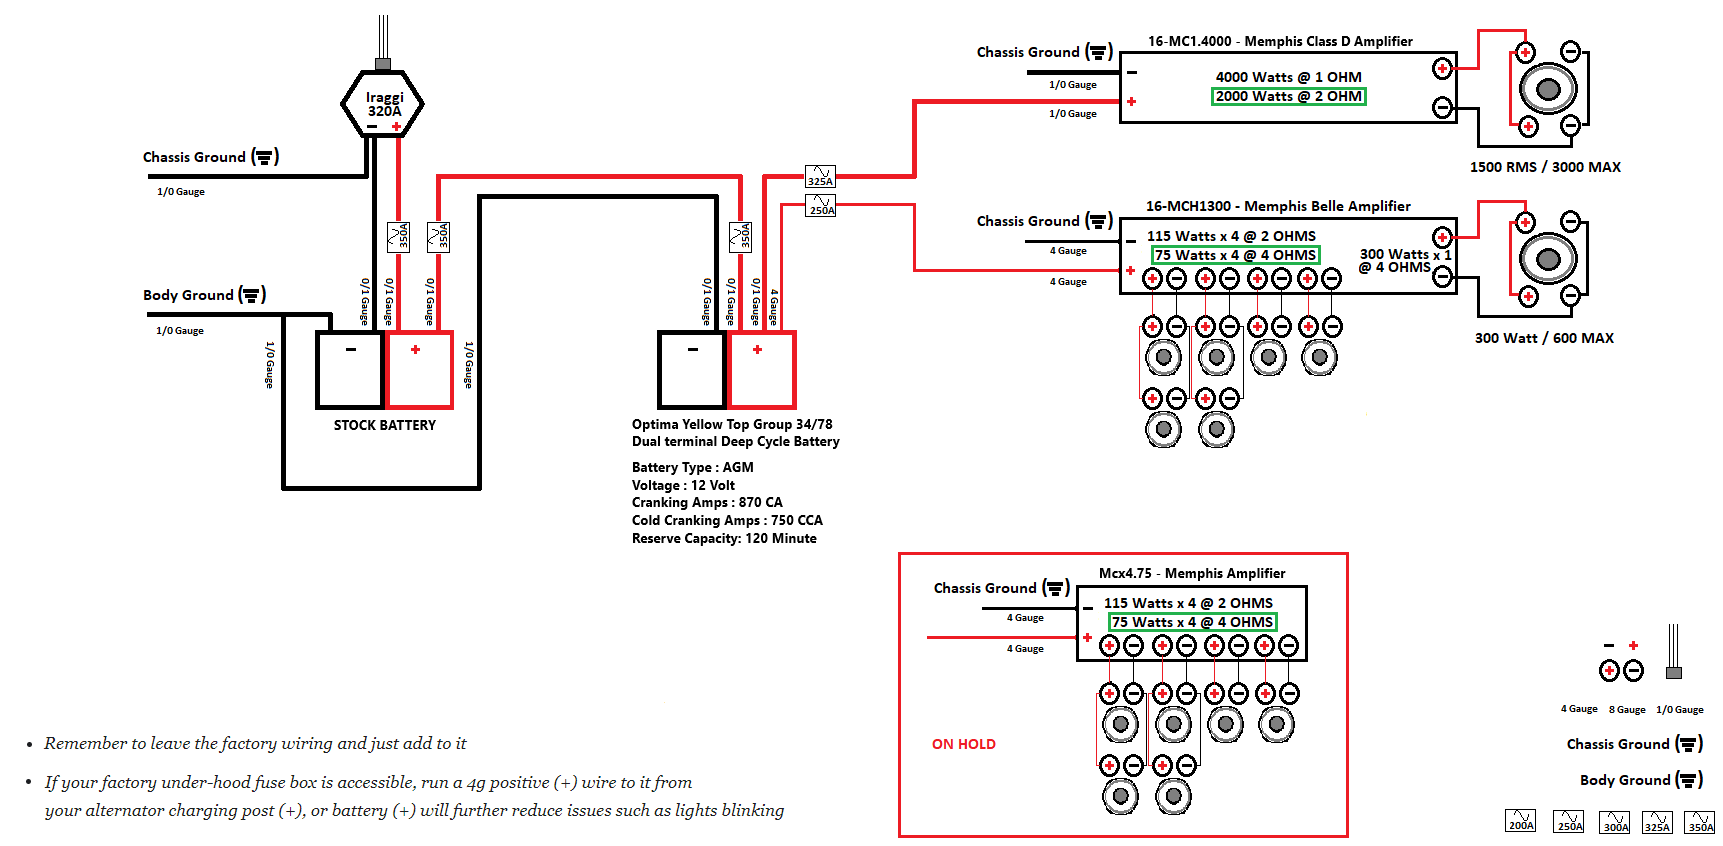
- Adding Accessories: Planning on installing a winch, upgraded stereo, or auxiliary lights? The diagram shows you where to safely tap into the electrical system.
- Preventing Damage: Incorrect wiring can lead to short circuits, blown fuses, or even fires. The diagram helps you avoid costly and dangerous mistakes.
- Understanding System Operation: For the mechanically inclined, the diagram provides a deeper understanding of how the battery interacts with the starter, alternator, and other electrical components.
Key Specs and Main Parts
Before we crack into the diagram itself, let's cover the key players in the Silverado's battery system:
- Battery: Typically a 12-volt lead-acid battery, providing the initial power to start the engine and operate electrical accessories. The Cold Cranking Amps (CCA) rating is important, as it indicates the battery's ability to deliver a large amount of current in cold weather. You'll likely see specs around 720-800 CCA depending on the engine and trim level.
- Battery Cables: Heavy-gauge cables (usually 4 AWG or larger) connect the battery to the starter and the vehicle's chassis ground. Pay attention to the color coding: red for positive (+) and black for negative (-).
- Starter Motor: The starter uses a significant amount of current from the battery to crank the engine. It's a high-draw component, so the connection to the battery needs to be solid and clean.
- Alternator: Once the engine is running, the alternator recharges the battery and provides power to the vehicle's electrical system. Its output is measured in amps (e.g., 150 amps).
- Fuses and Relays: These protect the electrical system from overloads and control the flow of current to various components. Fuses are sacrificial, blowing to break the circuit when too much current flows. Relays act as electrically controlled switches, allowing a small current to control a larger current flow.
- Grounding Points: The Silverado's electrical system relies on good grounding. Poor grounds can cause all sorts of electrical gremlins. Key grounding points are typically on the engine block, frame, and body.
Understanding the Diagram: Symbols, Lines, and Colors
The battery diagram is a schematic representation of the electrical system. Here's what the various symbols mean:
- Solid Lines: Represent wires connecting electrical components. The thickness of the line *generally* (but not always) indicates the wire gauge – thicker lines often mean larger gauge wires.
- Dashed Lines: May represent ground connections or shielded wires.
- Battery Symbol: A series of alternating long and short lines represents the battery. The longer line indicates the positive (+) terminal.
- Fuse Symbol: Typically a wavy line or a small rectangle with a line through it. The diagram will usually indicate the fuse amperage (e.g., 10A, 20A).
- Relay Symbol: A rectangle with a coil and a switch. The coil is energized to close the switch and complete the circuit.
- Ground Symbol: Looks like an inverted triangle or a series of decreasing horizontal lines.
- Color Coding: Wires are often color-coded to identify their function. Common colors include red (power), black (ground), and other colors for specific circuits (e.g., blue for headlights, yellow for turn signals). The diagram will have a legend explaining the color codes. You might see abbreviations too, like "BRN" for brown or "GRN" for green.
- Connectors: Represented by circles or squares where wires are joined. These are potential points of corrosion and failure.
Example: A solid red line connecting the positive battery terminal to a fuse labeled "ALT 150A" indicates the main power feed from the battery to the alternator, protected by a 150-amp fuse.
How It Works: A Simplified Explanation
Here's a simplified overview of how the Silverado's battery system operates:
- When you turn the ignition key, a signal is sent to the starter relay.
- The starter relay closes, allowing a large current to flow from the battery to the starter motor.
- The starter motor cranks the engine.
- Once the engine starts, the alternator begins to generate electricity.
- The alternator recharges the battery and provides power to all the vehicle's electrical systems.
- Fuses protect the various circuits from overloads.
- Grounding points ensure a return path for the current to the battery.
Understanding the sequence of events is key to troubleshooting problems. If the starter isn't engaging, you'll want to check the battery voltage, the starter relay, and the wiring between them.
Real-World Use: Basic Troubleshooting Tips
Here are a few common troubleshooting scenarios and how the battery diagram can help:
- Battery Keeps Dying: A parasitic drain is likely the culprit. Use the diagram to identify circuits that are drawing power when the ignition is off. Start by checking common culprits like the dome light, radio, or aftermarket accessories. A multimeter can help you measure the current draw on each circuit.
- No Start: Check the battery voltage first. If the battery is good, check the starter relay and the wiring to the starter. Use the diagram to trace the circuit and identify any breaks or shorts.
- Blown Fuses: Identify the circuit protected by the blown fuse using the diagram. A blown fuse indicates an overload or a short circuit. Replace the fuse with the correct amperage rating. If the fuse blows again immediately, there's a short circuit in the wiring or in the component it protects.
- Dim Headlights: Could indicate a weak battery, a faulty alternator, or poor grounding. Use the diagram to check the wiring to the headlights and the grounding points.
Safety First! Highlighting Risky Components
Working on automotive electrical systems can be dangerous. Here are some key safety precautions:
- Disconnect the Battery: Always disconnect the negative (-) battery cable before working on the electrical system. This prevents accidental short circuits.
- Wear Safety Glasses: Protect your eyes from sparks and debris.
- Use Insulated Tools: Avoid using metal tools that could create a short circuit.
- Be Careful Around the Battery: Batteries contain sulfuric acid, which is corrosive. Avoid contact with skin and eyes.
- Don't Work Alone: It's always a good idea to have someone nearby in case of an emergency.
- High Voltage Components: Be extremely careful around the ignition system and any high-voltage components. These can deliver a dangerous shock, even with the battery disconnected.
Specifically, the starter solenoid is a high-current component that can produce significant heat and sparks if shorted. The alternator, while not typically "high voltage" like the ignition, can still deliver a substantial shock if you accidentally short its output.
By understanding the 2015 Chevy Silverado battery diagram and following proper safety precautions, you can confidently diagnose and repair electrical issues, add accessories, and gain a deeper understanding of your truck's electrical system. Remember to always double-check your work and consult a qualified mechanic if you're unsure about anything.
We have the full, high-resolution diagram available for download. It will give you even more detail than what we've covered here. Let us know if you need it. Happy wrenching!