
2015 Chevy Sonic Coolant Hose Diagram
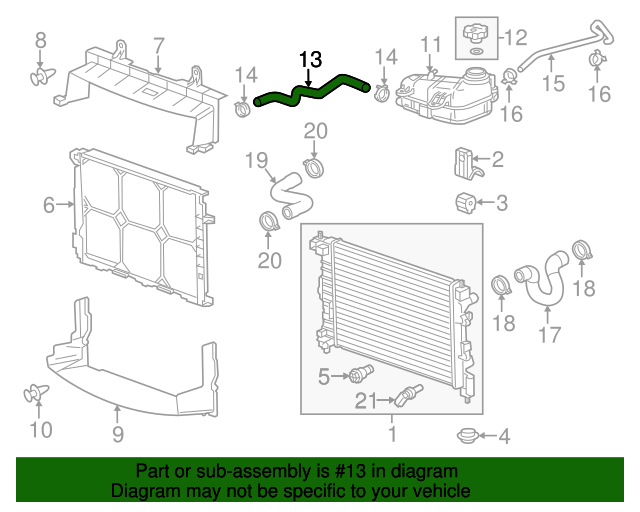
Alright, let's dive into the coolant hose diagram for the 2015 Chevy Sonic. Understanding this system is crucial for maintaining your Sonic's engine health, preventing overheating, and tackling repairs like leaks or hose replacements yourself. Whether you're a seasoned DIYer or just looking to expand your automotive knowledge, this guide will break down the diagram, explain its components, and offer some practical troubleshooting tips. We even have a downloadable diagram ready for you to use (more on that later!).
Purpose of the Coolant Hose Diagram
Why bother with a coolant hose diagram? Well, it's your roadmap to the engine's cooling system. This diagram is indispensable for several reasons:
- Repair and Maintenance: Identifying the correct hose for replacement is paramount. A diagram prevents you from grabbing the wrong size or type, which can lead to leaks and further problems.
- Troubleshooting: When dealing with leaks, overheating, or coolant loss, the diagram helps you trace the system and pinpoint the source of the issue.
- Learning and Understanding: It's a fantastic visual aid for comprehending how the cooling system functions, where each component is located, and how they interact.
- Modifications/Upgrades: If you're considering performance upgrades related to cooling, knowing the system layout is vital for proper installation and integration.
Key Specs and Main Parts
The 2015 Chevy Sonic, depending on the engine (typically a 1.8L naturally aspirated or a 1.4L turbocharged engine), will have a slightly different coolant hose routing. However, the core components remain the same. Here are the key parts you'll find on the diagram and in the cooling system:
- Radiator: The primary heat exchanger. Coolant flows through it, and air passing through the fins dissipates heat.
- Radiator Hoses (Upper & Lower): These thick hoses connect the radiator to the engine block. The upper hose carries hot coolant from the engine, and the lower hose returns cooled coolant to the engine.
- Heater Core Hoses: These smaller hoses circulate coolant through the heater core inside the vehicle's cabin. This hot coolant is what provides heat to the interior.
- Expansion Tank (Coolant Reservoir): A reservoir that holds excess coolant. It allows for expansion and contraction of the coolant due to temperature changes. It also allows you to easily check the coolant level.
- Thermostat: A temperature-sensitive valve that regulates coolant flow to the radiator. It opens when the engine reaches a certain temperature to allow coolant to flow and cool the engine.
- Water Pump: A pump driven by the engine (typically via a belt) that circulates coolant throughout the system. A failing water pump is a major cause of overheating.
- Bypass Hose: A smaller hose that allows coolant to circulate within the engine block when the thermostat is closed (during engine warm-up).
Important Specs: While the diagram won't list every spec, pay attention to hose diameters when replacing them. Using the incorrect size will cause leaks or restrict coolant flow. Use the diagram to identify the specific hose you need and then check parts suppliers for the correct diameter and length.
Symbols and Notations on the Diagram
Coolant hose diagrams use standardized symbols to represent components and flow. Here's a breakdown:
- Solid Lines: Typically represent coolant hoses. Thicker lines might indicate larger diameter hoses.
- Dotted Lines: May represent vacuum lines or other related systems that interact with the cooling system. Consult the diagram's legend for clarification.
- Arrows: Indicate the direction of coolant flow. Pay close attention to these to understand how the system operates.
- Component Symbols: The radiator is usually represented as a rectangular grid, the water pump as a stylized pump shape, and the thermostat as a valve symbol. Again, refer to the diagram's legend for specific symbols used.
- Color Coding (if present): Some diagrams use color to differentiate between hot and cold coolant lines. For example, red might indicate hot coolant flowing away from the engine, and blue might indicate cooled coolant flowing back to the engine. Not all diagrams use color.
How the Coolant System Works
The cooling system's operation is relatively straightforward:
- The water pump circulates coolant from the radiator, through the engine block, and back to the radiator.
- When the engine is cold, the thermostat remains closed, preventing coolant from flowing to the radiator. Instead, coolant circulates only within the engine block via the bypass hose, allowing the engine to warm up quickly.
- As the engine warms up, the thermostat opens, allowing coolant to flow to the radiator.
- In the radiator, heat is dissipated from the coolant to the air passing through the radiator fins.
- The cooled coolant then returns to the engine to repeat the cycle.
- The expansion tank accommodates changes in coolant volume as the temperature fluctuates.
- The heater core taps into the coolant loop to provide heat for the vehicle's interior. A valve controls how much coolant flows to the core, which in turn controls how hot the air is in the cabin.
Real-World Use and Troubleshooting
Here are some common issues you might encounter and how the diagram can help:
- Coolant Leaks: Use the diagram to trace the hose connections near the leak. Check for cracks, bulges, or loose clamps. Pay attention to connections to the water pump and radiator.
- Overheating: If the engine overheats, the diagram can help you check the thermostat, water pump, and radiator hoses. A collapsed lower radiator hose can restrict coolant flow and cause overheating, and the diagram will show you where to inspect. If there are no leaks, it may be a faulty thermostat or water pump.
- No Heat in the Cabin: The diagram will show you the heater core hoses. Check for kinks, leaks, or clogs in these hoses. A blockage can prevent coolant from reaching the heater core, resulting in no heat.
- Low Coolant Level: Regularly check the coolant level in the expansion tank. The diagram will show the MIN and MAX fill lines. If the level is consistently low, look for leaks throughout the system using the diagram as your guide.
Troubleshooting Tip: When chasing a leak, a coolant system pressure tester is invaluable. It allows you to pressurize the system while the engine is off, making leaks easier to spot. Always relieve the pressure slowly and carefully.
Safety Precautions
Working on the cooling system can be dangerous if you're not careful. Here are some critical safety tips:
- Never work on the cooling system when the engine is hot! Coolant is under pressure and can cause severe burns. Allow the engine to cool completely before opening any coolant lines or the radiator cap.
- Depressurize the system carefully. If you need to open the system while it's still slightly warm, wrap a rag around the radiator cap and open it slowly to release pressure gradually.
- Wear safety glasses and gloves. Coolant can irritate your skin and eyes.
- Dispose of used coolant properly. Coolant is toxic to animals and humans. Recycle it at a designated recycling center or auto parts store.
- The water pump can be a high risk component. Not only can it cause major issues, it is typically driven by the timing belt. Therefore, If the water pump fails, it can lead to catastrophic engine failure if it seizes, especially on interference engines where valves and pistons can collide.
By understanding the coolant hose diagram and following proper safety procedures, you can confidently tackle cooling system maintenance and repairs on your 2015 Chevy Sonic. This knowledge will save you money and ensure your engine runs smoothly for years to come.
We have a detailed, high-resolution coolant hose diagram specifically for the 2015 Chevy Sonic ready for you. You can download it [HERE - Add a download Link here]. This diagram includes all the key components, hose routings, and relevant specifications. This will prove to be an invaluable asset for any maintenance or repair tasks you undertake.