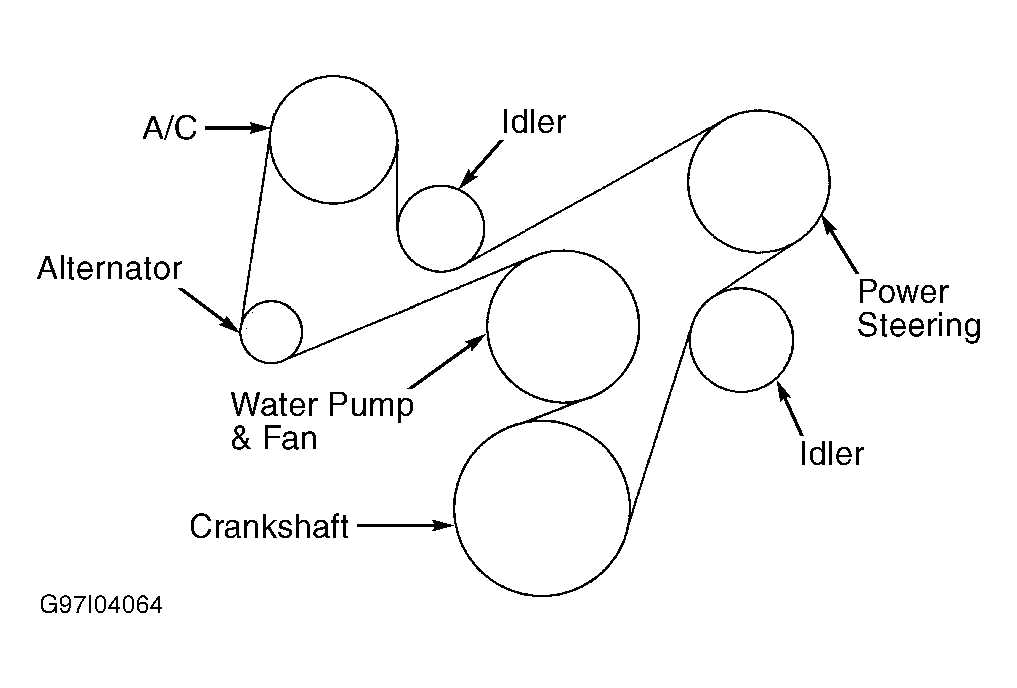
2015 Chevy Traverse Serpentine Belt Diagram
For the experienced DIYer tackling maintenance or repairs on their 2015 Chevy Traverse, understanding the serpentine belt system is crucial. This article provides a detailed breakdown of the 2015 Chevy Traverse serpentine belt diagram, empowering you to diagnose issues, replace the belt correctly, and ensure your vehicle's vital components function optimally. We'll cover everything from identifying the belt's route to troubleshooting common problems. And don't worry, we've got the actual diagram file ready for you to download.
Why This Diagram Matters
The serpentine belt, also known as the accessory drive belt, is a single, continuous belt that powers multiple engine components. Understanding its path and function is essential for several reasons:
- DIY Repairs: Replacing a worn or broken serpentine belt is a common maintenance task. The diagram shows you exactly how to route the new belt, preventing incorrect installation and potential damage.
- Troubleshooting: A squealing or slipping belt can indicate issues with other components, such as a failing alternator or power steering pump. The diagram helps you trace the belt's path and identify the source of the problem.
- Component Identification: The diagram clearly labels each component driven by the belt, allowing you to quickly identify and locate them within the engine bay.
- Preventative Maintenance: By understanding the system, you can inspect the belt and pulleys for wear or damage, allowing for timely replacement and preventing costly breakdowns.
- Learning and Understanding: Even if you're not immediately doing a repair, grasping how the serpentine belt works provides invaluable insight into the overall operation of your vehicle's engine.
Key Specs and Main Parts
The 2015 Chevy Traverse, equipped with the 3.6L V6 engine, utilizes a specific serpentine belt configuration. While exact dimensions and materials vary slightly depending on the manufacturer, the fundamental system remains consistent. Here are the main parts:
- Serpentine Belt: The main component, a long, ribbed belt typically made of EPDM (Ethylene Propylene Diene Monomer) rubber, designed for durability and resistance to heat and wear. Expect to replace this every 60,000 to 100,000 miles, or sooner if signs of wear are visible.
- Crankshaft Pulley (Harmonic Balancer): Located at the bottom of the engine, this pulley is driven directly by the engine and provides the initial power to drive the serpentine belt. It also dampens torsional vibrations from the engine.
- Alternator Pulley: Powers the alternator, which charges the battery and supplies electrical power to the vehicle's systems.
- Power Steering Pump Pulley: Drives the power steering pump, which provides hydraulic assistance to the steering system.
- Air Conditioning (A/C) Compressor Pulley: Powers the A/C compressor, which circulates refrigerant and cools the cabin air.
- Water Pump Pulley: Drives the water pump, which circulates coolant through the engine and radiator to maintain a stable operating temperature.
- Tensioner Pulley: A spring-loaded pulley that maintains the correct tension on the serpentine belt. Crucially important for proper operation and belt life. A failing tensioner is a common cause of belt squealing.
- Idler Pulley: A smooth pulley that guides the belt and provides additional wrap angle around other pulleys. It doesn't drive any components.
Understanding Diagram Symbols
Serpentine belt diagrams use a standardized set of symbols to represent different components and their relationships. Here's a breakdown of common symbols:
- Solid Lines: Represent the serpentine belt itself. The thickness of the line may vary depending on the diagram's detail level.
- Arrows: Indicate the direction of belt rotation around each pulley. This is crucial for proper routing.
- Circles: Represent pulleys. The diameter of the circle may not be proportional to the actual pulley size.
- Text Labels: Identify each pulley, such as "ALT" for alternator, "P/S" for power steering, "A/C" for air conditioning, "WP" for water pump, "CRANK" for crankshaft, "TENS" for tensioner, and "IDLER" for idler pulley.
- Dashed Lines or Boxes: May indicate components that are located behind other parts or are otherwise partially obscured in the diagram's view.
- Color Coding: Some diagrams use color coding to highlight different sections of the belt path or to differentiate between the front and back sides of the belt.
How It Works
The serpentine belt system is designed for efficient power transfer from the engine to various accessories. The crankshaft pulley, driven by the engine's rotation, provides the initial driving force. The serpentine belt wraps around this pulley and then snakes its way around all the other pulleys, transferring rotational energy to each component. The tensioner pulley maintains the proper belt tension, preventing slippage and ensuring that each accessory receives the necessary power.
The key to understanding the system is the concept of belt wrap. Belt wrap refers to the angle of contact between the belt and each pulley. A greater wrap angle provides more friction and better power transfer. Idler pulleys are often used to increase the wrap angle around certain pulleys, especially those that require more power, like the alternator or A/C compressor.
Real-World Use: Basic Troubleshooting Tips
Here are some basic troubleshooting tips using the serpentine belt diagram:
- Squealing Noise: A squealing noise, especially when the engine is first started or under load (e.g., turning the steering wheel sharply), often indicates a slipping belt. Inspect the belt for cracks, glazing, or missing ribs. Also, check the tensioner pulley for proper operation. If the tensioner is bouncing or vibrating excessively, it may be failing.
- Belt Damage: Regularly inspect the belt for signs of wear, such as cracks, fraying, or missing ribs. Use the diagram to check the alignment of each pulley. Misalignment can cause premature belt wear.
- Component Failure: If one of the accessories, such as the alternator or power steering pump, is not functioning correctly, check the belt for proper tension and inspect the corresponding pulley for damage. A seized pulley can cause the belt to break.
- Unusual Noises from Specific Components: Grinding or rattling noises emanating from a particular pulley location (identified using the diagram) are strong indicators of a failing component, like a bearing in the alternator or water pump.
- Battery Light On: If the battery light is illuminated on the dashboard, and the serpentine belt is intact, this could suggest an issue with the alternator. Using the diagram, locate the alternator pulley and inspect it closely.
Safety Considerations
Working on the serpentine belt system involves certain risks. Take precautions to avoid injury:
- Disconnect the Battery: Before working on the serpentine belt, disconnect the negative battery cable to prevent accidental starting of the engine.
- Hot Engine: Allow the engine to cool completely before working on the serpentine belt. Components can become very hot during operation.
- Moving Parts: Never put your hands near the serpentine belt or pulleys while the engine is running. Serious injury can result.
- Tensioner Release: When removing the serpentine belt, use the correct tool to release the tension on the tensioner pulley. Releasing the tensioner incorrectly can cause it to snap back forcefully, potentially causing injury.
- Eye Protection: Wear safety glasses to protect your eyes from debris.
The crankshaft pulley is particularly risky due to its direct connection to the engine. Accidental contact with this pulley while the engine is running can result in serious injury. Also the tensioner pulley stores a lot of spring energy, make sure to use proper tools to avoid uncontrolled release.
By understanding the serpentine belt diagram and following proper safety procedures, you can confidently diagnose and repair issues related to your 2015 Chevy Traverse's accessory drive system.
We have the detailed 2015 Chevy Traverse serpentine belt diagram file available for you to download. This will provide you with a visual aid to further assist with your maintenance and repair tasks.