2015 Chevy Trax Coolant Hose Diagram
Alright, let's dive into the coolant hose diagram for the 2015 Chevy Trax. Whether you're tackling a cooling system repair, trying to understand your vehicle's anatomy better, or planning some engine modifications, having a clear understanding of the coolant hose routing is essential. This article will break down the diagram, explaining its purpose, components, symbols, and how to use it for troubleshooting. Plus, we'll highlight potential safety concerns and offer some real-world advice. And the best part? We've got the complete diagram ready for you to download at the end of this article.
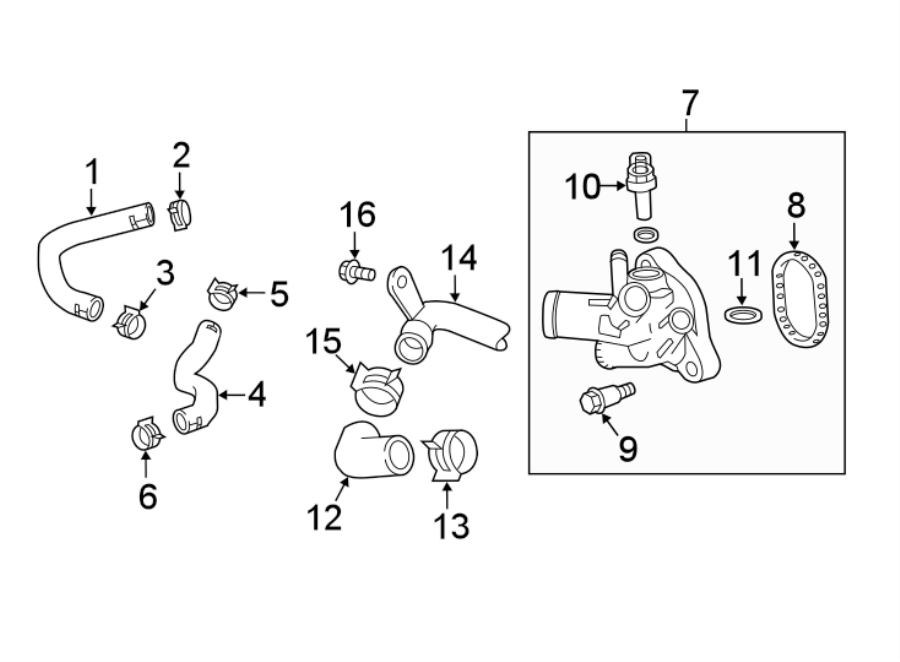
Purpose of the Coolant Hose Diagram
The coolant hose diagram is essentially a roadmap for your Trax's cooling system. It visually represents how coolant, the lifeblood of your engine's temperature regulation, circulates throughout the engine bay. Its primary purposes include:
- Repair and Maintenance: Accurately identifying coolant hose locations during replacement or repair is crucial. Incorrect routing can lead to overheating and significant engine damage.
- Diagnosis: The diagram helps you trace coolant leaks to their source. By understanding the system's flow, you can isolate the problem area efficiently.
- Understanding Vehicle Operation: Gaining insight into how the cooling system works contributes to your overall knowledge of your vehicle's mechanics.
- Modification and Upgrades: If you're planning modifications, like adding an aftermarket intercooler or a performance radiator, knowing the existing coolant hose layout is indispensable for proper integration.
Key Specs and Main Parts of the 2015 Chevy Trax Cooling System
Before we dissect the diagram, let's identify the key components of the Trax's cooling system:
- Radiator: Located at the front of the vehicle, the radiator dissipates heat from the coolant.
- Radiator Cap: Maintains pressure within the cooling system, raising the boiling point of the coolant and preventing boil-over.
- Coolant Reservoir (Overflow Tank): Holds excess coolant and allows for expansion and contraction as the system temperature changes.
- Water Pump: Circulates coolant throughout the engine and cooling system. It's typically driven by the serpentine belt. A failing water pump is a common cause of overheating.
- Thermostat: Regulates coolant flow to the radiator, maintaining the engine's optimal operating temperature. A stuck-closed thermostat will cause overheating, while a stuck-open thermostat can prevent the engine from reaching operating temperature, reducing fuel efficiency.
- Coolant Hoses: These hoses, made of reinforced rubber, transport coolant between the various components.
- Heater Core: Located inside the vehicle's dashboard, the heater core provides heat to the cabin by circulating hot coolant.
- Engine Block/Cylinder Head Passages: Internal passages within the engine that allow coolant to circulate and absorb heat.
Understanding the Symbols in the Coolant Hose Diagram
The coolant hose diagram uses a set of standardized symbols to represent various components and connections. While the specific symbols might vary slightly between diagrams, here's a general guide:
- Solid Lines: Generally represent coolant hoses carrying liquid coolant. The thickness of the line might indicate the hose diameter.
- Dotted Lines: Often used to represent vacuum lines, or possibly small coolant lines such as bypass hoses, or lines that are hidden behind other components. Refer to the diagram's legend for clarification.
- Arrows: Indicate the direction of coolant flow. Pay close attention to these!
- Radiator Symbol: A stylized representation of the radiator, often depicted as a rectangular grid.
- Water Pump Symbol: Usually shown as a circle with blades inside, representing the impeller.
- Thermostat Symbol: Can be a rectangle or square with a wavy line inside.
- Hose Clamps: Represented by small circles or rectangles along the hose lines.
- Color Coding: Some diagrams use color coding to differentiate between hoses carrying hot coolant and hoses carrying cooler coolant. Check the diagram's legend for color assignments.
Important Note: Always refer to the diagram's legend for specific symbol definitions. The legend is your key to accurately interpreting the information presented.
How the Coolant System Works
The cooling system's operation is relatively straightforward, but understanding it helps you troubleshoot effectively. Here's a simplified explanation:
- The water pump circulates coolant from the engine block through the engine's internal passages, absorbing heat generated by combustion.
- The heated coolant flows towards the thermostat.
- If the engine is cold, the thermostat remains closed, preventing coolant from flowing to the radiator and allowing the engine to warm up quickly. Coolant is typically recirculated back through the engine via a bypass hose.
- Once the engine reaches its operating temperature (typically around 195-210°F or 90-99°C), the thermostat opens, allowing coolant to flow to the radiator.
- As coolant passes through the radiator, air flowing through the radiator fins dissipates the heat.
- The cooled coolant returns to the engine, completing the cycle.
- Coolant Reservoir: As the coolant heats and cools, it expands and contracts. The coolant reservoir provides a space for this expansion and contraction, preventing pressure buildup in the system.
- Heater Core: When you turn on your car's heater, a valve opens, allowing hot coolant to flow through the heater core. A fan blows air across the heater core, warming the air that enters the cabin.
Real-World Use: Basic Troubleshooting Tips
Here are some common issues you might encounter and how the coolant hose diagram can help:
- Coolant Leaks: The diagram allows you to trace the leak back to its source. Inspect hose connections, the water pump area, the radiator, and the thermostat housing. Look for signs of coolant stains or drips. Use the diagram to identify the specific hose involved and determine if it needs replacement.
- Overheating: Overheating can be caused by several factors, including a low coolant level, a faulty thermostat, a failing water pump, or a blocked radiator. The diagram helps you check the coolant level in the reservoir and inspect the hoses for kinks or blockages.
- No Heat in the Cabin: If you're not getting heat, it could be due to a low coolant level, a clogged heater core, or a malfunctioning heater control valve. Use the diagram to trace the heater hoses and identify the components involved.
- Hose Degradation: Coolant hoses degrade over time due to heat and pressure. Regularly inspect them for cracks, swelling, or softness. The diagram helps you identify the correct replacement hoses.
Troubleshooting Example: Let's say you notice coolant leaking near the water pump. The diagram will show you the hoses connected to the water pump, allowing you to inspect them closely for leaks or damage. You can then determine if the leak is coming from a hose connection, the water pump itself, or a nearby component.
Safety Considerations
Working with the cooling system involves several safety risks. Always take the following precautions:
- Hot Coolant: Never open the radiator cap or any coolant system components while the engine is hot. The system is under pressure, and hot coolant can spray out, causing severe burns. Allow the engine to cool completely before working on the system.
- Coolant Toxicity: Coolant contains ethylene glycol or propylene glycol, which are toxic chemicals. Avoid ingestion and skin contact. Wear gloves and eye protection when handling coolant. Clean up any spills immediately.
- Electrical Components: Be aware of electrical components near the cooling system, such as the radiator fan motor. Disconnect the battery's negative terminal before working on the system to avoid electrical shocks.
- Moving Parts: Be careful of moving parts, such as the serpentine belt and the radiator fan. Keep your hands and tools clear of these components when the engine is running.
- Pressure Testing: When pressure testing the cooling system, never exceed the recommended pressure. Over-pressurizing the system can damage components and cause leaks.
Especially dangerous: The radiator cap, when the system is hot. Removing this cap without proper precautions can lead to scalding injuries.
By using the coolant hose diagram in conjunction with basic diagnostic skills, you can confidently tackle many cooling system repairs and maintenance tasks on your 2015 Chevy Trax. Remember safety first! Now, to help you get started, we've prepared a high-resolution, printable version of the 2015 Chevy Trax coolant hose diagram. Click the link below to download it.
[Download Link for 2015 Chevy Trax Coolant Hose Diagram Here - Replace with actual link]
Good luck, and happy wrenching!