
2015 Chrysler 200 Coolant Hose Diagram
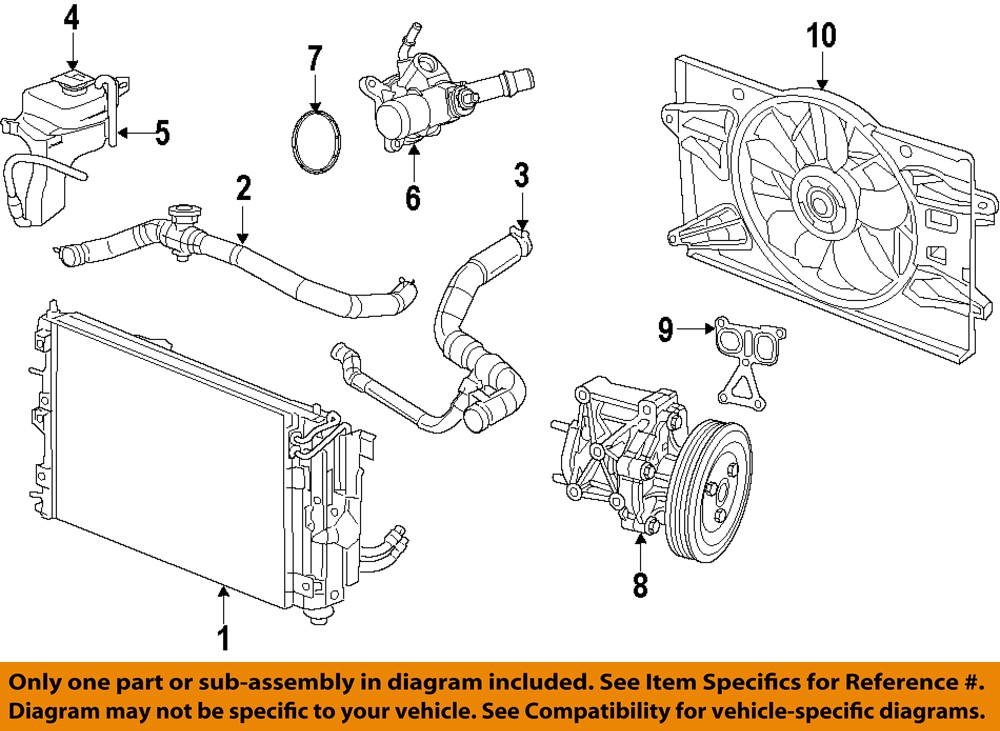
Alright, let's dive into the coolant hose diagram for the 2015 Chrysler 200. Understanding this system is crucial for a few key reasons. First and foremost, it's essential for performing repairs, whether you're replacing a leaking hose, troubleshooting overheating issues, or even just topping off your coolant. Secondly, it's incredibly valuable for general maintenance and understanding the overall health of your engine. Finally, if you're planning any modifications or performance upgrades that might affect the cooling system, a solid understanding of the coolant hoses is non-negotiable.
Key Specs and Main Parts
The 2015 Chrysler 200, depending on the engine (2.4L Tigershark I4 or 3.6L Pentastar V6), will have slightly different coolant hose layouts. However, the basic principles and components remain the same. Let's break down the key players:
- Radiator Hoses (Upper and Lower): These are the heavy hitters, the large-diameter hoses that connect the engine to the radiator. The upper radiator hose typically carries hot coolant from the engine's thermostat housing to the radiator. The lower radiator hose returns cooled coolant from the radiator back to the engine block.
- Heater Hoses (Inlet and Outlet): These hoses supply hot coolant to the heater core, which is essentially a small radiator located inside the dashboard. The heater core provides heat for the cabin.
- Thermostat Housing: This housing contains the thermostat, a temperature-sensitive valve that regulates coolant flow. The thermostat prevents coolant from circulating to the radiator until the engine reaches its operating temperature.
- Coolant Reservoir (Overflow Tank): This tank stores extra coolant and allows the system to expand and contract as the coolant heats and cools. It’s a vital part of a closed cooling system.
- Water Pump: Although not a hose, the water pump is integral to coolant flow. It's a centrifugal pump driven by the engine's belt system that forces coolant through the entire system.
- Bypass Hose: A smaller hose that allows coolant to circulate within the engine block when the thermostat is closed. This helps to prevent localized overheating and maintain a more even temperature distribution.
While the above are the primary components relating to coolant hoses, other auxiliary hoses might be present depending on the specific configuration of your 200. These might include hoses for oil coolers or transmission coolers that utilize coolant for heat exchange.
Symbols and Diagram Interpretation
Understanding the symbols on the coolant hose diagram is just as important as identifying the components themselves. Here's a breakdown of common conventions:
- Solid Lines: Typically represent the main coolant hoses carrying the bulk of the coolant flow. Their thickness often corresponds to the hose diameter.
- Dashed Lines: May indicate smaller, auxiliary hoses or vacuum lines associated with the cooling system, or even represent the flow *within* components like the radiator.
- Arrows: Indicate the direction of coolant flow. This is *crucial* for understanding how the system is designed to operate.
- Colors (if present): While not universally used, colors can sometimes differentiate between supply and return lines. For example, red might represent hot coolant leaving the engine, and blue might represent cooler coolant returning from the radiator. Always refer to the diagram's legend to understand the color coding.
- Component Symbols: Each component (radiator, water pump, thermostat housing, etc.) will have a simplified symbol. These symbols are usually labeled with abbreviations or part numbers.
- Clamps: Typically shown as small circles or squares along the hose lines, representing the locations where hoses are secured to fittings.
Important note: The diagram may also include vacuum lines related to the cooling system. For instance, some older systems might use vacuum to control coolant flow to the heater core. These lines should be differentiated from coolant hoses, often by smaller diameter and sometimes by a different line style.
How It Works
The cooling system's primary function is to maintain the engine at its optimal operating temperature. Here's a simplified breakdown of how it works:
- Engine Start-up (Cold): When the engine is cold, the thermostat remains closed. This restricts coolant flow to the radiator, allowing the engine to warm up quickly. Coolant circulates only within the engine block via the bypass hose.
- Engine Warm-up: As the engine heats up, the thermostat gradually opens, allowing coolant to flow to the radiator. The radiator dissipates heat from the coolant to the atmosphere.
- Normal Operation: Once the engine reaches its operating temperature (typically around 190-220°F), the thermostat modulates the coolant flow to the radiator to maintain that temperature. The water pump constantly circulates the coolant throughout the system.
- Heat Demand: When you turn on the heat in the cabin, coolant flows through the heater core, transferring heat to the air that blows into the passenger compartment.
- Expansion and Contraction: As the coolant heats up, it expands. Excess coolant flows into the coolant reservoir. When the engine cools down, coolant contracts, and coolant is drawn back from the reservoir into the system.
Real-World Use and Troubleshooting
Here are some practical tips for using the coolant hose diagram to troubleshoot common cooling system problems:
- Leaks: A visual inspection of the hoses is the first step. Look for cracks, bulges, or signs of coolant leakage (staining, wetness). The diagram helps you quickly locate the relevant hose and identify potential points of failure, like hose connections or the hose material itself.
- Overheating: If your engine is overheating, the diagram helps you trace the coolant flow to identify potential blockages. Check the thermostat housing, radiator hoses (are they hot?), and the water pump. A collapsed lower radiator hose (especially under high engine load) can restrict coolant flow.
- No Heat: If you're not getting heat in the cabin, check the heater hoses. Ensure they are both hot when the engine is at operating temperature. If one is cold, there might be a blockage in the hose or the heater core itself. Consult the diagram to trace the coolant flow through the heater core circuit.
- Coolant Loss: If you're constantly topping off your coolant, use the diagram to systematically check all the hoses and connections for leaks. Pay close attention to the water pump area, as a leaking water pump is a common cause of coolant loss.
- Hose Routing: Use the diagram as a reference when replacing hoses to ensure they are routed correctly. Incorrect routing can cause hoses to rub against other components, leading to premature wear and failure.
Safety Considerations
Working on the cooling system involves some inherent risks, so safety is paramount:
- Hot Coolant: *Never* attempt to remove or loosen any coolant hoses or the radiator cap when the engine is hot. Coolant is under pressure, and releasing it can cause severe burns. Always allow the engine to cool completely before working on the cooling system.
- System Pressure: Even when the engine is cool, the system may still be pressurized. Slowly release the pressure by carefully opening the radiator cap (if equipped) or the coolant reservoir cap. Wear eye protection.
- Coolant Disposal: Coolant (antifreeze) is toxic. Never pour it down the drain or onto the ground. Collect it in a suitable container and dispose of it properly at a recycling center or auto parts store.
- Water Pump Pulley: Be extremely careful when working around the water pump pulley, especially when the engine is running. Keep your hands and clothing clear of the moving parts. A broken belt can cause severe injury.
Having a good understanding of your 2015 Chrysler 200's coolant system, coupled with the proper diagram, will empower you to perform a variety of maintenance and repair tasks with confidence. Remember to always prioritize safety and consult a professional if you're unsure about any aspect of the work.
We have the full coolant hose diagram available for download. It includes detailed information and component locations to aid your maintenance and repair tasks.