2015 Dodge Dart Radio Wiring Diagram
So, you're looking to delve into the radio wiring of your 2015 Dodge Dart? Excellent! Whether you're troubleshooting a blown fuse, upgrading to a new head unit, or simply trying to understand your car's electrical system better, having the right wiring diagram is crucial. This article will break down the 2015 Dodge Dart radio wiring diagram, equipping you with the knowledge to tackle your project safely and effectively. We'll cover the key components, symbols, and troubleshooting tips.
Purpose of Understanding the Radio Wiring Diagram
Why bother with a wiring diagram? Well, there are several compelling reasons:
- Repair: A faulty radio can be incredibly frustrating. Diagnosing issues like no power, intermittent audio, or speaker problems often requires tracing wires. A diagram helps you pinpoint the source of the problem.
- Upgrades: Swapping out your factory head unit for a newer model with features like Apple CarPlay or Android Auto requires connecting the correct wires. Incorrect wiring can damage your new unit or your car's electrical system.
- Adding Accessories: Installing aftermarket amplifiers, subwoofers, or backup cameras often involves tapping into existing radio wiring. A diagram ensures you're connecting to the right circuits.
- Learning: Even if you don't have an immediate project, understanding your car's electrical system is beneficial for general maintenance and troubleshooting down the road. It empowers you to be a more informed car owner.
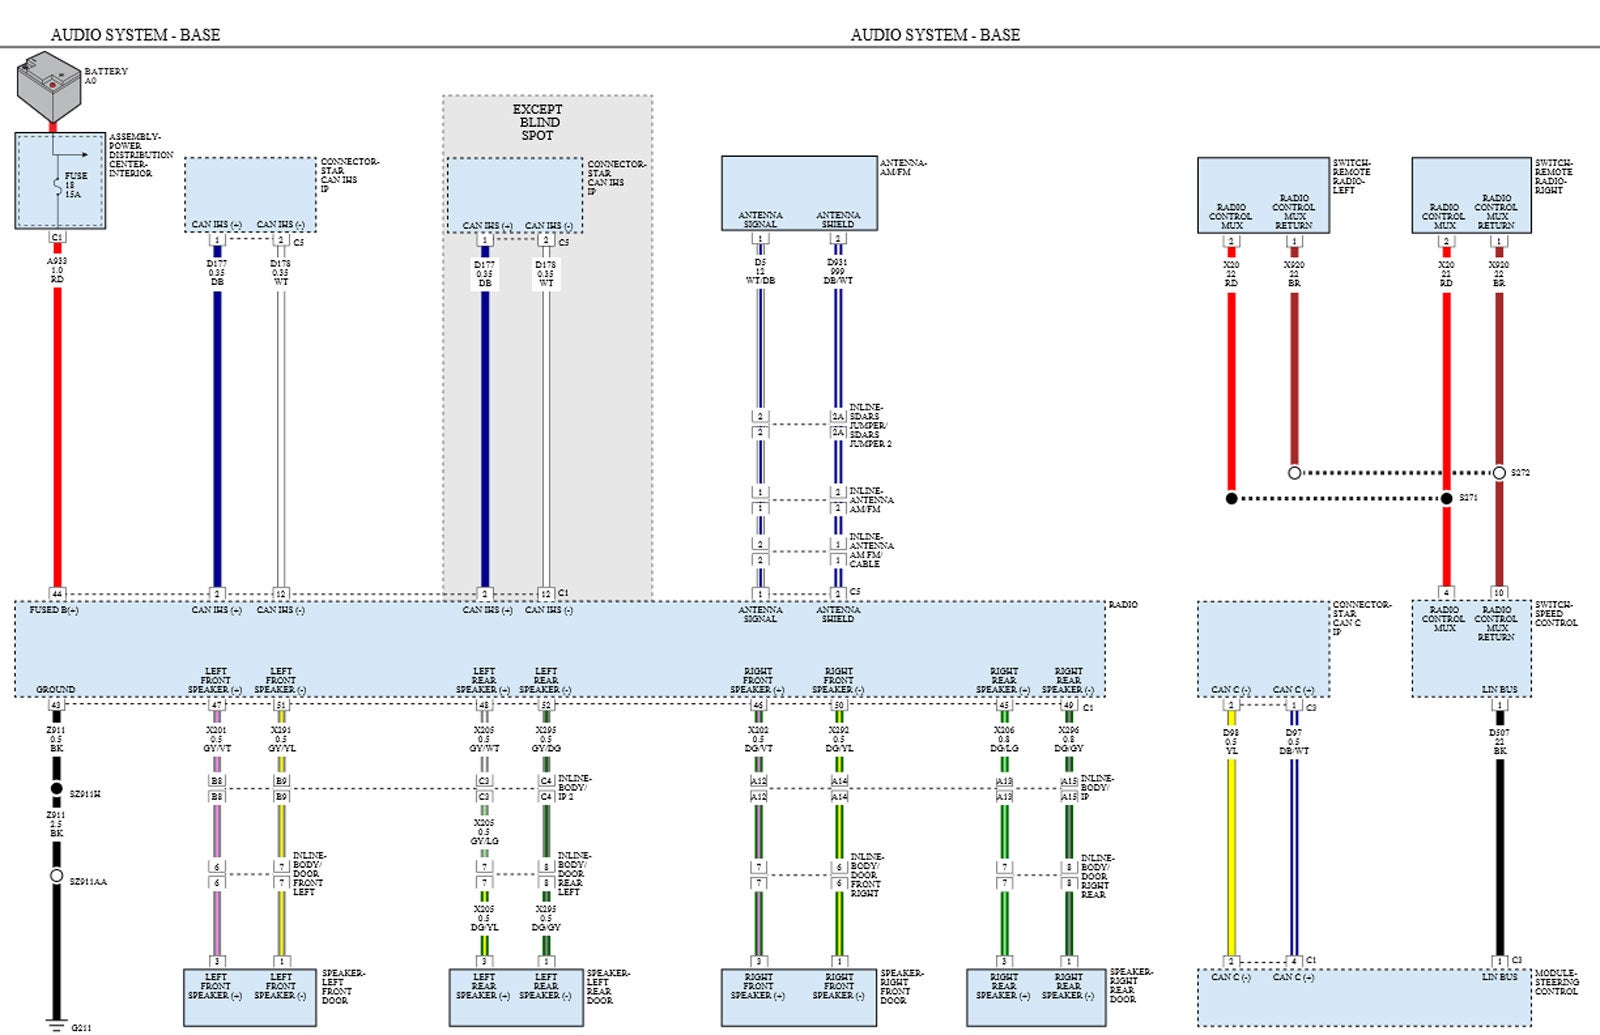
Key Specs and Main Parts of the 2015 Dodge Dart Radio Wiring
Before diving into the diagram itself, let's identify the key components and their specifications. Keep in mind that specific trim levels and options might affect the exact wiring configuration. The diagram we provide should cover the most common setups, but always double-check against your vehicle's specific build.
Here are the main parts you'll encounter:
- Head Unit: This is the brain of the system, controlling the radio, CD player (if equipped), Bluetooth connectivity, and other infotainment functions. It provides the audio signal and power to the speakers.
- Speakers: Located throughout the cabin, these convert the electrical signal from the head unit into audible sound. The Dart typically has speakers in the front doors, rear doors (or rear deck), and sometimes a center channel speaker in the dashboard.
- Amplifier (Optional): Some higher-end Dart models come with a factory amplifier to boost the audio signal to the speakers. If your car has an amp, it will be located separately from the head unit, often under a seat or in the trunk.
- Wiring Harnesses: These are bundles of wires that connect the various components of the radio system. The main harness connects the head unit to the car's electrical system. Speaker harnesses connect the head unit (or amplifier) to the speakers.
- Antenna: This receives radio signals. It's typically located on the roof or rear window of the car.
Key specs to be aware of include:
- Voltage: The Dart's electrical system operates at 12V DC.
- Wire Gauge: The thickness of the wires varies depending on their function. Power wires (e.g., battery and ground) are typically thicker (lower gauge number) than signal wires (e.g., speaker wires).
- Fuses: The radio system is protected by one or more fuses, usually located in the fuse box under the hood or inside the cabin. These fuses are designed to protect the system from overloads. Check your owner's manual for the specific fuse location and amperage rating.
Understanding Wiring Diagram Symbols
Wiring diagrams use a standardized set of symbols to represent electrical components and connections. Here's a breakdown of common symbols:
- Solid Lines: Represent wires. The thickness of the line might indicate the wire gauge.
- Dashed Lines: Often indicate shielded wires or connections that are not directly connected but are related (e.g., ground connections).
- Circles: Represent connections or terminals.
- Rectangles: Can represent various components, such as the head unit, amplifier, or switches.
- Ground Symbol: A series of horizontal lines decreasing in length, indicates a connection to the vehicle's chassis ground.
- Fuse Symbol: A squiggly line inside a rectangle, indicates a fuse.
- Connector Symbols: Varying shapes represent connectors, which are used to join wiring harnesses. These are often labeled with pin numbers.
Color Codes: Wire colors are indicated by abbreviations, such as:
- BK: Black
- RD: Red
- WH: White
- BL: Blue
- GN: Green
- YL: Yellow
- OR: Orange
- BR: Brown
Sometimes, a wire will have two colors, indicated by two abbreviations separated by a slash (e.g., WH/BL for a white wire with a blue stripe).
How the 2015 Dodge Dart Radio Wiring Works
The radio system operates as follows:
- Power Supply: The head unit receives power from the car's battery through a constant (unswitched) power wire and a switched power wire. The constant power wire maintains the radio's memory settings, while the switched power wire turns the radio on and off with the ignition.
- Ground Connection: The head unit is grounded to the car's chassis, providing a return path for the electrical current.
- Signal Input: The head unit receives audio signals from various sources, such as the radio antenna, CD player (if equipped), Bluetooth receiver, or auxiliary input.
- Signal Processing: The head unit processes the audio signal, adjusting the volume, tone, and balance.
- Amplification: The head unit (or a separate amplifier) amplifies the audio signal to a level suitable for driving the speakers.
- Speaker Output: The amplified audio signal is sent to the speakers through speaker wires.
Real-World Use: Basic Troubleshooting Tips
Here are some basic troubleshooting tips using the wiring diagram:
- No Power: Use a multimeter to check for voltage at the constant and switched power wires going to the head unit. If there's no voltage, check the corresponding fuses. Also, verify the ground connection is secure.
- No Sound from One Speaker: Check the speaker wire connection at the head unit and the speaker itself. Use a multimeter to test the speaker wire for continuity (resistance). A broken wire or a blown speaker can cause this issue. If you have an amp, check the amp’s input and output speaker connections.
- Intermittent Sound: Look for loose connections or damaged wires. Wiggle the wiring harness at the back of the head unit and listen for changes in the audio.
- Blown Fuse: A frequently blowing fuse indicates a short circuit. Inspect the wiring harness for damaged insulation or wires that are touching each other.
Remember, always disconnect the negative battery terminal before working on your car's electrical system to prevent accidental shorts.
Safety Considerations
Working with automotive electrical systems can be dangerous if you're not careful. Here are some important safety considerations:
- Disconnect the Battery: Always disconnect the negative battery terminal before working on any electrical components. This will prevent accidental shorts and electrical shocks.
- Use Proper Tools: Use insulated tools to avoid short circuits.
- Work in a Well-Lit Area: Good lighting will help you see what you're doing and avoid mistakes.
- Avoid Working with Live Wires: Never work on wiring while the ignition is on or the engine is running.
- Be Aware of Airbag Wiring: Airbags are deployed by explosive charges. Avoid disturbing or disconnecting airbag wiring unless you're a qualified technician. Improper handling of airbag wiring can result in accidental deployment and serious injury. This is especially important around the steering wheel and dashboard areas.
The constant power wire (typically red or orange) is *always hot* even when the ignition is off. Be extremely careful when working with this wire to avoid short circuits.
By carefully following these steps and using the correct wiring diagram, you can confidently tackle most radio-related projects on your 2015 Dodge Dart. Remember to double-check your work and consult a qualified technician if you're unsure about anything.
We have the complete 2015 Dodge Dart Radio Wiring Diagram file available for download. This diagram will provide you with the specific wiring information you need for your vehicle. Good luck with your project!