
2015 Hyundai Elantra Fuse Box Diagram
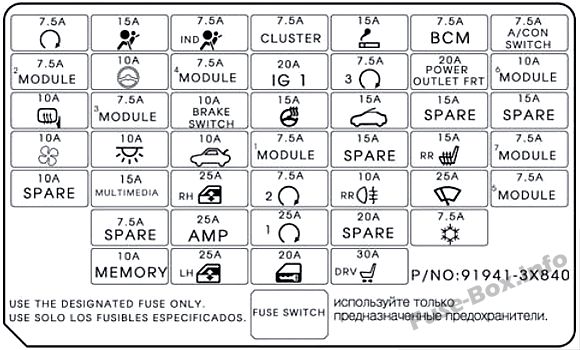
The 2015 Hyundai Elantra, like any modern vehicle, relies heavily on its electrical system. Keeping that system healthy and diagnosing issues effectively depends on understanding its architecture, and the fuse box diagram is your key to that understanding. This document isn't just a static picture; it's a roadmap to your Elantra's electronic heart, crucial for everything from diagnosing a blown tail light to safely tapping into power for aftermarket accessories.
Purpose of the Fuse Box Diagram
Think of the fuse box diagram as your electrical troubleshooting bible. It serves several critical purposes:
- Diagnosis and Repair: Quickly identifying which fuse corresponds to a faulty circuit is the primary benefit. Instead of blindly testing fuses, you can pinpoint the culprit in seconds.
- Safe Modification: If you're adding accessories (e.g., aftermarket lights, a dashcam), the diagram shows you where to safely tap into the electrical system with minimal risk of overloading circuits.
- Preventative Maintenance: Familiarity with the diagram allows you to periodically inspect fuses for signs of corrosion or impending failure, preventing future breakdowns.
- Educational Value: Understanding how the electrical system is laid out deepens your knowledge of your car's inner workings.
Key Specs and Main Parts of the 2015 Elantra Fuse Box
The 2015 Elantra typically has two fuse boxes:
- Interior Fuse Box (Driver's Side): Located under the dashboard, typically on the driver's side. This box primarily houses fuses for interior components like the infotainment system, lighting, power windows, and the cigarette lighter (power outlet).
- Engine Compartment Fuse Box: Situated in the engine bay, usually near the battery. This contains fuses and relays for critical engine management systems (fuel injection, ignition), ABS, headlights, and other vital components.
Key components you'll find within these boxes include:
- Fuses: These are sacrificial devices designed to protect circuits from overcurrent. They contain a thin wire that melts and breaks the circuit when excessive current flows through it. Fuses are rated in amperes (amps), indicating the maximum current they can handle before blowing. Common ratings include 5A, 7.5A, 10A, 15A, 20A, 25A, 30A, and sometimes higher for specific components.
- Relays: Relays are electromechanical switches. They use a small current to control a larger current, allowing low-current circuits (like those controlled by a dashboard switch) to operate high-current devices (like headlights or a starter motor).
- Fuse Puller: A small plastic tool specifically designed to safely remove fuses without damaging them or the surrounding components.
- Spare Fuses: Most fuse boxes include a selection of spare fuses of various amperages for emergency replacement.
Decoding the Symbols: Lines, Colors, and Icons
The fuse box diagram itself isn't just a bunch of lines and boxes. It uses a standardized set of symbols and conventions to convey information efficiently:
- Lines: Solid lines represent the electrical wiring connecting components. The thickness of the line doesn't typically indicate wire gauge, but rather is just for visual clarity on the diagram. Dashed lines *might* indicate a ground connection (although a ground symbol is more common) or a shielded wire.
- Colors: While the diagram itself might be black and white, the actual wires in your Elantra are color-coded. The color of the wire *should* correspond to the color indicated in the wiring diagrams in the official service manual. However, there can be variations based on trim level and production date. Common wire colors include red (power), black (ground), blue, yellow, green, white, etc. The fuse box diagram *typically* doesn't indicate wire colors, but the wiring diagrams in the service manual will.
- Icons: Icons are the most important part. Each fuse location is usually labeled with an icon representing the component it protects. Here are some common examples:
- Headlight Icon: A stylized headlight.
- Windshield Wiper Icon: A wiper blade sweeping across a windshield.
- Radio Icon: A stylized radio or speaker.
- Cigarette Lighter/Power Outlet Icon: A lighter or a plug.
- Engine Icon: A simplified representation of an engine.
- ABS Icon: A symbol associated with the Anti-lock Braking System.
- Horn Icon: A horn symbol.
- Amperage Rating: Each fuse location will be marked with the fuse's amperage rating (e.g., 10A, 15A). Always replace a blown fuse with one of the same amperage rating. Using a higher amperage fuse can overload the circuit and cause serious damage or even a fire.
How It Works: From Battery to Component
Understanding the basics of electrical flow is key to using the fuse box diagram effectively. Here's a simplified overview:
- Power Source: The battery provides the initial source of DC (direct current) power.
- Distribution: Power is distributed from the battery to various circuits throughout the car via the wiring harness.
- Fuse Protection: Each circuit is protected by a fuse. The fuse is placed in series with the component it protects.
- Component Operation: When a switch is closed (e.g., you turn on the headlights), electricity flows through the circuit, powering the component.
- Ground: The circuit is completed by a ground connection, which returns the electricity to the battery.
The fuse box diagram shows how these circuits are organized and which fuse protects which component. If a component stops working, the first step is to check the corresponding fuse in the diagram. If the fuse is blown, it indicates an overcurrent situation in that circuit. Replace the fuse, but if it blows again immediately, there's a short circuit or other underlying problem that needs further investigation.
Real-World Use: Basic Troubleshooting Tips
Here are some practical tips for using the fuse box diagram for troubleshooting:
- Symptom-Based Diagnosis: Identify the malfunctioning component (e.g., a non-working window). Consult the fuse box diagram to locate the corresponding fuse.
- Visual Inspection: Remove the fuse and visually inspect it. A blown fuse will have a broken filament inside. Some fuses have a clear window for easy inspection.
- Continuity Test: Use a multimeter to perform a continuity test on the fuse. A good fuse will have continuity (the multimeter will beep or show a low resistance reading). A blown fuse will have no continuity.
- Fuse Replacement: Replace the blown fuse with a new fuse of the same amperage rating.
- Recurring Issues: If the fuse blows repeatedly, don't just keep replacing it. This indicates a short circuit or overload in the circuit. Consult a qualified mechanic to diagnose the underlying problem.
- Document Your Work: Keep a record of the fuses you've replaced and any issues you've encountered. This can be helpful for future troubleshooting.
Safety Considerations: Handle with Care
Working with automotive electrical systems can be dangerous. Here are some crucial safety precautions:
- Disconnect the Battery: Before working on any electrical components, disconnect the negative terminal of the battery. This prevents accidental shorts and potential electric shock. This is especially important when working on circuits with high amperage fuses.
- Use the Right Tools: Use a fuse puller to remove fuses. Never use pliers or other metal tools, as this can damage the fuse box and create a short circuit.
- Never Bypass a Fuse: Never bypass a fuse with a wire or other conductive material. This eliminates the protection provided by the fuse and can lead to serious damage or fire.
- Be Aware of Airbags: Airbag systems have their own fuses and wiring. Be extremely careful when working near airbag components, as accidental deployment can cause serious injury. If you are not comfortable working near airbags, consult a qualified mechanic.
- Consult a Professional: If you are not comfortable working with automotive electrical systems, consult a qualified mechanic. Electrical problems can be complex and dangerous, and it's best to leave them to the experts.
We have the 2015 Hyundai Elantra fuse box diagram file available for download. It's a valuable resource that you can save to your computer or print out for easy reference in your garage. It will help you perform maintenance and repairs.