2015 Hyundai Sonata Serpentine Belt Diagram
The serpentine belt on your 2015 Hyundai Sonata is a crucial component responsible for powering various accessories of your engine. Understanding its layout and function is essential for both preventative maintenance and troubleshooting common issues. This article provides a detailed breakdown of the serpentine belt diagram for the 2015 Sonata, enabling you to confidently diagnose problems and perform necessary replacements.
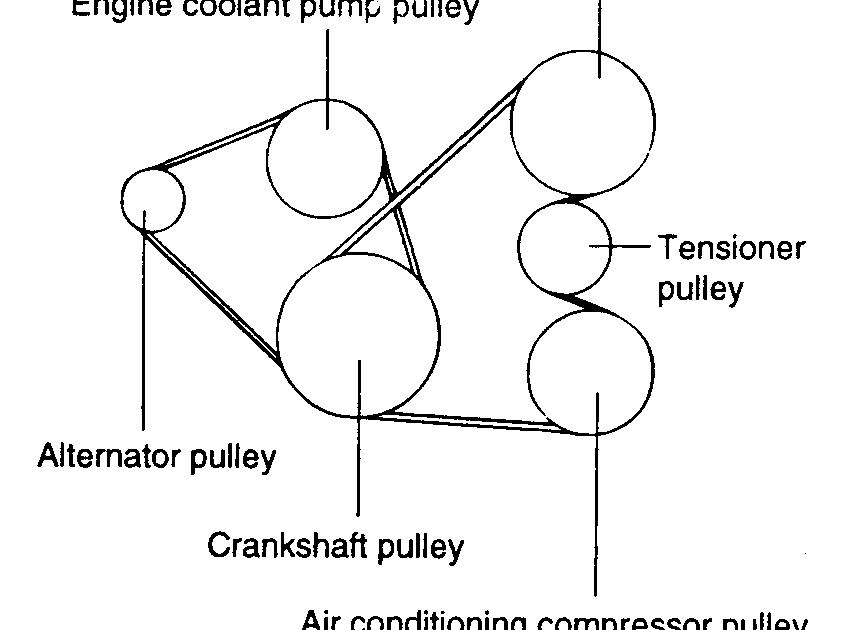
Purpose of Understanding the Serpentine Belt Diagram
Why bother with the diagram? Several reasons: performing a serpentine belt replacement is a fairly straightforward task that can save you significant money compared to taking your car to a mechanic. The diagram allows you to:
- Correctly Route a New Belt: Ensuring the belt follows the precise path is critical. Incorrect routing can lead to component damage, belt slippage, and reduced accessory performance.
- Diagnose Component Issues: If you notice unusual noises or accessory malfunctions (power steering issues, AC problems, etc.), the diagram helps you pinpoint the affected component connected to the belt.
- Perform Visual Inspections: You can use the diagram to quickly locate and inspect the belt's condition, checking for cracks, wear, or fraying.
- Understand Belt Tensioner Operation: The diagram shows the location of the belt tensioner, which is essential for maintaining proper belt tension. Understanding its location aids in determining if the tensioner is functioning correctly.
Key Specs and Main Parts of the 2015 Hyundai Sonata Serpentine Belt System
The 2015 Hyundai Sonata, depending on the engine type (2.4L or 2.0L Turbo), will have a slightly different serpentine belt layout. However, the core components remain the same:
- Serpentine Belt: The main component; a long, winding belt made of reinforced rubber.
- Crankshaft Pulley (or Damper): Driven directly by the engine, this pulley is the source of power for the entire system. It's connected directly to the crankshaft.
- Alternator Pulley: Powers the electrical system and charges the battery.
- Power Steering Pump Pulley: Provides hydraulic pressure for power-assisted steering.
- Air Conditioning (AC) Compressor Pulley: Drives the AC compressor, responsible for cooling the cabin.
- Water Pump Pulley: Circulates coolant throughout the engine to maintain optimal operating temperature.
- Idler Pulley(s): Smooth, non-driven pulleys that guide the belt and maintain proper tension.
- Belt Tensioner: A spring-loaded pulley that automatically adjusts belt tension as the belt wears or expands due to heat. This is a critical component for belt longevity and proper accessory function.
Specifics for each engine type (2.4L and 2.0L Turbo) may differ slightly in pulley placement and routing. Always refer to the correct diagram for your specific engine.
Understanding Serpentine Belt Diagram Symbols
Diagrams use specific symbols to represent different components and belt routing. Here's a breakdown:
- Solid Lines: Represent the serpentine belt itself. Thicker lines might indicate the belt's path more prominently.
- Arrows: Indicate the direction of belt travel and pulley rotation. This is essential for correct belt routing.
- Circles: Represent pulleys. These are typically labeled with abbreviations indicating the component they are attached to (e.g., ALT for alternator, P/S for power steering, A/C for air conditioning).
- Squares or Rectangles: Can represent the belt tensioner assembly.
- Text Labels: Provide additional information about specific components or routing instructions.
Color-coding is less common in serpentine belt diagrams but may be present in some versions. If colors are used, a legend should explain their meaning. A red line, for instance, might indicate a particularly critical section of the belt path.
How the Serpentine Belt System Works
The serpentine belt system operates on a straightforward principle: mechanical energy transfer. The engine's rotational force, generated by the crankshaft, is transferred to the crankshaft pulley. This pulley, in turn, drives the serpentine belt. As the belt rotates, it engages with the pulleys of the various engine accessories (alternator, power steering pump, AC compressor, and water pump), transferring the rotational force to each of these components, allowing them to function. The belt tensioner maintains proper tension on the belt to ensure efficient power transfer and prevent slippage.
The belt tensioner is a crucial part of this system. It typically consists of a spring-loaded arm with a pulley attached. The spring mechanism automatically adjusts the pulley's position to compensate for belt stretch and ensure constant tension. A failing tensioner can lead to belt slippage, noise, and damage to other components.
Real-World Use: Basic Troubleshooting Tips
Here are some common problems you might encounter and how the diagram can help:
- Squealing Noise: This is often caused by a loose or worn belt. Use the diagram to locate the belt tensioner and inspect its operation. Check the belt for cracks, glazing, or missing chunks.
- Accessory Malfunctions: If your power steering is weak, AC isn't cooling, or the battery isn't charging, the belt might be slipping on the corresponding pulley. Refer to the diagram to confirm the belt is properly routed and in good condition.
- Belt Slippage: This can be caused by a worn belt, a faulty tensioner, or a contaminated pulley. Inspect all pulleys for debris or oil contamination. Replace the belt and/or tensioner as needed.
- Visual Inspection: Regularly inspect the belt for signs of wear. Cracks, fraying, and missing pieces are all indicators that the belt needs replacement. The diagram helps you quickly locate the belt and identify potential problem areas.
When troubleshooting, always remember to visually inspect all components associated with the serpentine belt system. Look for signs of wear, damage, or leaks.
Safety Precautions
Working on the serpentine belt system involves certain risks:
- Engine Heat: Ensure the engine is completely cool before working on the belt. Components can remain hot for a significant period after the engine is shut off.
- Rotating Parts: Never work on the serpentine belt system while the engine is running. The rotating belt and pulleys can cause serious injury.
- Battery Disconnect: Disconnect the negative battery terminal before starting any work to prevent accidental electrical shorts.
- High Belt Tension: Be careful when releasing the belt tensioner. The spring can release with considerable force. Use the appropriate tools and techniques to safely relieve the tension.
- Sharp Edges: Be aware of sharp edges on pulleys and other components. Wear gloves to protect your hands.
The crankshaft pulley, in particular, can be difficult to access and may require specialized tools for removal and installation. If you are not comfortable working on this component, it's best to consult a professional mechanic.
We have access to the 2015 Hyundai Sonata Serpentine Belt Diagram in a printable PDF format. If you need a copy, please reach out, and we'll be happy to provide it to you. Having the diagram readily available will be invaluable when performing maintenance or repairs on your Sonata's serpentine belt system. This resource, coupled with the information in this article, should empower you to tackle serpentine belt related issues with confidence.