2015 Hyundai Tucson Serpentine Belt Diagram
The serpentine belt in your 2015 Hyundai Tucson is a critical component responsible for powering several essential engine accessories. Knowing how it's routed – which is where the serpentine belt diagram comes in – is invaluable for maintenance, troubleshooting, and repair. This article will provide a comprehensive guide to understanding the 2015 Hyundai Tucson serpentine belt diagram, empowering you to tackle related tasks with confidence.
Purpose of the Serpentine Belt Diagram
The serpentine belt diagram serves as a visual roadmap for the belt's routing around various pulleys. Its purpose is multifaceted:
- Repair and Replacement: When replacing a worn or broken serpentine belt, the diagram ensures you install the new belt correctly. Incorrect routing can lead to accessory malfunction and potentially engine damage.
- Troubleshooting: If you experience issues like a squealing noise from the engine bay or a non-functional power steering, the diagram helps you visually inspect the belt's condition and tension.
- Understanding Engine Mechanics: For DIY enthusiasts, studying the diagram provides insight into how different engine components are interconnected and driven.
- Preventative Maintenance: Referencing the diagram during routine checks allows you to identify potential problems, such as misaligned pulleys or excessive belt wear, before they escalate into major issues.
Key Specs and Main Parts
The 2015 Hyundai Tucson (depending on the engine; 2.0L or 2.4L) typically uses a single serpentine belt to drive the following accessories:
- Crankshaft Pulley: This is the driving pulley, directly connected to the engine's crankshaft. It transfers the engine's rotational force to the serpentine belt.
- Alternator Pulley: The alternator converts mechanical energy from the engine into electrical energy to charge the battery and power electrical systems.
- Power Steering Pump Pulley: The power steering pump provides hydraulic pressure to assist steering.
- Air Conditioning Compressor Pulley: The A/C compressor circulates refrigerant to cool the cabin.
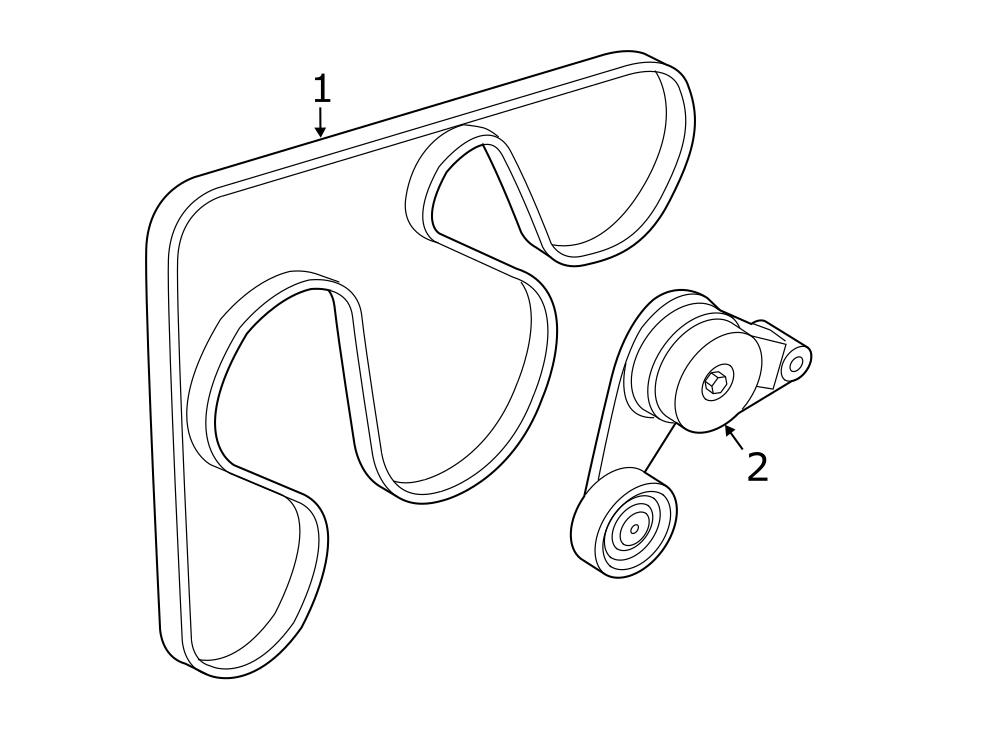
- Idler Pulley(s): These pulleys provide belt guidance and tension. They don't drive any accessories but ensure proper belt alignment and wrap around other pulleys.
- Tensioner Pulley: This is a spring-loaded pulley that automatically maintains the correct tension on the serpentine belt. Proper tension is crucial for efficient accessory operation and preventing belt slippage.
Belt Material: Serpentine belts are typically made of reinforced rubber compounds designed to withstand high temperatures and constant flexing. Specific material compositions vary depending on the manufacturer.
Belt Length and Width: The belt length is critical and engine specific. Using the wrong length will either prevent installation or result in improper tension. The width also matters but is less critical, variations there cause noise and belt wear. The 2015 Tucson requires a specific length; refer to the parts listing for your particular engine configuration.
Symbols and Diagram Conventions
Serpentine belt diagrams use standard conventions to represent the various components and belt routing. Understanding these symbols is essential for interpreting the diagram correctly:
- Solid Lines: Represent the path of the serpentine belt. The direction of the line indicates the belt's movement.
- Pulleys: Depicted as circles, with labels indicating the component they belong to (e.g., ALT for Alternator, P/S for Power Steering, A/C for Air Conditioning).
- Arrows: Indicate the direction of pulley rotation. Note that some pulleys rotate clockwise, and others rotate counter-clockwise.
- Tensioner: The tensioner pulley is often represented with a spring symbol or an arrow indicating the direction of its movement. Sometimes, it is simply labeled "Tensioner."
- Idler Pulleys: Typically shown as plain circles labeled "Idler."
- Diagram Orientation: Diagrams are usually drawn from the perspective of looking at the engine from the front of the vehicle. However, always compare the diagram to the actual engine layout to ensure correct interpretation.
How It Works
The serpentine belt system works by transferring rotational power from the engine's crankshaft to the various engine accessories. Here's a simplified explanation:
- The crankshaft pulley, driven by the engine, rotates and drives the serpentine belt.
- The belt wraps around the various accessory pulleys, transferring rotational force to them.
- The tensioner pulley maintains constant tension on the belt, preventing slippage and ensuring efficient power transfer. This is crucial because as the belt heats up or the engine speed changes, the belt's length subtly alters. The tensioner compensates for this.
- Each accessory pulley then performs its respective function: the alternator generates electricity, the power steering pump provides steering assistance, and the A/C compressor cools the cabin.
The specific routing of the belt is critical to ensure that each accessory receives the correct amount of power and rotates in the proper direction. This is why the serpentine belt diagram is so important.
Real-World Use: Troubleshooting Tips
Here are some common problems associated with the serpentine belt and how the diagram can help with troubleshooting:
- Squealing Noise: This is often caused by a loose or worn serpentine belt. Use the diagram to check the belt's condition for cracks, fraying, or glazing. Also, inspect the tensioner pulley to ensure it's functioning correctly and maintaining proper belt tension. A failed tensioner is a common cause of squealing.
- Accessory Malfunction: If an accessory, such as the alternator or power steering pump, stops working, use the diagram to verify that the belt is properly routed and that the pulley is rotating when the engine is running. A broken or slipped belt will prevent the accessory from operating.
- Belt Slippage: Can be caused by a worn belt, a loose tensioner, or a misaligned pulley. The diagram helps identify the location of the tensioner and allows you to visually inspect the pulley alignment.
- Belt Wear and Tear: Regularly inspect the belt for signs of wear, such as cracks, fraying, or missing chunks. The diagram reminds you of the belt's routing, allowing you to systematically examine the entire belt length. Note excessive wear on the edges may point to a pulley misalignment problem.
Important Note: When replacing the serpentine belt, always inspect the pulleys for damage or wear. A worn pulley can damage a new belt and shorten its lifespan. Use a straight edge to check the pulley alignment if you suspect a misalignment problem.
Safety Considerations
Working with the serpentine belt system involves certain safety risks:
- Moving Parts: The serpentine belt operates while the engine is running, posing a risk of injury from moving parts. Always ensure the engine is turned off and the key is removed before working on the belt.
- High Temperatures: Engine components, including the pulleys and belt, can become very hot during operation. Allow the engine to cool down completely before touching these parts.
- Spring-Loaded Tensioner: The tensioner pulley is spring-loaded and can snap back suddenly when released. Use appropriate tools to safely relieve the tension on the belt. Failure to do so can result in serious injury. Always consult your vehicle's repair manual or a trusted mechanic if you're unsure about the proper procedure.
- Electrical Components: The alternator is part of the electrical system. Disconnect the battery's negative terminal before working on the serpentine belt to avoid accidental electrical shocks.
Never attempt to adjust or replace the serpentine belt while the engine is running.
The serpentine belt is a vital component, and understanding its routing is crucial for maintaining your 2015 Hyundai Tucson. This article has provided you with the knowledge and tools to confidently approach serpentine belt-related tasks. Remember to prioritize safety and consult a qualified mechanic if you encounter any difficulties.
We have the complete 2015 Hyundai Tucson Serpentine Belt Diagram file available for download. This detailed diagram will provide an even clearer visual aid for your maintenance and repair endeavors. Please contact us to request access to the file.