2015 Mitsubishi Outlander Sport Fuse Box Diagram
For the seasoned DIYer or budding modder tackling a 2015 Mitsubishi Outlander Sport, understanding the fuse box diagram is absolutely critical. It's more than just a map; it's your key to electrical system diagnosis, repair, and even safe customization. Without it, you're essentially working blind, risking blown components, short circuits, or worse. This guide will equip you with the knowledge to confidently navigate your Outlander Sport's fuse box.
Purpose of the Fuse Box Diagram
Why is a fuse box diagram so important? Primarily, it serves three crucial functions:
- Troubleshooting Electrical Issues: When an electrical component fails (e.g., a malfunctioning cigarette lighter, non-working headlights), the fuse box is the first place you should check. The diagram identifies the specific fuse protecting that circuit.
- Performing Repairs: Replacing a blown fuse is often the simplest solution. The diagram ensures you replace it with the correct amperage rating, preventing further damage.
- Safe Modifications and Upgrades: Adding aftermarket accessories like auxiliary lights or a new sound system requires tapping into existing circuits. The diagram allows you to identify appropriate power sources and ensure you're not overloading any single circuit.
- General Learning and Understanding: For anyone wanting to understand the inner workings of their vehicle, studying the fuse box diagram offers valuable insight into the electrical architecture of the Outlander Sport.
Key Specs and Main Parts
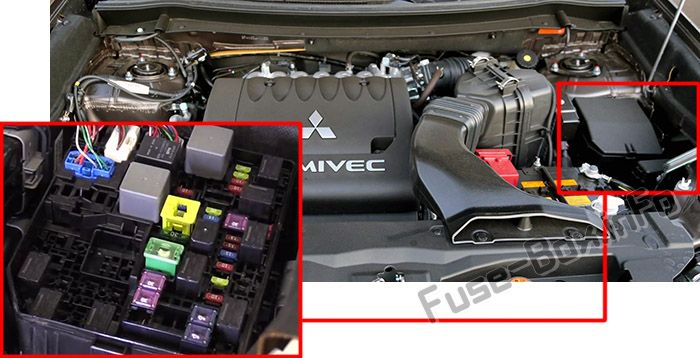
The 2015 Mitsubishi Outlander Sport typically has two fuse box locations:
- Interior Fuse Box: Usually located under the dashboard on the driver's side. You might need to remove a small access panel to expose it. This box primarily handles interior components like the radio, climate control, power windows, and interior lighting.
- Engine Compartment Fuse Box: Situated in the engine bay, often near the battery. This box protects vital engine components such as the fuel pump, ignition system, starter motor, and cooling fan.
Fuse Types:
Understanding the different types of fuses is crucial. The Outlander Sport primarily uses blade-type fuses, which are characterized by their plastic housing and visible metal element. These come in various sizes and amperage ratings, typically ranging from 5 amps to 30 amps.
- Mini (or Low-Profile Mini) Blade Fuses: Smaller in size compared to standard blade fuses, often used in newer vehicles to save space.
- Standard Blade Fuses: The most common type, easily identifiable by their plastic housing and two male terminals.
- ATO/ATC Blade Fuses: Another common type, often interchangeable with standard blade fuses.
- Cartridge Fuses: Typically higher amperage fuses used for circuits with high current demands, such as the main power distribution.
Decoding the Symbols and Diagram
The fuse box diagram isn't just a random assortment of numbers; it uses a standardized system of symbols and markings to convey information.
- Numbers: Each fuse location is assigned a number. This number corresponds directly to the diagram, allowing you to quickly identify the fuse responsible for a specific circuit.
- Amperage Rating (A): The amperage rating indicates the maximum current a fuse can handle before blowing. It's crucial to replace a blown fuse with one of the same amperage rating. Using a higher amperage fuse can overload the circuit and cause a fire hazard.
- Symbols/Icons: Symbols are used to represent the component or system the fuse protects. For example:
- A headlight symbol indicates a fuse for the headlight circuit.
- A radio symbol represents the radio or audio system fuse.
- A cigarette lighter symbol signifies the power outlet (cigarette lighter) fuse.
- An engine symbol could represent a fuse related to the engine control unit (ECU).
- Lines: Lines on the diagram often connect fuses that are related to the same system or subsystem. This can be helpful in diagnosing complex electrical problems.
- Colors: While less common in the diagram itself, the fuse body is color-coded to indicate its amperage rating. This helps quickly identify the correct amperage fuse. A common color-coding scheme is:
- 5A - Orange
- 7.5A - Brown
- 10A - Red
- 15A - Blue
- 20A - Yellow
- 25A - Clear/White
- 30A - Green
How It Works: The Fuse as a Circuit Protector
A fuse is a simple but effective safety device designed to protect electrical circuits from overcurrent. It contains a thin wire or filament that's designed to melt and break the circuit when the current exceeds a specific level (the amperage rating). This prevents damage to the wiring and components connected to that circuit. Think of it as a sacrificial component. When there's a surge of electricity due to a short circuit or overload, the fuse blows, sacrificing itself to protect the more expensive components connected to the circuit.
Real-World Use: Basic Troubleshooting
Let's say your cigarette lighter (power outlet) isn't working.
- Consult the Diagram: Locate the fuse box diagram for the interior fuse box.
- Identify the Fuse: Find the fuse labeled "CIG LTR" or "POWER OUTLET" (or a similar designation). The diagram will tell you its number and amperage rating.
- Inspect the Fuse: Use a fuse puller (often located inside the fuse box itself) to remove the fuse. Examine the filament. If it's broken, the fuse is blown.
- Replace the Fuse: Replace the blown fuse with a new fuse of the exact same amperage rating.
- Test: Turn on the ignition and test the cigarette lighter. If it still doesn't work, there might be a more serious problem requiring further diagnosis.
Important Considerations:
- Repeatedly Blowing Fuses: If a fuse blows repeatedly, there's likely a short circuit or overload in the circuit. Don't just keep replacing the fuse; find and fix the underlying problem!
- Using a Higher Amperage Fuse: Never replace a blown fuse with one of a higher amperage rating. This can bypass the circuit protection and lead to overheating, melted wires, and even a fire.
- Visual Inspection: Sometimes a fuse can be blown without the filament being visibly broken. Using a multimeter to test for continuity across the fuse terminals provides a more definitive diagnosis.
Safety First: Risky Components and Best Practices
Working with electrical systems can be dangerous if proper precautions aren't taken.
- Disconnect the Battery: Before working on any electrical components, disconnect the negative terminal of the battery. This minimizes the risk of accidental shorts and electrical shock.
- High-Voltage Components: Be extremely cautious around high-voltage components like the ignition coil and fuel injectors. These components can deliver a painful (and potentially dangerous) electric shock.
- Airbag Systems: Airbag systems are also highly sensitive and should only be handled by trained professionals. Improper handling can trigger the airbags, causing serious injury.
- Always Use the Correct Tools: Use insulated tools whenever possible and ensure your hands are dry.
Disclaimer: This guide provides general information and should not be considered a substitute for professional automotive advice. Always consult a qualified mechanic if you're unsure about any aspect of electrical system repair.
We have the complete 2015 Mitsubishi Outlander Sport fuse box diagram available for download. Use this resource in conjunction with this guide for effective and safe electrical system maintenance.