2015 Subaru Impreza Serpentine Belt Diagram
Alright, let's dive into the serpentine belt system of your 2015 Subaru Impreza. Whether you're tackling a repair, planning some preventative maintenance, or just keen to understand your car a bit better, grasping the serpentine belt layout is essential. This guide will walk you through the diagram, its key components, and how it all works together.
Purpose of the Serpentine Belt Diagram
Why bother with a diagram at all? Simple: accuracy and efficiency. Without a clear visual guide, replacing a serpentine belt can turn into a frustrating guessing game, potentially damaging components or leading to incorrect belt routing. The diagram provides a blueprint for:
- Proper Belt Routing: Ensuring the belt wraps around each pulley in the correct sequence.
- Component Identification: Pinpointing the location of essential accessories like the alternator, power steering pump, and AC compressor.
- Troubleshooting: Identifying potential issues like misalignment or worn pulleys based on the belt's path.
- Preventative Maintenance: Understanding the belt's path helps in inspecting for wear and tear, leading to timely replacements and avoiding breakdowns.
Key Specs and Main Parts
The 2015 Subaru Impreza utilizes a single serpentine belt to drive multiple engine accessories. This system is designed for efficiency, but proper tension and routing are critical. Here's a breakdown of the main components and specs:
Components:
- Crankshaft Pulley: The driving force of the system, connected directly to the engine's crankshaft. All power originates here.
- Alternator Pulley: Powers the vehicle's electrical system and charges the battery.
- Power Steering Pump Pulley: Provides hydraulic assistance for steering.
- Air Conditioning (AC) Compressor Pulley: Operates the air conditioning system.
- Idler Pulley(s): Smooth, unpowered pulleys that guide the belt and maintain proper wrap angle on other pulleys.
- Tensioner Pulley: Spring-loaded pulley that automatically adjusts the belt tension, compensating for belt stretch over time. This is critical for proper operation.
Key Specs (General - Consult your vehicle's service manual for precise specifications):
- Belt Length: Varies slightly based on engine configuration (e.g., with or without AC). It's crucial to use the correct belt length as specified in your vehicle's service manual or parts catalog.
- Belt Width: Standard width for most Impreza models. Again, verify this detail for your specific sub-model.
- Belt Material: Typically EPDM (Ethylene Propylene Diene Monomer) rubber, known for its durability and resistance to heat and cracking.
- Tension: Measured in foot-pounds or Newton-meters, this is usually set by the automatic tensioner. It's a good practice to verify the tensioner's indicator is within its acceptable range after installation.
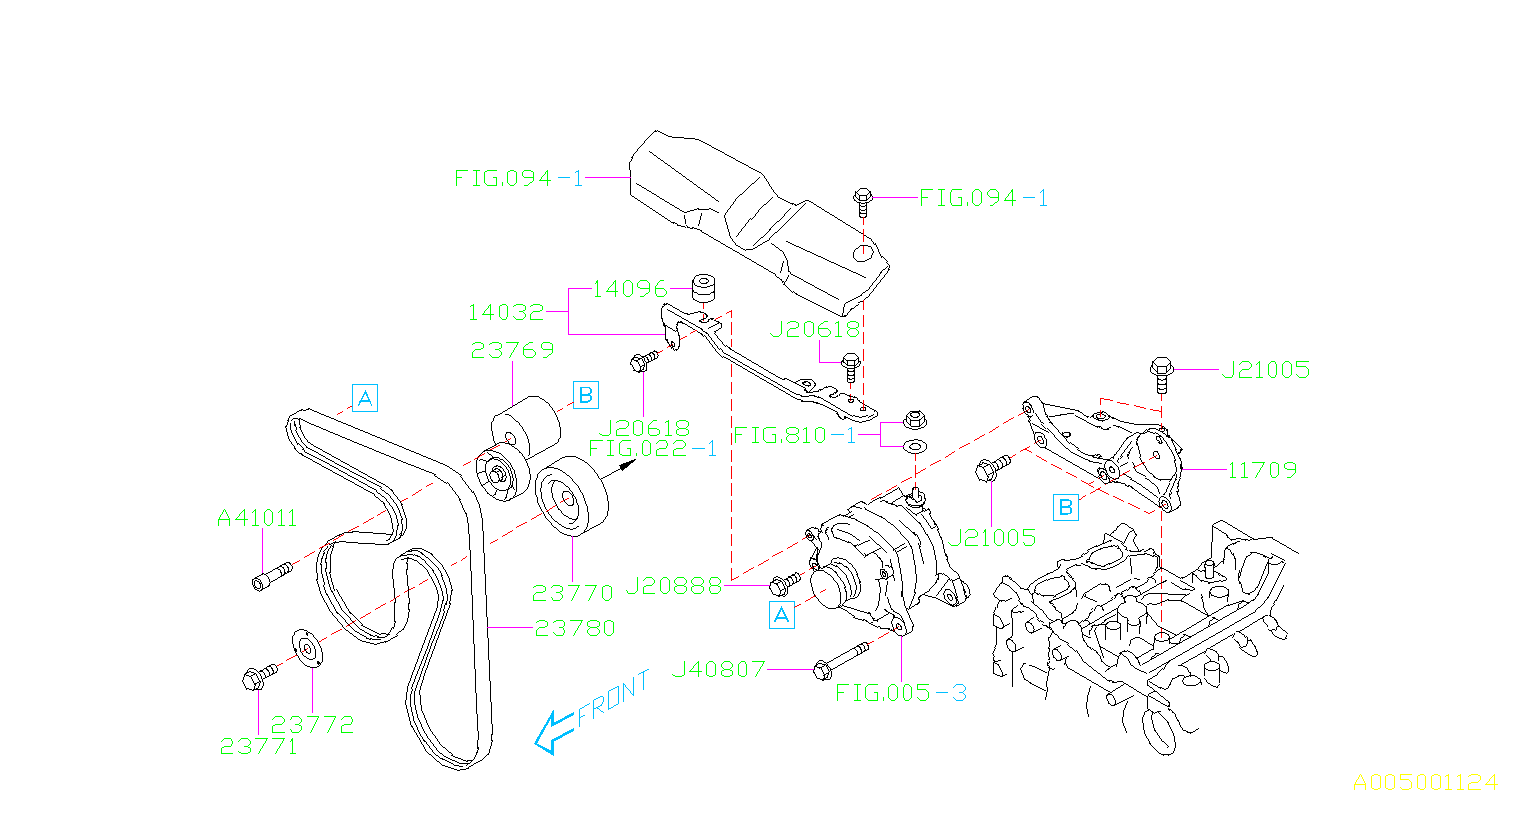
Symbols – Interpreting the Diagram
Serpentine belt diagrams aren't overly complex, but understanding the symbols is key. Here's a typical breakdown:
- Solid Lines: Represent the belt itself and its path around the pulleys. The thickness of the line doesn't usually have any specific meaning.
- Circles or Ovals: Indicate the various pulleys. The component name (e.g., "Alternator," "AC Compressor") is usually labeled next to each circle.
- Arrows: Show the direction of rotation for each pulley. This is vital for ensuring the belt is routed correctly. Incorrect rotation can damage components.
- Tensioner Symbol: Often represented by a spring symbol or a labeled "Tensioner Pulley" indicator.
- Dotted Lines (Less Common): Might indicate the rear side of the belt where it wraps around a pulley. This helps to differentiate between the front and back sides of the belt in complex routing situations.
How It Works
The serpentine belt system is fairly simple in concept. The crankshaft pulley, driven by the engine's rotation, provides the power. The belt transfers this rotational force to the various accessory pulleys. The order of the pulleys is specifically designed to ensure each component receives the necessary power. The tensioner pulley maintains consistent belt tension, preventing slippage and ensuring optimal performance. A properly tensioned belt provides peak performance and reduced wear. If the belt is too loose, it slips, reducing accessory performance and generating excessive heat. Too tight, and it can overstress the bearings in the accessories and shorten the belt's lifespan.
Real-World Use – Basic Troubleshooting Tips
Here are a few common problems and how the serpentine belt diagram can help you diagnose them:
- Squealing Noise: Often indicates a loose belt or worn belt. Consult the diagram to check the tensioner and ensure it's operating correctly. Look for cracks, glazing, or missing chunks on the belt.
- Accessory Malfunction (e.g., weak AC, poor power steering): Could be due to a slipping belt. Again, check the tensioner. Verify the belt is routed correctly around all the relevant pulleys using the diagram.
- Belt Breaking Prematurely: Misalignment is a common culprit. The diagram helps you visually inspect the alignment of each pulley. A straightedge can also be used to verify that the pulleys are in line. Damaged or seized pulleys can also cause belt failure.
- Visual Inspection using the diagram: Follow the belt diagram and inspect each pulley as you go. Look for signs of rust or corrosion on the pulleys that could damage the belt.
Safety – Highlighting Risky Components
Working on the serpentine belt system involves inherent risks. Always disconnect the negative battery cable before starting any work to prevent accidental starting of the engine. The following components present specific hazards:
- Moving Parts: Never work on the serpentine belt system while the engine is running. Keep hands and tools clear of all pulleys and the belt itself.
- Tensioner: The tensioner spring can be very strong. Use the correct tools (usually a breaker bar and socket) to relieve tension. Improper handling can result in serious injury.
- Hot Engine: Allow the engine to cool completely before working on the serpentine belt system to avoid burns.
Always refer to your vehicle's service manual for specific instructions and torque specifications. This guide provides a general overview, but your manual contains crucial information tailored to your 2015 Subaru Impreza.
We have the serpentine belt diagram file available for download. Please contact us through the form below to request the document. Providing the correct information will ensure you receive the proper diagram version.