2015 Toyota Corolla Serpentine Belt Diagram
The serpentine belt in your 2015 Toyota Corolla is a critical component responsible for powering several vital accessories. Understanding its routing and condition is essential for preventative maintenance, diagnosing issues, and performing repairs. This article provides a detailed breakdown of the 2015 Toyota Corolla serpentine belt diagram, empowering you with the knowledge to confidently work on your vehicle.
Purpose of the Serpentine Belt Diagram
A serpentine belt diagram isn't just a pretty picture; it's a crucial tool for several reasons:
- Repair and Replacement: The primary purpose is to guide you when replacing a worn or broken serpentine belt. Incorrect routing can lead to severe damage to your accessories.
- Troubleshooting: The diagram helps you understand the belt's path and identify which accessories it drives. This assists in diagnosing issues related to specific components, such as a failing alternator or power steering pump.
- Preventative Maintenance: By knowing the belt's path, you can visually inspect it for signs of wear and tear, such as cracks, fraying, or glazing. Early detection allows for timely replacement, preventing breakdowns.
- Understanding Vehicle Systems: Studying the diagram provides a clearer understanding of how different systems in your car are interconnected and powered.
Key Specs and Main Parts
While exact belt length varies slightly depending on the specific engine configuration in your 2015 Corolla, they generally fall within a common range. Consult your vehicle's owner's manual or a reliable parts catalog for the exact specification for your specific engine (e.g., 1.8L 2ZR-FE). Knowing the precise length is crucial for purchasing the correct replacement.
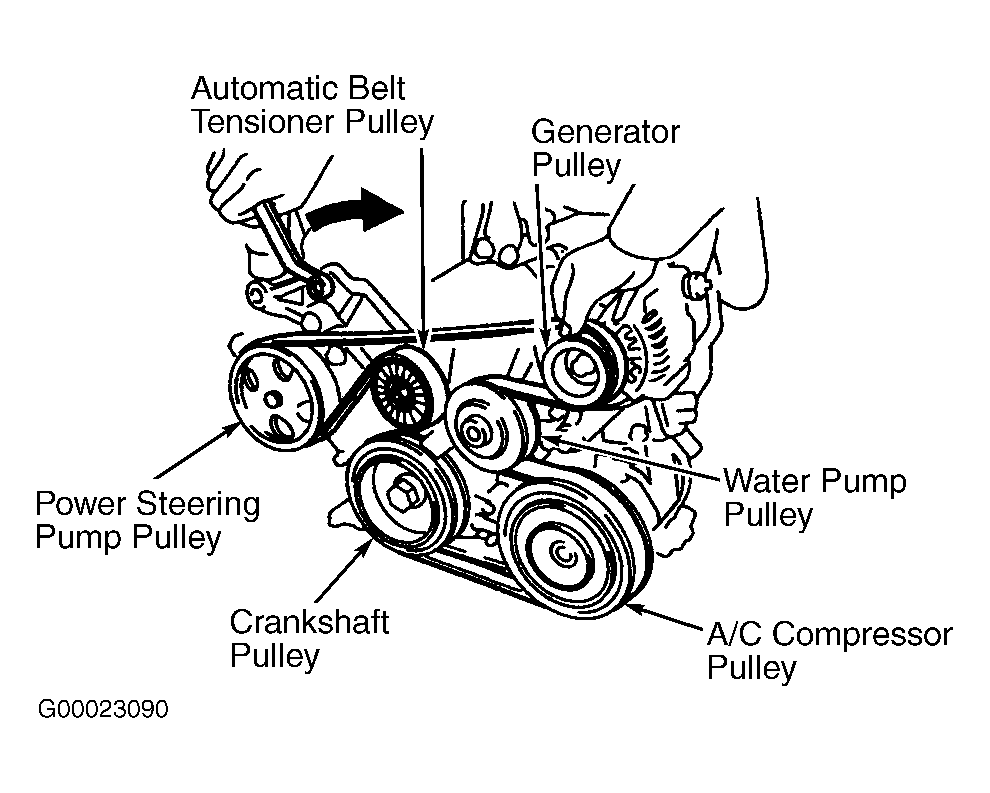
The main components involved in the serpentine belt system include:
- Serpentine Belt: The main driver of all accessories. It's typically made of reinforced rubber.
- Crankshaft Pulley (Crank Pulley): Driven directly by the engine's crankshaft, it's the starting point for the belt's rotation.
- Alternator Pulley: Powers the alternator, which charges the battery and provides electrical power to the car.
- Power Steering Pump Pulley: Drives the power steering pump, providing hydraulic assistance for steering.
- Air Conditioning Compressor Pulley: Engages the air conditioning compressor, cooling the cabin.
- Water Pump Pulley: (On some Corolla configurations) Drives the water pump, circulating coolant to regulate engine temperature. In other configurations, the water pump may be driven by the timing chain instead.
- Tensioner Pulley: This spring-loaded pulley maintains proper tension on the serpentine belt, preventing slippage and ensuring efficient operation. It's critical for belt longevity.
- Idler Pulley(s): Smooth, non-driven pulleys that guide the belt around the engine and ensure proper wrap angle on the other pulleys.
Symbols and Diagram Interpretation
Serpentine belt diagrams use specific conventions to convey information clearly. Understanding these symbols is crucial for accurate interpretation:
- Solid Lines: Represent the primary path of the serpentine belt. Follow these lines closely when routing the belt.
- Dashed Lines: May indicate the path of the belt *behind* other components for visual clarity. They are not a separate belt.
- Arrows: Indicate the direction of rotation for each pulley. Pay attention to these, as incorrect routing can cause accessories to spin in the wrong direction, damaging them.
- Pulley Symbols: Each pulley is represented by a circle. Annotations or labels next to the circle identify the component it drives (e.g., "ALT" for alternator, "P/S" for power steering).
- Tensioner Symbol: The tensioner pulley is often marked with a unique symbol, often including an arrow indicating the direction of its movement when releasing or applying tension.
- Color Coding: While not always present, some diagrams may use colors to differentiate between different sections of the belt's path or to highlight specific components. Refer to the diagram's key if colors are used.
How It Works
The serpentine belt system is a closed-loop system. The crankshaft pulley, driven by the engine, provides the rotational force. The serpentine belt wraps around this pulley and transfers the force to all other accessory pulleys. The tensioner pulley is crucial for maintaining the appropriate amount of tension on the belt. Too little tension leads to slippage and reduced performance, while too much tension can damage bearings and shorten the belt's lifespan.
When the engine is running, the crankshaft pulley rotates, driving the serpentine belt. The belt, in turn, spins the pulleys connected to the alternator, power steering pump, air conditioning compressor, and, in some cases, the water pump. Each of these components performs its specific function, powered by the belt's rotation.
Real-World Use and Basic Troubleshooting Tips
Here are some practical tips for using the serpentine belt diagram in real-world scenarios:
- Belt Squealing: A common symptom of a loose or worn serpentine belt. Check the tensioner pulley and belt condition. A glazed belt surface can also cause squealing.
- Accessory Malfunction: If a specific accessory, like the alternator or power steering pump, is not functioning correctly, use the diagram to confirm the belt is properly routed and has adequate tension. Slippage on a particular pulley could be the culprit.
- Visual Inspection: Regularly inspect the belt for cracks, fraying, missing chunks, or excessive wear. Replace the belt if any of these signs are present.
- Tensioner Check: Ensure the tensioner pulley moves freely and maintains consistent tension. A failing tensioner can cause belt slippage and premature wear. Look for excessive bouncing or noise from the tensioner.
- Document Before Disassembly: Before removing the old belt, take a picture or make a sketch of the belt's routing. This will be invaluable when installing the new belt.
Safety Precautions
Working on the serpentine belt system involves certain risks. Prioritize safety by following these guidelines:
- Disconnect the Battery: Before working on any part of the engine, disconnect the negative battery terminal to prevent accidental electrical shocks or damage.
- Hot Engine: Never work on the serpentine belt system when the engine is hot. Allow the engine to cool completely before proceeding.
- Moving Parts: Be extremely cautious around the serpentine belt while the engine is running. Keep your hands, clothing, and tools clear of the belt and pulleys.
- Tensioner Spring: The tensioner pulley is spring-loaded and can snap back with considerable force. Use the correct tools to release the tension and avoid injury.
- Eye Protection: Wear safety glasses to protect your eyes from debris.
The alternator is a potentially risky component due to the high voltage it generates. Avoid touching any exposed terminals or wiring while the engine is running or the battery is connected.
By carefully studying the serpentine belt diagram and following these guidelines, you can confidently and safely maintain and repair the serpentine belt system on your 2015 Toyota Corolla. Remember to always consult your vehicle's repair manual for specific instructions and torque specifications.
We have the 2015 Toyota Corolla Serpentine Belt Diagram file ready for you to download. Contact us for immediate access.