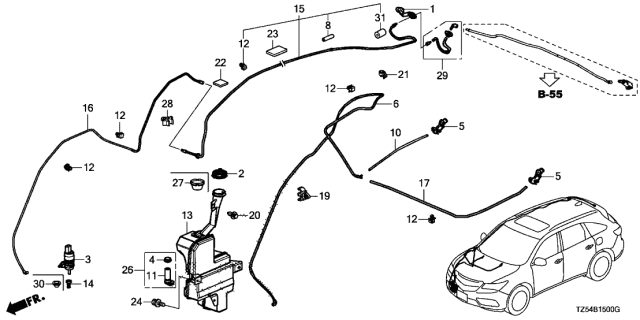
2016 Acura Mdx Windshield Washer Fluid Line Diagram
Okay, so you're diving into the windshield washer system of your 2016 Acura MDX. Smart move! Understanding this system, especially having access to the fluid line diagram, can save you a bundle on repairs and even help you diagnose other related issues. This article is designed to guide you through that diagram and explain the workings of the washer system. We've got the complete diagram available for download (link below), so you can follow along.
Purpose of Understanding the Windshield Washer System
Why bother understanding the windshield washer fluid lines? There are several key reasons:
- Troubleshooting Leaks: Pinpointing the source of a leak is much easier with a visual map of the system. You can quickly identify potential culprits like cracked hoses or faulty connectors.
- Repairing Damage: If a hose gets damaged (say, by a rodent or accident), the diagram shows you exactly where it goes and how it's connected. This is crucial for replacing it correctly.
- Preventive Maintenance: Knowing the components helps you inspect them regularly for wear and tear, preventing future breakdowns.
- Customization/Modification: If you're thinking about adding features like heated nozzles or different types of fluid, the diagram is essential for planning your modifications.
- General Knowledge: Simply knowing how your car works empowers you to make informed decisions about its care and maintenance.
Key Specs and Main Parts of the 2016 Acura MDX Washer System
The windshield washer system in the 2016 Acura MDX is relatively straightforward, but it's important to know the main components:
- Washer Fluid Reservoir: This is the container that holds the washer fluid. Its capacity varies, but it's typically around 1.5 to 2 gallons. It's usually located in the engine bay, often near the fender well.
- Washer Pump(s): The MDX typically has at least one pump to supply fluid to both the windshield and the rear window (if equipped). Some models may even have a separate pump for headlight washers (if applicable). These are usually small electric pumps mounted directly to the reservoir.
- Washer Fluid Lines/Hoses: These are flexible tubes that carry the fluid from the reservoir to the nozzles. They are typically made of rubber or plastic.
- Washer Nozzles: These are the sprayers that direct the fluid onto the windshield or rear window. They can be adjustable to optimize the spray pattern.
- Check Valves: These small valves prevent fluid from flowing back into the reservoir when the pump is not running. This ensures that fluid is readily available at the nozzles when needed.
- Connectors and Fittings: These are the various clips and joints that connect the hoses to the pump, nozzles, and other components.
Decoding the Windshield Washer Fluid Line Diagram: Symbols, Lines and Colors
Understanding the symbols in the diagram is critical. While specific diagrams may vary slightly, here's a general guide:
- Solid Lines: These typically represent the washer fluid hoses themselves. Their thickness may indicate the hose diameter.
- Dashed Lines: These *can* indicate electrical wiring, but in *some* washer diagrams they might represent sections of the fluid line that are hidden or routed in a complex way. Refer to diagram notes to confirm
- Arrows: Arrows indicate the direction of fluid flow.
- Symbols for Components: Each component (reservoir, pump, nozzle, check valve) will have a specific symbol. Consult the legend of the diagram for a key to these symbols. Pump symbols, for example, may show a small motor driving a gear.
- Colors: *Some* diagrams might use colors to differentiate between lines supplying fluid to the front versus the rear windshield. For example, blue might be front, and green might be rear. However, don't rely *solely* on color without consulting the diagram's legend. Color coding is not always consistent across all diagrams.
- Ground Symbols: If the diagram shows any electrical components (like the washer pump), it will include a ground symbol (usually a series of descending lines or a triangle) indicating where the component is grounded to the vehicle's chassis.
Important: Always refer to the legend or key that accompanies the diagram for a definitive explanation of the symbols used.
How the Washer System Works: A Step-by-Step Overview
The windshield washer system works as follows:
- The driver activates the system by pulling the windshield washer stalk or pressing a button on the steering wheel.
- This sends an electrical signal to the washer pump.
- The washer pump draws fluid from the reservoir.
- The pump pushes the fluid through the hoses.
- Check valves, if present, ensure that the fluid flows only towards the nozzles.
- The fluid is sprayed onto the windshield (or rear window) through the nozzles.
- The windshield wipers then clear the fluid and any debris from the glass.
Real-World Use: Basic Troubleshooting Tips
Here are some common problems you might encounter and how the fluid line diagram can help:
- No Fluid Spraying: Check the reservoir level first! If that's okay, use the diagram to trace the lines from the pump to the nozzles. Look for kinks, cracks, or disconnections. A multimeter can verify power to the pump when activated. If the pump isn't receiving power, check the fuse.
- Weak Spray: This could be a clogged nozzle. Try cleaning the nozzle with a small needle or pin. If that doesn't work, check for leaks in the lines or a failing pump. The diagram can help you find these potential leak points. Check valve malfunctions can also cause weak spray.
- Fluid Leaking: The diagram allows you to trace the entire system to pinpoint the leak. Common leak locations are around the reservoir, pump connections, hose connections, and nozzles.
- Pump Runs But No Fluid: This suggests the pump might be running "dry" (perhaps the pickup tube inside the reservoir has come loose), a clogged filter inside the reservoir (if equipped), or a severely blocked line. Use the diagram to confirm the pump is connected to the correct line and that there are no obvious obstructions.
Safety Considerations
While the windshield washer system isn't typically considered a high-risk area, here are a few safety points to keep in mind:
- Electrical Components: The washer pump is an electrical component. Disconnect the negative battery terminal before working on the electrical connections to prevent short circuits or electrical shock.
- Washer Fluid: Avoid getting washer fluid in your eyes or ingesting it. Most washer fluids contain methanol, which is toxic. Wash your hands thoroughly after working with washer fluid.
- Hot Engine: Allow the engine to cool down completely before working on the washer system, especially if the reservoir is located near hot engine components.
- Sharp Edges: Be careful of sharp edges on the vehicle's body panels when working in the engine bay.
Download the Diagram
To help you get started, we've got the complete 2016 Acura MDX windshield washer fluid line diagram ready for you to download. Having this visual aid will significantly simplify your troubleshooting and repair tasks. Click the link below to access the file.
[Diagram Download Link Placeholder - Imagine a functional link here]
By using this article and the downloadable diagram, you'll be well-equipped to tackle most windshield washer system issues on your 2016 Acura MDX. Remember to always prioritize safety and consult a qualified mechanic if you're unsure about any procedure.