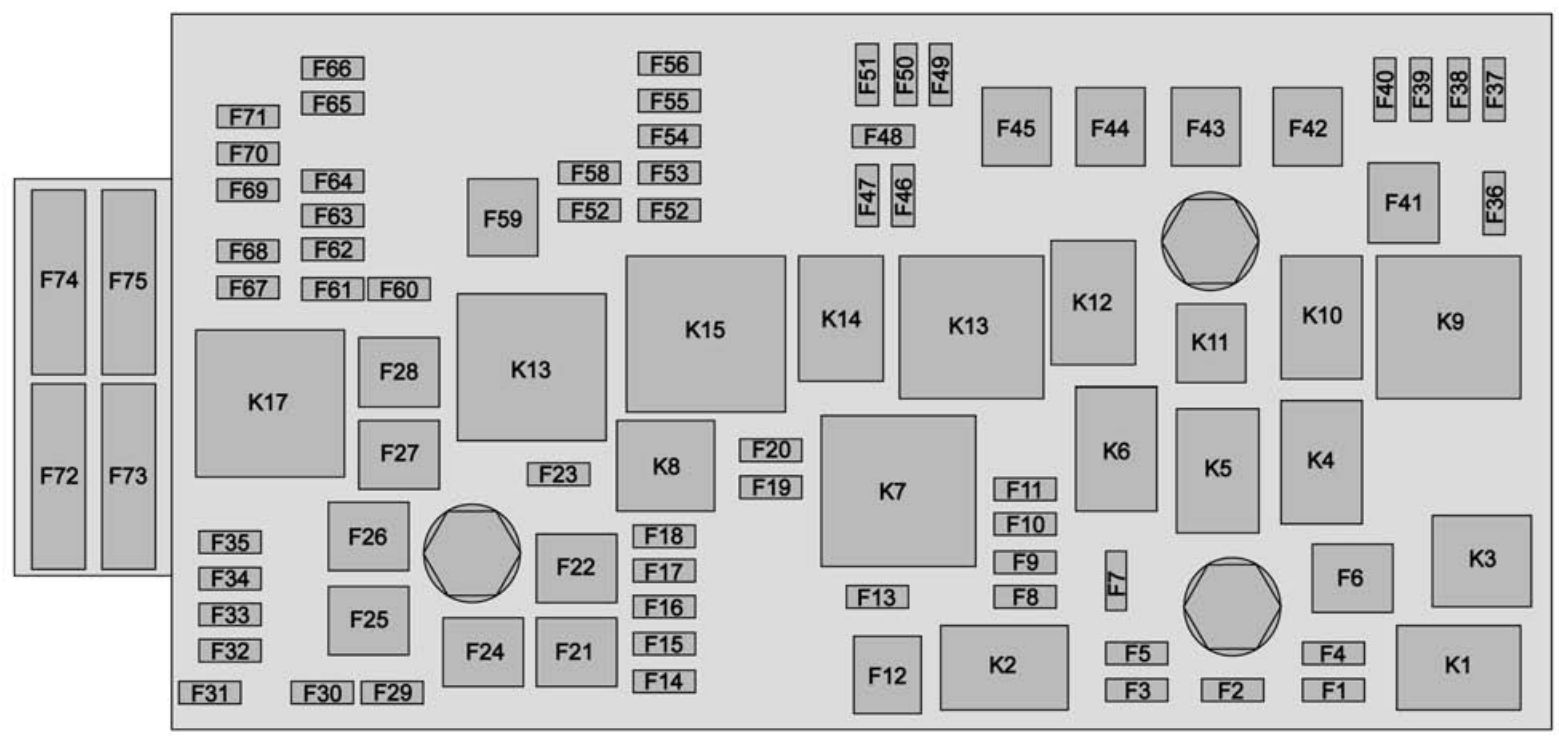
2016 Chevy Colorado Fuse Box Diagram
The 2016 Chevy Colorado is a versatile and reliable mid-size truck, but like any vehicle, electrical issues can arise. Understanding your truck's fuse box diagram is crucial for diagnosing and resolving these problems quickly and efficiently. This article will serve as a comprehensive guide to the 2016 Colorado's fuse box, covering its purpose, key components, symbols, operation, real-world use cases, and essential safety precautions. We will also let you know where you can download the diagram to keep handy!
Purpose of the Fuse Box Diagram
The fuse box diagram is essentially a map of your truck's electrical system. It identifies the location of each fuse and relay, along with the specific circuit each protects. Knowing this information is invaluable for several reasons:
- Troubleshooting Electrical Problems: When a component stops working (e.g., headlights, radio, power windows), the first step is usually to check the corresponding fuse. The diagram allows you to quickly locate the correct fuse and determine if it's blown.
- Performing Modifications: If you're adding aftermarket accessories like a winch, auxiliary lights, or a new stereo system, you'll need to tap into the truck's electrical system. The diagram helps you identify suitable power sources and ensure you're protecting your new circuits with the correct fuses.
- Preventive Maintenance: Occasionally inspecting the fuses can help identify potential problems before they escalate. Corroded or loose fuses can cause intermittent issues or even damage to electrical components.
- General Understanding: Even if you're not actively working on your truck, understanding the fuse box layout gives you a better overall knowledge of its electrical system.
Key Specs and Main Parts
The 2016 Chevy Colorado typically has two main fuse box locations:
- Underhood Fuse Box: Located in the engine compartment, this fuse box houses fuses and relays for critical systems like the engine control module (ECM), starter, alternator, headlights, and other high-current components.
- Instrument Panel Fuse Box: Usually found inside the cab, often on the driver's side behind a panel or beneath the dashboard. This box protects circuits for interior features such as the radio, power windows, power locks, and climate control.
Key components within these fuse boxes include:
- Fuses: These are safety devices designed to protect electrical circuits from overcurrent. They contain a thin wire that melts and breaks the circuit if the current exceeds a predetermined level. Fuses are typically rated in Amperes (Amps), indicating the maximum current they can safely handle. The 2016 Colorado uses various fuse types, including blade fuses (ATO/ATC, Mini, Micro2) and potentially some cartridge fuses.
- Relays: Relays are electromechanical switches that control high-current circuits using a low-current signal. They are used to switch on components like the headlights, starter motor, and air conditioning compressor. A relay consists of a coil, a set of contacts (normally open or normally closed), and an armature.
- Circuit Breakers: Some circuits, particularly those for power windows or power seats, may be protected by circuit breakers. Unlike fuses, circuit breakers can be reset after tripping. They typically use a bimetallic strip that bends and opens the circuit when heated by excessive current.
- Jump Start Terminal (If Equipped): Some models may have a remote jump start terminal located near the underhood fuse box, providing a convenient point for connecting jumper cables.
Understanding Fuse Box Symbols
The fuse box diagram uses a variety of symbols to represent different components and circuits. It's important to understand these symbols to correctly identify the fuse or relay you're looking for.
- Lines: Solid lines typically represent the wiring harness and the connections between components. Dashed lines may indicate ground connections or shielded wires.
- Colors: Wire colors are often indicated on the diagram to help you trace circuits. Common colors include red (power), black (ground), yellow, blue, and green. These can vary by trim and specific vehicle build.
- Icons: Specific icons represent different components. Examples include:
- Headlight icon: Represents the headlight circuit.
- Radio icon: Represents the radio circuit.
- Window icon: Represents the power window circuit.
- Engine icon: Represents engine-related circuits (ECM, fuel pump, etc.).
- Relay symbol (usually a square with a diagonal line): Represents a relay.
- Numerical Labels: Each fuse and relay is typically labeled with a number or code that corresponds to the diagram. This is the most important information for identifying the correct component.
The diagram will also list the Amperage (A) rating of each fuse, crucial for replacing a blown fuse with the correct type. Never use a fuse with a higher amperage rating than specified, as this can damage the circuit and create a fire hazard.
How It Works: Fuse Box in Operation
The fuse box acts as a central distribution point for electrical power throughout the vehicle. Power from the battery is routed through the fuse box, where it's distributed to various circuits, each protected by a fuse or circuit breaker. When a component is switched on, current flows through its corresponding circuit. If a fault occurs in the circuit, such as a short circuit or an overload, the current will increase dramatically. This excessive current will cause the fuse to blow or the circuit breaker to trip, interrupting the flow of electricity and preventing damage to the component and wiring.
Relays are used to switch high-current circuits on and off using a low-current signal. For example, the headlight switch may control a relay that then switches on the high-current headlight circuit. This allows the headlight switch to be smaller and handle less current, reducing the risk of overheating and damage.
Real-World Use: Basic Troubleshooting Tips
Here's a basic troubleshooting process using the fuse box diagram:
- Identify the Problem: Determine which component isn't working (e.g., the radio, headlights, power windows).
- Consult the Diagram: Locate the fuse box diagram (either printed or downloaded). Identify the fuse or relay associated with the non-functional component.
- Inspect the Fuse: Remove the fuse using a fuse puller (usually located in the fuse box itself). Visually inspect the fuse. A blown fuse will have a broken filament. You can also use a multimeter to test the fuse for continuity. A working fuse will show continuity (a reading of near zero ohms).
- Replace the Fuse (if blown): Replace the blown fuse with a new fuse of the exact same amperage rating. Do not use a fuse with a higher amperage rating.
- Test the Component: After replacing the fuse, test the component to see if it's now working.
- If the Fuse Blows Again: If the new fuse blows immediately or shortly after replacement, there's likely a more serious problem in the circuit, such as a short circuit. This requires further diagnosis by a qualified mechanic.
- Check Relays (if necessary): If the fuse is good but the component still doesn't work, the relay may be faulty. Relays can be tested using a multimeter or by swapping them with a known good relay of the same type.
Safety Precautions
Working with electrical systems can be dangerous. Always follow these safety precautions:
- Disconnect the Battery: Before working on any electrical components, disconnect the negative battery cable to prevent accidental short circuits.
- Use the Right Tools: Use insulated tools specifically designed for automotive electrical work.
- Avoid Water: Never work on electrical components in wet conditions.
- Be Aware of High-Current Circuits: Components like the starter motor and alternator are connected to high-current circuits. Exercise extreme caution when working near these components.
- Never Bypass a Fuse: Never bypass a fuse by using a wire or other conductive material. This can cause serious damage and create a fire hazard.
- Proper Fuse Replacement: Always replace a blown fuse with one of the correct amperage. An underrated fuse will simply blow again. An overrated fuse will not provide sufficient protection and damage to expensive equipment may occur.
High-current circuits, like the starter and alternator, demand extra caution. Never directly short these circuits, as this can cause sparks, fires, and potential injury.
Understanding your 2016 Chevy Colorado's fuse box and practicing safe electrical troubleshooting will save you time, money, and frustration. Keep this guide handy, and you'll be well-equipped to handle common electrical issues.
We have the complete 2016 Chevy Colorado Fuse Box Diagram available for download. You can access it by clicking here.