2016 Chevy Colorado Serpentine Belt Diagram
Alright, let's dive into the serpentine belt system of the 2016 Chevy Colorado. This article is designed to be your comprehensive guide to understanding the belt routing, troubleshooting common issues, and maintaining this crucial component of your truck. Whether you're planning a belt replacement, diagnosing a squealing noise, or just looking to better understand your vehicle, this information will be invaluable.
Purpose of the Serpentine Belt Diagram
The serpentine belt diagram is absolutely essential for several reasons:
- Proper Belt Routing: First and foremost, it shows you the correct path the serpentine belt must take around all the pulleys. An incorrectly routed belt will not only fail to properly drive the accessories, but can also quickly damage the belt itself.
- Repairs and Maintenance: When replacing the belt, water pump, power steering pump, alternator, or any other component driven by the serpentine belt, the diagram is your go-to reference for reinstalling everything correctly.
- Troubleshooting: The diagram allows you to visually inspect the belt's path for potential issues, like misalignment or worn pulleys, which might be causing problems like squealing, power loss, or component failure.
- Learning and Understanding: Even if you're not actively working on your Colorado, understanding the system can deepen your knowledge of how your engine operates.
Key Specs and Main Parts of the 2016 Colorado Serpentine Belt System
The 2016 Colorado, depending on the engine, has slight variations in the layout. However, the main components and principles remain the same. We'll cover both the 2.5L I4, the 3.6L V6 and the 2.8L Duramax Diesel.
Common Components:
- Serpentine Belt: This is the main rubber belt that transmits power from the crankshaft pulley to all the accessory pulleys. Specific belt length is crucial and depends on the engine configuration (with or without AC, etc.). Using the wrong belt length can lead to tensioner issues or accessory malfunctions.
- Crankshaft Pulley (Harmonic Balancer): This pulley, connected directly to the crankshaft, is the driving force behind the entire serpentine system. It converts the engine's rotational energy into the belt's motion.
- Alternator Pulley: The alternator charges the battery and powers the electrical system. Its pulley receives power from the belt.
- Water Pump Pulley: The water pump circulates coolant to keep the engine from overheating.
- Power Steering Pump Pulley: Powers the hydraulic system that assists steering.
- Air Conditioning Compressor Pulley (if equipped): Operates the A/C system.
- Idler Pulley(s): These smooth, usually plastic or metal pulleys serve to guide the belt around the system, preventing it from rubbing against other components and maintaining the correct wrap angle on the driven pulleys.
- Tensioner Pulley: This spring-loaded pulley maintains constant tension on the serpentine belt. A failing tensioner is a common cause of belt squealing and premature belt wear. The tensioner is critical for proper operation of all accessories.
Engine Specifics:
- 2.5L I4: Generally a simpler layout. Look for alternator, water pump, and tensioner.
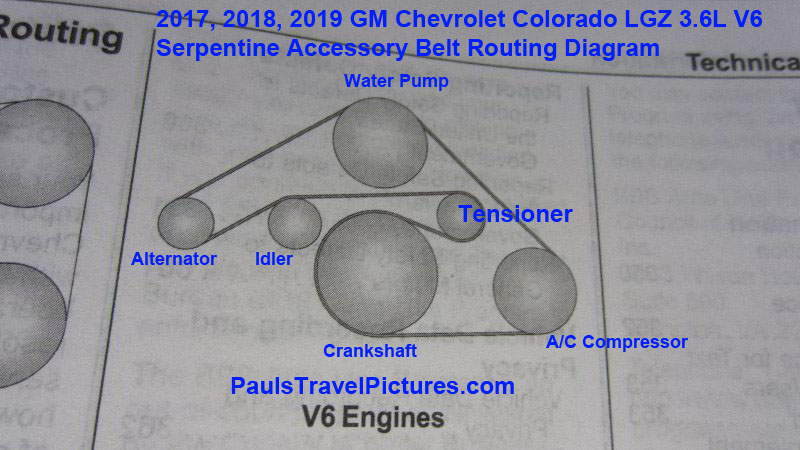
- 3.6L V6: More complex, often including power steering and air conditioning, plus more idler pulleys. Pay close attention to the routing around the crank pulley.
- 2.8L Duramax Diesel: The diesel engine layout includes a vacuum pump and specific routing dictated by its larger size and increased power demands.
Understanding the Diagram Symbols
Serpentine belt diagrams use specific symbols to represent the components and belt routing. Here's a breakdown:
- Solid Lines: These represent the belt itself. The thickness of the line doesn't typically indicate anything special.
- Arrows: Indicate the direction of belt travel. Follow these arrows meticulously to ensure proper routing.
- Circles: Represent pulleys. The size of the circle doesn't necessarily correspond to the actual pulley size.
- Component Labels: Abbreviations are used to identify each component. Look for labels like "ALT" (alternator), "WP" (water pump), "PS" (power steering), "AC" (air conditioning), "CRANK" (crankshaft pulley), "IDLER," and "TENSIONER."
- Dashed Lines or Shading: Sometimes used to indicate the backside of the belt making contact with a pulley, particularly idler pulleys. This is crucial for understanding the overall path.
How the Serpentine Belt System Works
The serpentine belt system is a closed-loop system driven by the engine's crankshaft. The crankshaft pulley rotates, transferring its rotational energy to the serpentine belt. The belt, in turn, drives all the accessory pulleys connected to it.
The tensioner plays a crucial role in maintaining the optimal grip between the belt and the pulleys. Too little tension and the belt will slip, causing squealing and reducing the efficiency of the accessories. Too much tension and it can overstress the belt and pulley bearings, leading to premature failure.
The path the belt takes is carefully designed to ensure that each accessory receives the necessary power and that the belt has adequate wrap around each pulley to prevent slippage. The idler pulleys guide the belt along this optimized path.
Real-World Use and Basic Troubleshooting
Here are some common issues and how to troubleshoot them using the serpentine belt diagram:
- Squealing Noise: A common symptom. First, visually inspect the belt for cracks, fraying, or glazing. If the belt looks good, the tensioner might be weak or the pulleys could be misaligned. Use the diagram to check the belt's path and look for any signs of wobble or runout in the pulleys. A small amount of belt dressing can temporarily alleviate squealing, but it's a band-aid solution. Addressing the root cause is crucial.
- Belt Slipping: Symptoms can include dimming headlights, poor A/C performance, or stiff steering. Check the belt tension. If the tensioner is working correctly, look for a worn or glazed belt. Also, check the pulleys for grease or oil contamination, which can cause the belt to slip.
- Belt Breaking: A broken belt is a serious problem, as it will immediately disable all the accessories. Causes can include a seized pulley (like the alternator or water pump), excessive belt wear, or a failing tensioner. After replacing the belt, thoroughly inspect all the pulleys to ensure they spin freely and don't have excessive play.
- Component Failure: If an accessory fails (e.g., alternator stops charging, water pump leaks), inspect the serpentine belt system. A failing accessory can put excessive strain on the belt, leading to premature wear or failure. Conversely, a slipping belt can prevent the accessory from operating correctly.
Safety Precautions
Working on the serpentine belt system involves inherent risks:
- Hot Engine: Never work on the serpentine belt system immediately after the engine has been running. Allow the engine to cool down completely to avoid burns.
- Moving Parts: Never put your hands or tools near the serpentine belt while the engine is running. The rotating belt and pulleys can cause serious injury.
- Battery Disconnect: Before working on any electrical components (like the alternator), disconnect the negative battery cable to prevent short circuits and electrical shocks.
- Tensioner Spring: The tensioner pulley is spring-loaded and can snap back with considerable force when released. Use the correct tools and techniques to relieve the tension safely. Always wear safety glasses.
- Cooling System: If you're replacing the water pump, be prepared to drain and handle coolant. Dispose of used coolant properly. It is poisonous to animals and humans.
By carefully following the diagram, taking the necessary safety precautions, and understanding the function of each component, you can successfully troubleshoot and maintain the serpentine belt system on your 2016 Chevy Colorado.
We have the serpentine belt diagram available for download. It includes detailed routing for all engine options. This diagram will be invaluable for your maintenance and repair work. Please reach out, and we will get the diagram to you immediately.