2016 Chevy Traverse 3.6 Serpentine Belt Diagram
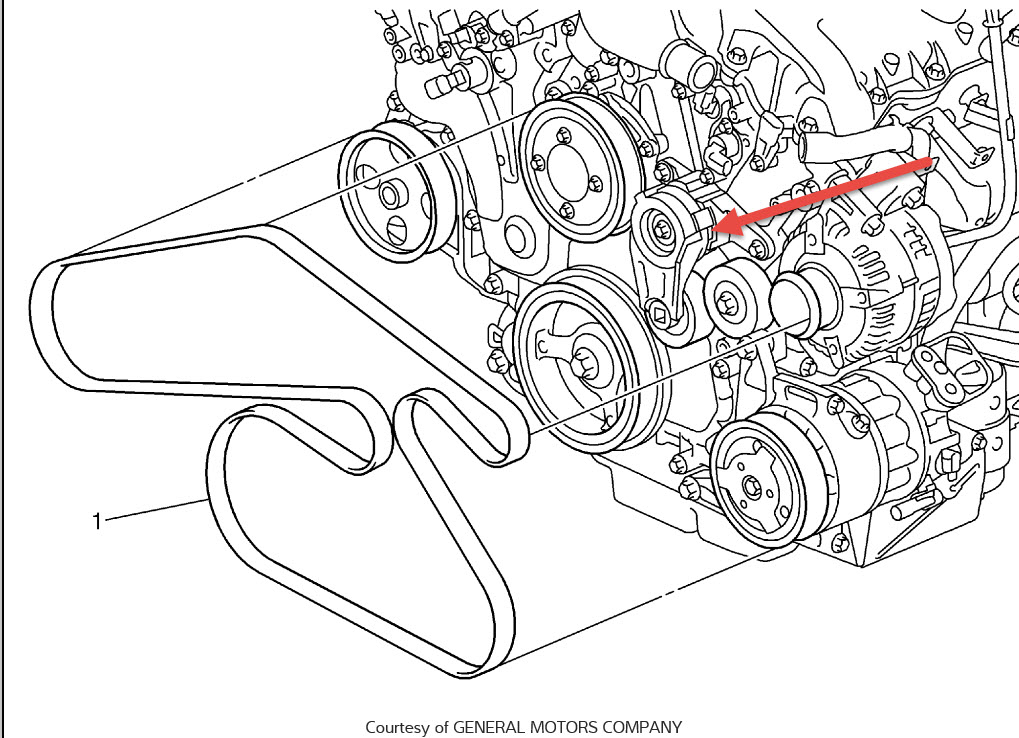
Alright, let's dive into the serpentine belt diagram for your 2016 Chevy Traverse equipped with the 3.6L engine. Understanding this diagram is crucial whether you're planning on replacing the belt yourself, diagnosing a squealing noise, or simply want a better grasp of how your engine's accessories are driven. We'll break down the diagram piece by piece, explain the key components, and offer some practical troubleshooting tips.
Why This Diagram Matters
The serpentine belt is the unsung hero of your engine bay. It's a single, continuous belt that drives multiple engine accessories. This diagram is your roadmap to understanding how that belt snakes its way around these components. Knowing its path is critical for:
- Belt Replacement: Installing the new belt correctly is essential. An incorrectly routed belt can lead to accessory failure and potential engine damage.
- Troubleshooting: A squealing belt can indicate a worn belt, a misaligned pulley, or a failing accessory. The diagram helps you identify the components in the belt's path and inspect them systematically.
- Preventative Maintenance: Regular inspection of the belt and its tensioner helps prevent unexpected breakdowns. Knowing the belt's routing makes this inspection easier and more thorough.
- General Understanding: For the DIY enthusiast, understanding the serpentine belt system provides a deeper appreciation for how your engine functions.
Key Specs and Main Parts
Before we examine the diagram, let's define the core components:
- Crankshaft Pulley (Harmonic Balancer): This is the main driving force of the system. The engine's crankshaft rotates this pulley, which then transfers power to the serpentine belt.
- Alternator Pulley: The alternator generates electrical power for the vehicle. The serpentine belt spins this pulley to drive the alternator.
- Power Steering Pump Pulley: The power steering pump provides hydraulic assistance for steering. The serpentine belt drives this pump.
- Air Conditioning (A/C) Compressor Pulley: The A/C compressor is responsible for cooling the cabin air. It's driven by the serpentine belt.
- Water Pump Pulley: The water pump circulates coolant throughout the engine to prevent overheating. The serpentine belt spins this pulley.
- Idler Pulley(s): These are smooth pulleys that guide the belt and maintain proper tension. They don't drive any accessories.
- Belt Tensioner: This spring-loaded device applies constant tension to the serpentine belt, preventing slippage. A failing tensioner is a common cause of belt squealing and premature wear. The tensioner is critical for proper operation.
The 2016 Chevy Traverse 3.6L typically uses a multi-ribbed serpentine belt, often referred to as a "multi-V" belt. The ribs provide increased surface area for better grip and power transfer.
Diagram Symbols Explained
Serpentine belt diagrams are usually straightforward, but understanding the symbols is essential:
- Solid Lines: These represent the belt itself, showing its path around the various pulleys.
- Arrows: These indicate the direction of belt rotation. Note that some pulleys will rotate clockwise, while others rotate counter-clockwise.
- Component Icons: Each pulley is represented by a simplified icon, often labeled with abbreviations like "ALT" for alternator, "P/S" for power steering, "A/C" for air conditioning, "W/P" for water pump, and "CRANK" for crankshaft.
- Tensioner Symbol: The tensioner is usually represented by a pulley symbol with an arrow indicating the direction it moves to apply tension. It may also have a spring symbol near it.
- "Smooth" vs "Grooved": The diagrams typically indicate which side of the belt is contacting each pulley. The outer (smooth) side of the belt typically contacts the idler pulley and the tensioner. The inner, ribbed side of the belt usually contacts the driving pulleys (alternator, A/C compressor, etc).
How It Works
The serpentine belt system is a closed-loop system. The crankshaft pulley, powered by the engine, initiates the movement. The belt then transfers this rotational force to all the other pulleys in its path. The tensioner ensures the belt remains taut, preventing slippage and maintaining optimal performance of the accessories. The order in which the belt runs around the pulleys is designed to maximize contact and minimize strain. The key is to understand the flow of power from the crankshaft to each accessory.
Real-World Use & Troubleshooting
Let's look at some common issues and how the diagram helps you diagnose them:
- Squealing Belt: This is often caused by a worn belt, a glazed belt, a misaligned pulley, or a failing tensioner. The diagram helps you identify the location of the tensioner and check its operation. You can also inspect the belt for cracks, fraying, or glazing.
Often, a simple visual inspection will reveal the culprit. - Accessory Failure: If an accessory (like the alternator or A/C compressor) stops working, the diagram helps you verify that the belt is properly routed and that the pulley is spinning. A frozen pulley can cause the belt to slip or even break.
- Belt Slippage: This can be caused by a worn belt, a loose tensioner, or excessive load on the accessories. The diagram allows you to inspect the belt path and ensure it's not obstructed or interfering with other components.
- Difficulty Installing a New Belt: Use the diagram as a reference when installing a new belt. Make sure the belt is properly seated in all the pulley grooves and that the tensioner is engaged correctly. Incorrect routing is a common mistake and can lead to serious problems.
Troubleshooting Steps:
- Visual Inspection: Start by visually inspecting the belt for wear and tear. Check for cracks, fraying, missing ribs, or signs of glazing.
- Tensioner Check: Inspect the tensioner for proper operation. The tensioner should move smoothly and apply consistent tension to the belt. If the tensioner is loose or wobbly, it needs to be replaced.
- Pulley Alignment: Use a straight edge to check the alignment of the pulleys. Misaligned pulleys can cause excessive belt wear and squealing.
- Accessory Function: With the engine running (exercise extreme caution!), observe the accessory pulleys to ensure they are spinning smoothly and without wobble.
Safety First!
Working on the serpentine belt system involves working near moving parts. Always disconnect the negative battery cable before working on the system to prevent accidental starting. Be extremely cautious when the engine is running. Keep your hands, tools, and clothing away from the moving belt and pulleys. The serpentine belt system components can become extremely hot, especially after prolonged use. Allow the engine to cool down before working on the system.
Special attention should be paid to the following components:
- Rotating Pulleys: Obvious, but crucial. Contact with a spinning pulley can cause serious injury.
- Belt Tensioner: The tensioner spring can be under significant pressure. Use the proper tools to relieve the tension when removing or installing the belt. Incorrect tool use could result in the tensioner snapping back unexpectedly.
Replacing the serpentine belt is a job that most DIYers can accomplish with the right tools and a bit of patience. The key is to follow the diagram carefully and double-check your work before starting the engine.
We have the full serpentine belt diagram for your 2016 Chevy Traverse 3.6L available for download. It provides a clear, visual reference to aid you in your maintenance and repair endeavors.