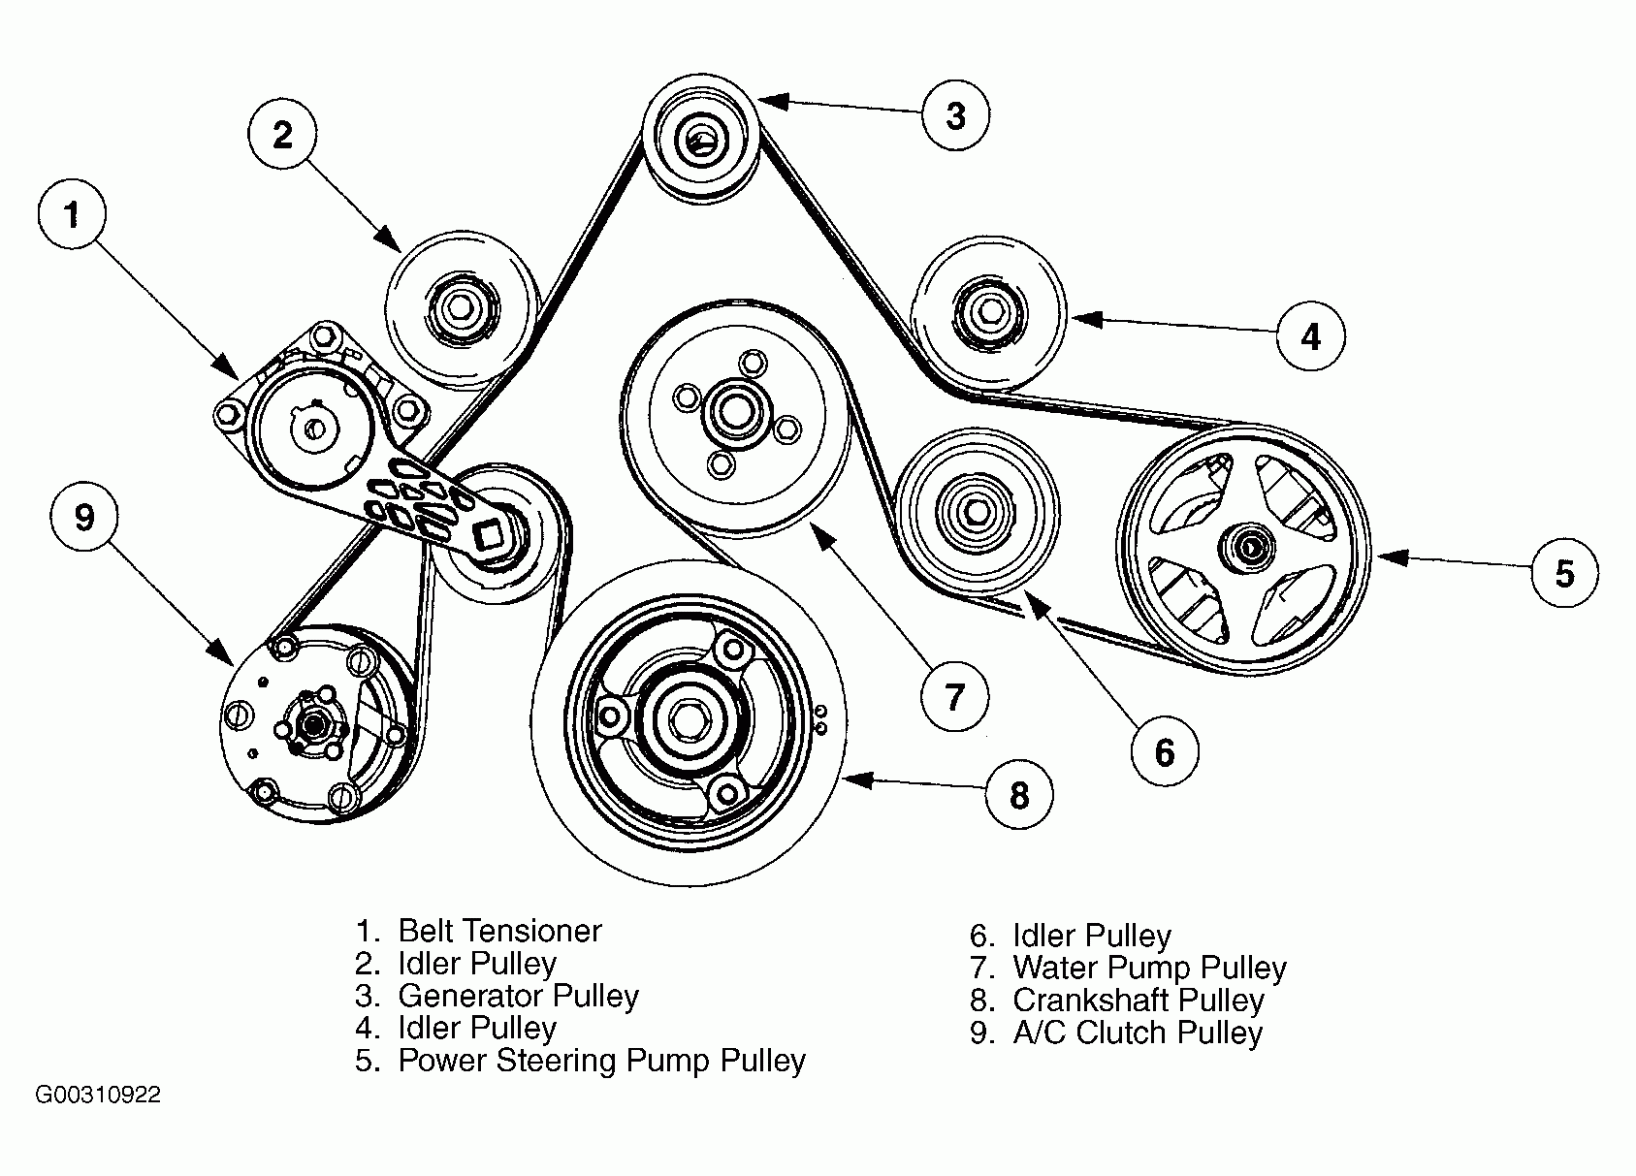
2016 Ford Explorer Serpentine Belt Diagram
The serpentine belt diagram for your 2016 Ford Explorer is an essential tool for any DIY mechanic or car owner who wants to understand, maintain, or repair their vehicle's accessory drive system. This article will provide a comprehensive breakdown of the diagram, explaining its purpose, key components, how it works, and offering practical troubleshooting advice.
Purpose of the Serpentine Belt Diagram
Why bother with a serpentine belt diagram? Simple. It's your roadmap to the accessory drive system. Specifically, having a diagram allows you to:
- Correctly Route the Belt: The most common reason for needing the diagram is when replacing the serpentine belt. A misrouted belt can lead to serious problems, including damage to accessories or the belt itself.
- Identify Components: The diagram clearly shows the location and names of each component in the system, like the alternator, power steering pump, A/C compressor, and idler pulleys.
- Troubleshoot Issues: By understanding the belt's path and the function of each component, you can more easily diagnose problems like squealing belts, power steering failure, or a dead battery.
- Perform Preventative Maintenance: Familiarity with the system helps you identify potential issues before they become major problems, allowing for proactive maintenance.
We have a downloadable version of the 2016 Ford Explorer Serpentine Belt Diagram available. Refer to the end of this article for information on how to access it.
Key Specs and Main Parts
The serpentine belt system on the 2016 Ford Explorer typically drives the following components:
- Crankshaft Pulley: This is the driving force behind the entire system. It receives power directly from the engine's crankshaft.
- Alternator: Charges the battery and provides electrical power to the vehicle's systems.
- Power Steering Pump: Provides hydraulic pressure to assist steering.
- A/C Compressor: Compresses refrigerant to cool the cabin.
- Water Pump: Circulates coolant throughout the engine to regulate temperature. Note: Some models may have a separate belt for the water pump.
- Idler Pulleys: These smooth, non-driven pulleys guide the belt and maintain optimal tension.
- Tensioner Pulley: This spring-loaded pulley maintains the correct tension on the belt, preventing slippage and ensuring proper operation of all accessories. The tensioner is *crucial* for proper belt function.
The specific configuration and belt length can vary slightly depending on the engine (3.5L V6, 2.3L EcoBoost, or 3.5L EcoBoost) and whether the vehicle is equipped with optional features. Therefore, consulting the correct diagram for *your specific engine* is crucial. These differences are often reflected in the belt's part number, which you should verify when purchasing a replacement.
Understanding the Symbols
The serpentine belt diagram utilizes standard symbols to represent the different components and the belt's path. Here's a breakdown:
- Solid Lines: Represent the path of the serpentine belt. The thicker the line, usually the more critical the path (but this is stylistic, not a hard rule).
- Circles: Indicate pulleys. Some circles may be labeled with abbreviations indicating their function (e.g., "ALT" for alternator, "P/S" for power steering).
- Arrows: Show the direction of rotation for each pulley. This is critical for understanding how the belt is routed.
- Tensioner Symbol: The tensioner pulley is often represented by a circle with an arrow indicating the direction of its spring-loaded movement. It may also be shaded or otherwise distinguished from the idler pulleys.
- Component Abbreviations: Standard abbreviations are used to identify each component, as mentioned above. Knowing these abbreviations is key to interpreting the diagram quickly.
Some diagrams may use color-coding to further differentiate components, but this is less common. The *most important* thing is to carefully follow the belt path and rotation arrows.
How It Works
The serpentine belt system is a relatively simple yet vital part of your Explorer. The crankshaft pulley, driven by the engine's rotation, transfers power to all the other pulleys via the serpentine belt. The belt is designed to grip the grooved pulleys, transferring rotational force to drive the accessories. The tensioner pulley maintains the correct amount of pressure on the belt to prevent slippage and ensure efficient operation of all components.
Think of it as a chain reaction. The engine turns the crankshaft, which turns the crankshaft pulley, which drives the serpentine belt, which then turns all the other pulleys attached to the accessories. If the belt is loose, worn, or improperly routed, the accessories won't function correctly.
Real-World Use and Troubleshooting
Here's how you can use the serpentine belt diagram for troubleshooting:
- Squealing Belt: A squealing belt is often a sign of slippage. Check the belt tension and condition. A worn or glazed belt may need replacement. Use the diagram to ensure the belt is properly routed and the tensioner is functioning correctly. If the tensioner arm bounces excessively, the tensioner itself might be failing.
- Accessory Failure: If you notice that your power steering isn't working, your A/C is blowing warm air, or your battery isn't charging, use the diagram to trace the belt's path to the corresponding accessory. A broken or slipped belt will prevent that accessory from operating.
- Belt Replacement: Before removing the old belt, carefully observe its path and compare it to the diagram. Take pictures or make a sketch to help you remember the routing. When installing the new belt, double-check the routing against the diagram to ensure it's correct. After installation, verify that the belt is properly seated in all the pulley grooves and that the tensioner is working correctly.
To release tension on the belt for removal or installation, use a serpentine belt tool (or a suitable wrench) to rotate the tensioner pulley arm against its spring pressure. This will loosen the belt, allowing you to slip it off the pulleys.
Safety Considerations
Working on the serpentine belt system involves several safety risks. Here are some important precautions:
- Engine Off: Always ensure the engine is off and the key is removed from the ignition before working on the serpentine belt system. Accidental engine start can cause serious injury.
- Hot Engine: Allow the engine to cool down completely before working on the system. The engine components, especially the pulleys, can get very hot.
- Moving Parts: Be extremely cautious of moving parts when the engine is running. Keep your hands, clothing, and tools away from the belt and pulleys.
- Tensioner Spring: The tensioner pulley is spring-loaded and can snap back forcefully if released improperly. Use caution when releasing the tension and always wear safety glasses.
- Battery Disconnect: Consider disconnecting the negative battery terminal to prevent accidental electrical shorts.
The alternator is a particularly risky component. It's directly connected to the electrical system, so avoid touching its terminals with metal tools while the battery is connected.
Remember, if you're not comfortable working on the serpentine belt system yourself, it's always best to consult a qualified mechanic. However, armed with the diagram and a good understanding of the system, many DIYers can successfully replace the belt and troubleshoot related issues.
Download the 2016 Ford Explorer Serpentine Belt Diagram: To access the diagram file, please contact us at [email protected]. We will provide a link to download the PDF file immediately.