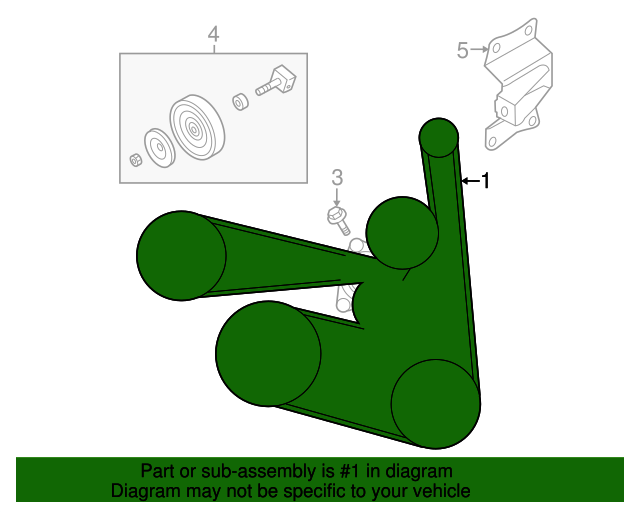
2016 Nissan Frontier Serpentine Belt Diagram
Hey folks, let's dive into something seemingly simple, yet crucial for your 2016 Nissan Frontier: the serpentine belt diagram. Understanding this layout isn't just for seasoned mechanics; it's valuable knowledge for any intermediate car owner, DIYer, or even a modder looking to personalize their ride. Whether you're tackling a repair, replacing a worn belt, or simply want to understand how your Frontier's accessories are powered, this guide will arm you with the necessary information.
Purpose of the Serpentine Belt Diagram
Why bother with a diagram? Several reasons. Firstly, the serpentine belt drives multiple engine accessories. If it breaks, you're not just stranded; you're looking at loss of power steering, air conditioning, and most critically, the alternator (meaning no charging of your battery). A correct diagram allows you to:
- Identify the belt routing: Essential for correct installation. A misrouted belt can cause damage to accessories or premature belt failure.
- Perform visual inspections: Knowing where the belt runs helps you spot wear, cracks, or misalignment.
- Replace the belt correctly: Avoiding errors that could lead to malfunction and further costly repairs.
- Understand accessory function: Seeing the belt’s path clarifies how each component (alternator, AC compressor, etc.) is driven.
In essence, having and understanding the diagram is preventative medicine for your Frontier. Think of it as a roadmap for your engine's accessory drive system.
Key Specs and Main Parts
The 2016 Nissan Frontier typically uses a single serpentine belt to drive most of its accessories. However, slight variations might exist depending on the engine (2.5L I4 or 4.0L V6) and trim level. Here are the key components typically driven by the serpentine belt:
- Crankshaft Pulley (Damper): This is the driven pulley, connected directly to the engine's crankshaft. It provides the rotational force to the belt.
- Alternator Pulley: The alternator charges the battery and powers the vehicle's electrical system.
- Power Steering Pump Pulley: This pulley drives the power steering pump, providing hydraulic assistance for steering.
- Air Conditioning (A/C) Compressor Pulley: The A/C compressor circulates refrigerant, providing cooled air to the cabin.
- Water Pump Pulley: The water pump circulates coolant through the engine to regulate temperature. Note: On some models the water pump may be driven by a separate belt or gear. Check your specific engine configuration.
- Tensioner Pulley: This spring-loaded pulley maintains the correct tension on the serpentine belt. A properly functioning tensioner is critical for belt life and accessory performance.
- Idler Pulley: These pulleys guide the belt around components and maintain proper wrap angle, ensuring adequate contact with the driven pulleys.
Symbols – Understanding the Diagram
A serpentine belt diagram isn't just a pretty picture. It uses specific symbols to represent each component and the belt's path. Here’s what you need to know:
- Solid Lines: Represent the belt itself. The thickness of the line doesn't typically indicate anything specific.
- Circles: Represent pulleys. Each pulley is labeled, often with abbreviations like "ALT" for alternator, "P/S" for power steering, "A/C" for air conditioning, and "CRANK" for crankshaft.
- Arrows: Indicate the direction of rotation for each pulley. This is crucial for understanding how the belt interacts with each component.
- Text Labels: Clearly identify each component. Look for abbreviations and, if available, part numbers.
- "Smooth" vs. "Grooved" Indication: Some diagrams illustrate whether the belt's smooth side or grooved side contacts a particular pulley. This is vital for correct belt routing. Grooved sides typically engage with grooved pulleys, while smooth sides engage with smooth idler pulleys or the back of tensioner pulleys.
The color of the lines is typically just for visual clarity and doesn't convey any specific information unless otherwise stated in the diagram's legend. Pay close attention to the arrows indicating the direction of rotation. Installing the belt backwards, even if seemingly correct, will lead to immediate problems.
How It Works
The serpentine belt's operation is simple in principle: the engine's crankshaft turns, rotating the crankshaft pulley. The serpentine belt, wrapped around this pulley, transfers the rotational force to all the other accessory pulleys. The tensioner pulley maintains the necessary tension for adequate grip and prevents slippage. The idler pulleys guide the belt along the optimal path. If the belt is too loose, it slips, causing squealing and reduced accessory performance (e.g., weak A/C, poor power steering, or a dimming battery light). If the belt is too tight, it can strain the accessory bearings and lead to premature failure.
Real-World Use – Basic Troubleshooting
Here are some common issues you might encounter and how the serpentine belt diagram can help:
- Squealing Noise: Often indicates a loose or worn belt. Check the tensioner's condition. Consult the diagram to ensure the belt is routed correctly. If the belt is old and cracked, replace it.
- Accessory Malfunction: If your power steering is weak or your A/C isn't cooling well, the belt might be slipping on the corresponding pulley. Inspect the belt and pulley for wear.
- Broken Belt: A completely broken belt is a clear indicator of a problem. Before replacing the belt, inspect all pulleys for free rotation. A seized pulley can cause a new belt to snap immediately. Use the diagram to route the new belt correctly.
- Misalignment: If you notice the belt is wearing unevenly or is constantly squealing, check for pulley misalignment. A straight edge can help identify if pulleys are properly aligned. A misaligned pulley can cause premature belt wear and damage to the accessory.
Pro Tip: Before removing the old belt, take a picture or create a sketch of its routing. This provides a visual reference in case you lose the diagram or get confused during reinstallation.
Safety – Handle with Care!
Working around a serpentine belt can be dangerous. Here's what to watch out for:
- Engine Must Be Off: Never work on the serpentine belt with the engine running. Serious injury can result from getting your hands or clothing caught in the moving belt and pulleys.
- Hot Engine Components: Be mindful of hot engine parts, such as the exhaust manifold, especially if you've recently run the engine.
- Tensioner Spring: The tensioner pulley is spring-loaded and can snap back forcefully. Use the correct tool (usually a wrench or socket) to relieve the tension gradually. Never release the tensioner suddenly.
- Battery Disconnect: While not always necessary for a simple belt replacement, disconnecting the negative battery terminal can provide an extra layer of safety, preventing accidental starting of the engine.
Always wear safety glasses and gloves when working on your vehicle.
By understanding the serpentine belt diagram and following proper procedures, you can confidently tackle belt replacements and troubleshoot accessory drive system issues on your 2016 Nissan Frontier. It's a valuable skill that can save you money and keep your vehicle running smoothly.
We have a downloadable PDF of the 2016 Nissan Frontier Serpentine Belt Diagram available. This file provides a clear visual reference for routing your belt correctly. Reach out, and we'll gladly provide access.