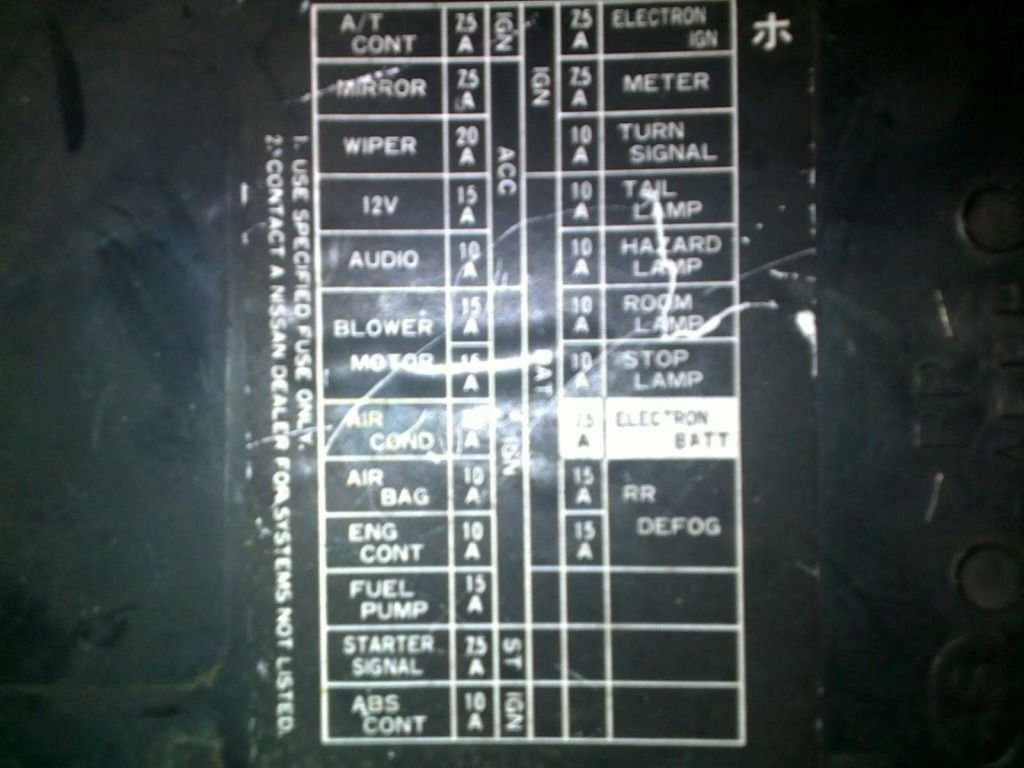
2016 Nissan Sentra Fuse Box Diagram
Alright, let's dive into the fuse box diagram for the 2016 Nissan Sentra. Understanding this layout is crucial for a number of reasons, whether you're troubleshooting a faulty circuit, planning to add aftermarket accessories, or just aiming to deepen your knowledge of your vehicle's electrical system. It's the roadmap to your Sentra's electrical health, and knowing how to read it can save you time, money, and potential headaches.
Purpose of the Fuse Box Diagram
The fuse box diagram serves several important purposes:
- Troubleshooting Electrical Issues: When a component stops working (e.g., a tail light, the radio, or the power windows), the diagram helps you pinpoint the corresponding fuse. This is the first and often easiest step in diagnosing the problem.
- Locating Fuses Quickly: Instead of blindly pulling fuses, the diagram provides a visual representation of each fuse's location within the fuse box.
- Identifying Fuse Ampere Ratings: The diagram typically indicates the amperage rating for each fuse. Using the correct amperage is vital to prevent damage to your car's electrical system. Overrated fuses can allow excessive current, potentially causing fires; underrated fuses will blow prematurely.
- Planning Modifications and Add-ons: If you're installing aftermarket accessories like a new stereo, alarm system, or auxiliary lights, the diagram helps you identify suitable circuits for tapping into power, always ensuring that you fuse the new circuit appropriately.
- General Electrical System Understanding: Studying the fuse box diagram can provide valuable insight into how the various electrical components of your Sentra are interconnected.
Key Specs and Main Parts of the 2016 Nissan Sentra Fuse Box
The 2016 Nissan Sentra typically has two main fuse box locations:
- Interior Fuse Box: Located inside the cabin, usually under the dashboard on the driver's side. Access often requires removing a small panel. This box generally contains fuses for interior accessories, such as the radio, lights, power windows, and wipers.
- Engine Compartment Fuse Box: Situated under the hood, often near the battery. This box houses fuses for critical engine components, headlights, air conditioning, and other systems essential for vehicle operation.
Key Specs:
- Fuse Types: The 2016 Sentra primarily utilizes blade-type fuses (ATO/ATC). These fuses are characterized by their plastic body and exposed metal blades that fit into the fuse box terminals. Mini-blade fuses might also be present.
- Voltage: The electrical system is a 12-volt DC system. All fuses are designed to protect circuits operating at this voltage.
- Amperage Ratings: Fuses are rated in amperes (A). Common ratings include 5A, 7.5A, 10A, 15A, 20A, 25A, and 30A. The correct amperage rating must be used when replacing a fuse.
Understanding the Symbols on the Diagram
Fuse box diagrams aren't just a jumble of lines; they use a standardized set of symbols and conventions to convey information clearly.
- Lines: Lines represent electrical circuits or wiring. A thicker line might indicate a larger gauge wire capable of handling more current.
- Boxes: Boxes represent fuses. Inside each box, you'll find the amperage rating, typically denoted by a number followed by "A" (e.g., 10A, 20A).
- Text Labels: Each fuse is labeled with a description of the circuit it protects. These labels can sometimes be abbreviated, so consult your owner's manual for clarification if needed. Common labels include "Headlight," "Radio," "ECU," "ABS," etc.
- Colors: While not always present on the diagram itself, fuse colors often correspond to their amperage rating. This is a helpful visual aid when replacing fuses. For example, a 10A fuse is often red, a 15A fuse is blue, and a 20A fuse is yellow.
- Relay Symbols: Some diagrams may include symbols for relays. A relay is an electrically operated switch that controls a separate circuit. Relays are used when a circuit requires a higher current than a standard switch can handle. They are usually represented by a rectangle with terminals that connect to the coil, the common terminal, the normally open (NO) and normally closed (NC) terminals.
How It Works: The Fuse as a Circuit Protector
A fuse is a sacrificial device designed to protect an electrical circuit from overcurrent. It contains a thin wire or strip of metal that is designed to melt and break the circuit if the current exceeds a certain threshold. When too much current flows through the circuit (e.g., due to a short circuit or a faulty component), the fuse element heats up rapidly and melts, opening the circuit and stopping the flow of electricity. This prevents damage to the wiring, components, and potentially, the vehicle itself. Think of it as an electrical safety valve.
The amperage rating of a fuse indicates the maximum current it can safely handle. Using a fuse with a lower amperage rating than specified will cause the fuse to blow prematurely. Using a fuse with a higher amperage rating is extremely dangerous, as it can allow excessive current to flow, potentially causing a fire.
Real-World Use: Basic Troubleshooting Tips
Here's a step-by-step guide to using the fuse box diagram for troubleshooting:
- Identify the Problem: Determine which component is not working.
- Consult the Diagram: Locate the fuse box diagram (typically in your owner's manual or available online). Identify the fuse that corresponds to the malfunctioning component.
- Locate the Fuse: Open the appropriate fuse box (interior or engine compartment) and find the fuse based on the diagram's layout.
- Inspect the Fuse: Visually inspect the fuse. If the metal filament inside the fuse is broken or blackened, the fuse is blown and needs to be replaced. You can also use a multimeter to test the fuse for continuity.
- Replace the Fuse: Replace the blown fuse with a new fuse of the exact same amperage rating.
- Test the Component: After replacing the fuse, test the component to see if it's now working.
- If the Fuse Blows Again: If the new fuse blows immediately or shortly after being replaced, it indicates a more serious problem in the circuit, such as a short circuit or a faulty component. Further diagnosis is required, and you may need to consult a qualified mechanic.
Safety Precautions
Working with electrical systems involves inherent risks. Here are some important safety precautions to keep in mind:
- Disconnect the Battery: Before working on any electrical system, disconnect the negative (-) battery cable to prevent accidental short circuits. This is especially crucial when working near high-current components like the starter or alternator.
- Use Proper Tools: Use insulated tools to avoid electrical shock.
- Avoid Wet Conditions: Never work on electrical systems in wet or damp conditions.
- Do Not Bypass Fuses: Never attempt to bypass a fuse by using a piece of wire or other conductive material. This can create a serious fire hazard.
- Identify High-Risk Components: Be particularly careful when working near components like the airbag control module or the anti-lock braking system (ABS) module. Accidental activation of these systems can be dangerous. Refer to your vehicle's service manual for specific precautions.
- When in Doubt, Seek Professional Help: If you're not comfortable working on your car's electrical system, or if you encounter a problem you can't diagnose, it's best to consult a qualified mechanic. Electrical issues can be complex and potentially dangerous if not handled properly.
Working with fuses and electrical components requires caution. Some fuses protect critical systems like the airbags and anti-lock brakes (ABS). Mishandling these circuits can be dangerous. Always disconnect the battery before working on the electrical system.
Understanding your 2016 Nissan Sentra's fuse box diagram is a valuable skill that can empower you to diagnose and resolve common electrical issues. By following these guidelines and taking appropriate safety precautions, you can confidently maintain and repair your vehicle's electrical system.
We have the complete 2016 Nissan Sentra Fuse Box Diagram available for download. This detailed diagram will provide you with a comprehensive overview of your vehicle's electrical system. Feel free to download it and keep it handy for future reference.