2016 Nissan Versa Fuse Box Diagram
Understanding your vehicle's electrical system is crucial for both routine maintenance and troubleshooting. A key component in this system is the fuse box. This article provides a comprehensive guide to the 2016 Nissan Versa's fuse box diagram, empowering you to diagnose electrical issues, perform repairs, and even add aftermarket accessories safely and effectively.
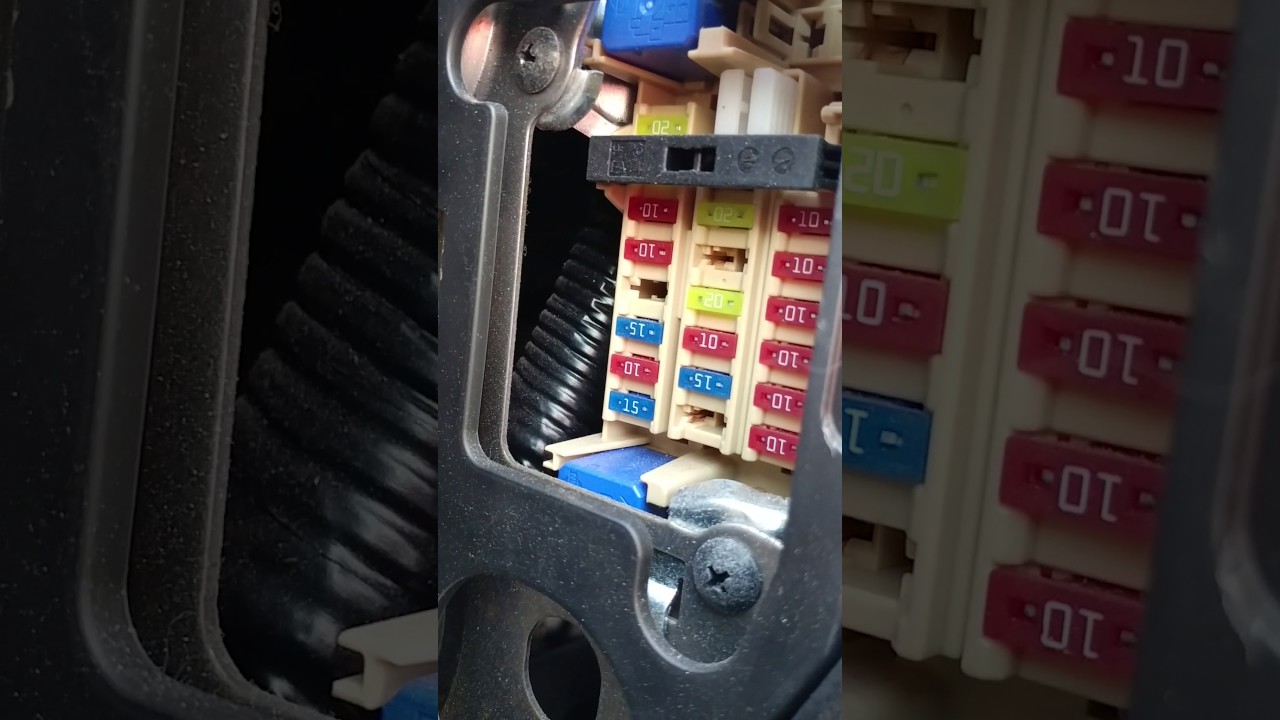
Purpose of the Fuse Box Diagram
The fuse box diagram is essentially a roadmap of your car's electrical circuit protection. Its primary purpose is to identify which fuse controls which circuit. This is invaluable for several reasons:
- Troubleshooting Electrical Problems: When an electrical component fails (e.g., a headlight, the radio, or even the A/C), the first step is often to check the corresponding fuse. The diagram tells you exactly which fuse to inspect.
- Performing Repairs: Knowing the fuse layout can help you isolate faulty circuits and avoid unnecessary repairs on unrelated systems.
- Adding Aftermarket Accessories: When installing things like new lights, a stereo system, or a dashcam, you'll need to tap into existing circuits. The diagram helps you identify appropriate power sources and ensure you're not overloading any single circuit.
- Learning Your Vehicle: For any car enthusiast, understanding the electrical system is a great way to become intimately familiar with your vehicle's inner workings.
Key Specs and Main Parts
The 2016 Nissan Versa typically has at least two fuse boxes, and potentially a third depending on the trim level and options:
- Interior Fuse Box: Located inside the cabin, usually under the dashboard on the driver's side. This box typically houses fuses for interior lights, radio, power windows, and other convenience features.
- Engine Compartment Fuse Box: Located in the engine bay, near the battery. This box contains fuses and relays for critical engine components, headlights, cooling fan, and other high-current systems.
- (Optional) Battery Terminal Fuse Box: Some models have a small fuse box directly attached to the battery terminal. This contains high-amperage fuses protecting the main electrical circuits of the car.
Key Components within the Fuse Box:
- Fuses: These are safety devices designed to protect electrical circuits from overcurrent. They contain a thin wire that melts and breaks the circuit if the current exceeds a specified level. Fuses are rated in amperes (A), indicating the maximum current they can safely carry.
- Relays: These are electromechanical switches that allow a low-current circuit to control a high-current circuit. They're often used to control things like headlights, the starter motor, and the fuel pump.
- Circuit Breakers: Unlike fuses, circuit breakers can be reset after tripping. They're less common in modern cars but may be used for certain high-current circuits.
- Fuse Puller: A small plastic tool used to safely remove fuses without damaging them or the fuse box.
Understanding Fuse Box Diagram Symbols
The fuse box diagram uses a combination of symbols, abbreviations, and color-coding to represent different components and circuits. Here's a breakdown of common elements:
- Lines: Represent electrical circuits. A solid line indicates a direct connection, while a dashed line may indicate a connection through a switch or relay.
- Colors: Often used to distinguish different circuits or voltage levels. While there isn't a universal standard, common colors include red for positive voltage, black for ground, and other colors for various circuits. Refer to the specific diagram for color-code definitions.
- Fuse Symbols: A simple rectangle or a rectangle with a wavy line inside. The number next to the symbol indicates the fuse's amperage rating (e.g., "10A" for a 10-amp fuse).
- Relay Symbols: Typically represented by a square with diagonal lines or a more complex symbol indicating the coil and switch contacts.
- Abbreviations: Common abbreviations include "IGN" for ignition, "ACC" for accessory, "BATT" for battery, and "ECU" for engine control unit.
- Icons: Small pictures representing the component the fuse protects (e.g., a light bulb for headlights, a radio for the audio system).
Crucially, the diagram is labeled with each fuse position. These labels directly correlate with the physical positions in the fuse box.
How the Electrical System Works
The car's electrical system works on a simple principle: a closed circuit allows current to flow from the battery, through a component, and back to the battery. The fuse acts as a safeguard in this circuit. If the current exceeds the fuse's rating, the fuse blows, interrupting the circuit and preventing damage to the component or wiring.
Relays work by using a small amount of current to activate an electromagnet. This electromagnet pulls a switch closed, allowing a larger amount of current to flow through a separate circuit. This is useful for controlling high-current devices with a low-current switch.
Real-World Use: Basic Troubleshooting Tips
Here's how to use the fuse box diagram to troubleshoot common electrical problems:
- Identify the Problem: Determine which electrical component is not working.
- Locate the Correct Fuse Box: Based on the component's location (interior or engine compartment), identify the appropriate fuse box.
- Consult the Diagram: Find the fuse that corresponds to the faulty component. The diagram will show the fuse's location, amperage rating, and the component it protects.
- Inspect the Fuse: Use a fuse puller to remove the fuse. Visually inspect it for a broken filament. A blown fuse will have a clear break in the wire inside. You can also use a multimeter set to continuity mode to test the fuse. A good fuse will show continuity (a beep or a reading of 0 ohms).
- Replace the Fuse: If the fuse is blown, replace it with a new fuse of the same amperage rating. Using a higher-amperage fuse can damage the wiring or components in the circuit.
- Test the Component: After replacing the fuse, test the component to see if it's working. If the fuse blows again immediately, there's likely a short circuit in the wiring or the component itself. Further diagnosis is required.
Example: Your interior lights aren't working. You consult the fuse box diagram for the interior fuse box and find a fuse labeled "Interior Lights - 10A". You remove the fuse and see that the filament is broken. You replace it with a new 10A fuse, and the interior lights now work. Problem solved!
Safety Precautions
Working with electrical systems can be dangerous. Here are some essential safety precautions:
- Disconnect the Battery: Before working on any electrical components, disconnect the negative terminal of the battery to prevent accidental short circuits.
- Use the Correct Fuse: Always replace a blown fuse with a fuse of the same amperage rating. Using a higher-amperage fuse can overload the circuit and cause a fire.
- Avoid Working on Wet Surfaces: Never work on electrical components in wet or damp conditions.
- Be Careful Around High-Voltage Components: The engine compartment contains high-voltage components, such as the ignition coil. Avoid touching these components when the engine is running.
- When in Doubt, Consult a Professional: If you're unsure about any aspect of the electrical system, consult a qualified mechanic.
Particular caution should be exercised around the main battery cables and the starter motor. These carry very high currents and accidental short circuits can be extremely dangerous.
By understanding the 2016 Nissan Versa's fuse box diagram, you can confidently diagnose and repair common electrical problems, saving time and money. Remember to always prioritize safety and consult a professional if you're unsure about any aspect of the electrical system.
We have the 2016 Nissan Versa Fuse Box Diagram available for download. This detailed diagram can be invaluable for accurately identifying and understanding the fuse and relay locations in your vehicle.