2016 Volkswagen Jetta 3.6l Drive Belt Pulley Diagram
So, you're tackling the drive belt system on your 2016 Volkswagen Jetta with the 3.6L VR6 engine, huh? Excellent! Understanding the drive belt pulley diagram is absolutely crucial for proper maintenance, diagnosing issues, and even for some more involved modifications. This article will break down everything you need to know, so you can approach this task with confidence.
Purpose of the Drive Belt Pulley Diagram
Why bother with a diagram at all? Well, for starters, it's your roadmap for the entire drive belt system. The drive belt, sometimes called the serpentine belt, powers essential engine components. The diagram serves several key purposes:
- Proper Belt Routing: This is paramount. If the belt isn't routed correctly around the pulleys, it won't function properly, potentially causing damage to the accessories or the engine itself.
- Troubleshooting: Identifying which pulley drives which component allows you to pinpoint the source of noises or failures within the system. A squealing belt, for example, might indicate a worn idler pulley or a failing accessory bearing.
- Maintenance and Repair: When replacing the belt, pulleys, or accessories (like the alternator or power steering pump), the diagram ensures you put everything back together correctly.
- Preventative Measures: A well-understood diagram can help you proactively inspect the system for signs of wear or misalignment, preventing costly breakdowns.
- Aftermarket Upgrades: Planning to install a new supercharger or other performance-enhancing accessory? Understanding the drive belt configuration is essential for ensuring proper integration and belt tension.
Key Specs and Main Parts of the 2016 Jetta 3.6L Drive Belt System
Let's dive into the specifics. The 2016 Jetta 3.6L engine utilizes a single serpentine belt to drive the following components:
- Crankshaft Pulley (Crank Pulley): This pulley is directly connected to the crankshaft and is the driving force of the entire system. Its rotational energy is transferred to the belt and then to the other pulleys.
- Alternator Pulley: The alternator generates electricity to power the vehicle's electrical system and charge the battery.
- Power Steering Pump Pulley: This pulley drives the power steering pump, which provides hydraulic assistance to make steering easier.
- Air Conditioning (A/C) Compressor Pulley: This pulley drives the A/C compressor, which circulates refrigerant to cool the cabin air.
- Idler Pulley(s): These pulleys are strategically placed to guide the belt around the other pulleys and maintain proper belt wrap. Wrap refers to the amount of contact the belt makes with the pulley; more wrap typically means more efficient power transfer.
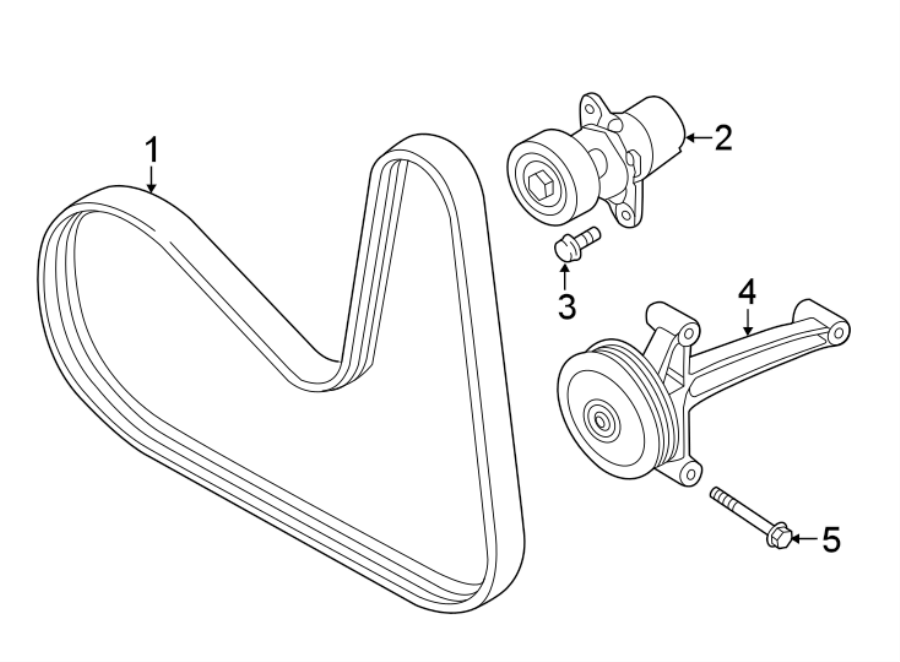
- Belt Tensioner: A spring-loaded mechanism that applies constant tension to the drive belt. This is crucial for preventing belt slippage and ensuring proper operation of the accessories. The tensioner often has a visual indicator to show whether the belt is within its operating range.
A critical specification is the belt length. Using the wrong length belt will result in either excessive or insufficient tension, leading to poor performance and premature belt failure. Always consult the vehicle's service manual or a reputable parts supplier for the correct belt length.
Understanding the Symbols in the Diagram
Drive belt diagrams use a standardized set of symbols. Here's a breakdown of the common ones you'll encounter:
- Solid Lines: Represent the drive belt itself. The path of the line indicates the belt routing.
- Circles: Represent pulleys. The size of the circle doesn't necessarily indicate the actual size of the pulley.
- Letters or Abbreviations: Each pulley is labeled with a letter or abbreviation representing the component it drives (e.g., ALT for Alternator, AC for A/C Compressor, PS for Power Steering).
- Arrows: Indicate the direction of rotation for each pulley. This is important for understanding how the belt drives each component.
- Dotted Lines: Often used to show the back (smooth) side of the belt routing against a particular pulley. This is helpful for visualizing the belt path in 3D.
- Tensioner Symbol: The tensioner is usually depicted as a pulley with a small spring symbol attached, indicating its spring-loaded nature.
Colors are sometimes used, although less frequently in older diagrams. If colors are present, they may highlight specific sections of the belt or differentiate between different components within the system.
How the Drive Belt System Works
The crankshaft pulley initiates the entire process. As the engine turns, the crankshaft pulley rotates, driving the serpentine belt. The belt, in turn, transfers this rotational energy to all the other pulleys connected to it. Each pulley then drives its respective accessory (alternator, power steering pump, A/C compressor, etc.).
The belt tensioner plays a crucial role in maintaining the correct amount of tension on the belt. As the belt stretches over time or due to temperature changes, the tensioner automatically adjusts to compensate, ensuring consistent performance. Without a properly functioning tensioner, the belt would likely slip, causing reduced performance of the accessories and potentially leading to overheating or other problems.
Real-World Use: Basic Troubleshooting Tips
Let's say you're experiencing a squealing noise coming from the engine bay. Here's how the drive belt pulley diagram can help you troubleshoot:
- Visual Inspection: First, visually inspect the belt for cracks, fraying, or glazing (a shiny, smooth surface). A worn belt is a common culprit for squealing.
- Pulley Inspection: Use the diagram to identify each pulley. Spin each pulley by hand (with the engine off, of course!). Listen for any grinding or rough sounds, which could indicate a failing bearing. Check for excessive play in the pulley.
- Belt Alignment: Use the diagram to verify that the belt is properly aligned on all the pulleys. Misalignment can cause excessive wear and noise. A straight edge can be used to check pulley alignment.
- Tensioner Check: Inspect the belt tensioner. Is it moving smoothly? Is the indicator within the acceptable range? A weak or damaged tensioner can cause belt slippage and noise.
If you suspect a specific accessory is the problem (e.g., the alternator), you can use the diagram to isolate that component and perform further testing. For example, if the alternator pulley is difficult to turn by hand, it may indicate a failing alternator.
Safety Precautions
Working on the drive belt system can be dangerous if you're not careful. Here are some critical safety precautions:
- Disconnect the Battery: Before working on any electrical components (like the alternator), disconnect the negative battery cable to prevent electrical shock.
- Engine Off and Cool: Never work on the drive belt system while the engine is running or hot. Allow the engine to cool completely before starting any repairs.
- Keep Fingers Clear: Be extremely cautious when working near the pulleys, especially the crankshaft pulley. The belt can easily catch fingers or clothing.
- Eye Protection: Wear safety glasses to protect your eyes from debris.
- Hand Protection: Wear gloves to protect your hands from sharp edges and hot surfaces.
- Pay attention to the tensioner. Because of the spring loaded mechanism, improper disengagement could lead to serious injury. Always follow proper procedure when releasing the tension.
Working on the belt tensioner requires caution because it's under significant spring pressure. Make sure you understand how to properly release the tension before attempting to remove or replace the belt. Many tensioners require a specific tool to release the tension. Using the wrong tool or technique can be dangerous.
By understanding the diagram and following these safety precautions, you'll be well-equipped to tackle your 2016 Jetta 3.6L drive belt system with confidence.
We have a high-resolution version of the drive belt pulley diagram available for download. This file contains detailed information and will be a valuable resource for your repairs and maintenance. Contact us to obtain the file.