2017 Chevy Traverse Serpentine Belt Diagram
Hey there, fellow gearheads! Ever found yourself staring blankly at a tangled mess of belts under the hood of your 2017 Chevy Traverse, wondering which one goes where? Chances are, you're dealing with the serpentine belt – and understanding its routing is crucial for maintenance, repairs, and even just diagnosing that annoying squeal you might be hearing. This article is your comprehensive guide to the 2017 Chevy Traverse serpentine belt diagram, equipping you with the knowledge to tackle belt-related tasks with confidence. We'll break down the diagram, its components, and real-world troubleshooting tips, all while keeping safety top of mind.
Why Bother with the Serpentine Belt Diagram?
The serpentine belt diagram isn't just a pretty picture; it's your roadmap to the engine's accessory drive system. This diagram is essential for several reasons:
- Repair and Replacement: If your serpentine belt breaks (it happens!), knowing the correct routing is essential for installing a new one properly. An incorrectly routed belt can lead to accessory failure and even engine damage.
- Troubleshooting: A squealing belt, a failing power steering pump, or an overheated engine can often be traced back to a problem with the serpentine belt or its tensioning system. The diagram helps you identify the components involved and their relationship to each other.
- Learning and Understanding: Even if you're not planning on doing any work yourself, understanding the serpentine belt system provides valuable insight into how your engine's accessories function.
Key Specs and Main Parts of the Serpentine Belt System
Let's familiarize ourselves with the key specs and the main players in the 2017 Chevy Traverse's serpentine belt system. Keep in mind that variations might exist depending on the engine (3.6L V6 is the most common). Always double-check your specific vehicle's information.
Key Specs:
- Belt Length: The specific length varies depending on the presence or absence of certain options like air conditioning or heavy-duty cooling. It's crucial to use the correct belt length recommended for your specific vehicle. Check your owner's manual or a reliable auto parts retailer for the exact specification.
- Belt Type: Serpentine belts are typically made of a durable rubber compound reinforced with fibers to resist stretching and cracking.
- Tension: Proper belt tension is critical. Too loose, and the belt will slip, causing accessory failure. Too tight, and you risk damaging bearings in the driven accessories.
Main Parts:
- Crankshaft Pulley (Harmonic Balancer): This pulley, attached to the crankshaft, drives the entire serpentine belt system.
- Alternator Pulley: The alternator generates electricity to power your car's electrical system and charge the battery.
- Power Steering Pump Pulley: The power steering pump provides hydraulic assistance to make steering easier.
- Air Conditioning Compressor Pulley: The A/C compressor is responsible for cooling the cabin air.
- Water Pump Pulley: The water pump circulates coolant through the engine to prevent overheating.
- Idler Pulley(s): These pulleys guide the belt and provide proper wrap angle around the driven pulleys.
- Tensioner Pulley: The tensioner maintains the correct tension on the serpentine belt. It typically uses a spring-loaded mechanism to automatically adjust for belt stretch and wear. This is a very important component.
Decoding the Serpentine Belt Diagram: Symbols and Conventions
Serpentine belt diagrams use specific symbols and conventions to convey information efficiently. Here's a breakdown of what you might encounter:
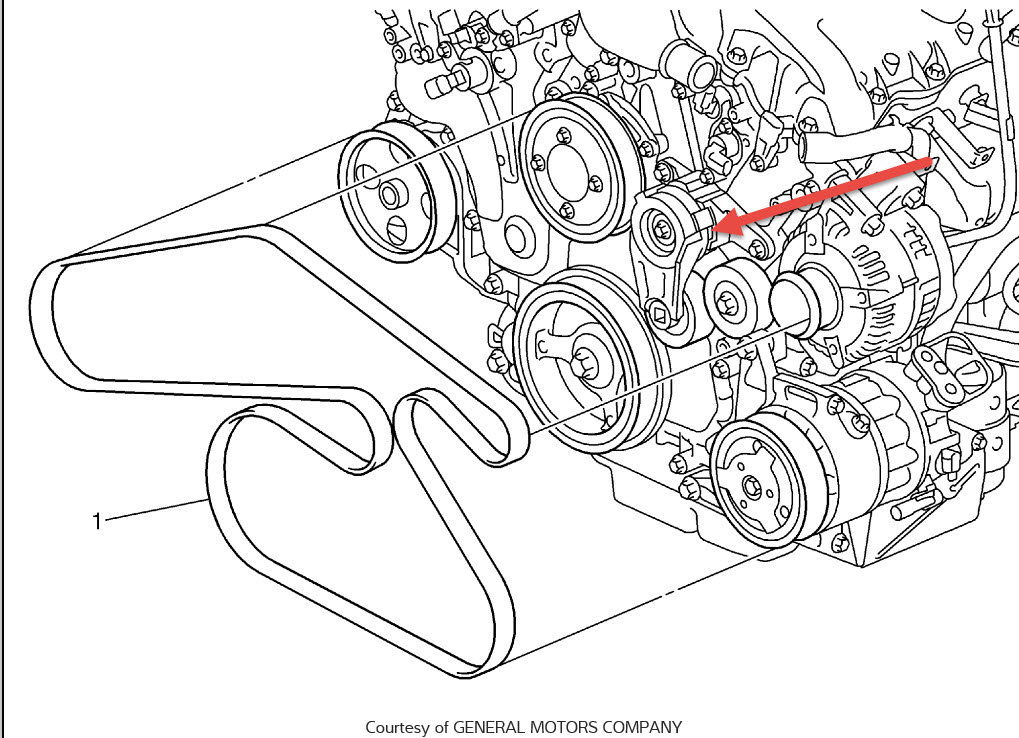
- Solid Lines: A solid line represents the path of the serpentine belt itself. Follow the line carefully to trace the belt's routing around each pulley.
- Arrows: Arrows indicate the direction of belt travel. This is crucial for ensuring the belt is installed correctly.
- Pulley Icons: Each pulley is typically represented by a circle. Sometimes, the diagram will include a label indicating the pulley's function (e.g., ALT for alternator, P/S for power steering).
- Tensioner Icon: The tensioner pulley may be represented by a circle with an arrow indicating the direction it moves to maintain tension.
- Component Labels: Diagrams often include abbreviations or full names of the components the belt drives. Familiarize yourself with these abbreviations to quickly identify each component.
Color-coding is less common on serpentine belt diagrams, but if present, it might be used to highlight specific sections or components. Always refer to the diagram's legend or accompanying notes for clarification.
How the Serpentine Belt System Works
The serpentine belt system is a marvel of engineering. The engine's crankshaft provides the rotational power that drives the entire system. The serpentine belt, a continuous loop of reinforced rubber, transmits this power to various accessories, including the alternator, power steering pump, air conditioning compressor, and water pump. The tensioner pulley plays a critical role in maintaining the correct belt tension, ensuring optimal performance of all driven components. When the engine is running, the crankshaft pulley spins, turning the serpentine belt, which in turn rotates the pulleys of the accessories. Each accessory performs its specific function, contributing to the overall operation of the vehicle.
Real-World Use: Basic Troubleshooting Tips
Here are a few common serpentine belt problems and how the diagram can help you diagnose them:
- Squealing Noise: A squealing noise, especially when starting the engine or turning the steering wheel, often indicates a slipping serpentine belt. Use the diagram to check the belt's condition, tension, and alignment. Look for cracks, fraying, or glazing on the belt's surface. Make sure the tensioner pulley is functioning correctly and maintaining proper tension.
- Accessory Failure: If an accessory, such as the alternator or power steering pump, isn't working correctly, the serpentine belt could be the culprit. Use the diagram to verify that the belt is properly routed and tensioned. Check the pulley alignment and look for any signs of damage or wear. A broken or slipping belt will definitely cause accessory failure.
- Overheating: If your engine is overheating, the water pump might not be circulating coolant properly. The serpentine belt drives the water pump, so use the diagram to check its condition and tension. A loose or damaged belt can prevent the water pump from operating at full capacity.
Safety First: Highlighting Risky Components
Working on the serpentine belt system involves certain risks. Here's what to watch out for:
- Moving Parts: Never work on the serpentine belt system while the engine is running. The rotating pulleys and belt can cause serious injury. Always disconnect the negative battery cable before beginning any work.
- Hot Components: The engine and its components, including the pulleys and belt, can get extremely hot. Allow the engine to cool completely before working on the system.
- Spring-Loaded Tensioner: The tensioner pulley is spring-loaded and can snap back forcefully when released. Use the correct tools and techniques to safely release and secure the tensioner. A specialized serpentine belt tool can be a lifesaver here.
- Sharp Edges: Be careful of sharp edges on the pulleys and other engine components. Wear gloves to protect your hands.
Always consult your vehicle's repair manual or a qualified mechanic if you're unsure about any aspect of the serpentine belt system.
By now, you should have a solid understanding of the 2017 Chevy Traverse serpentine belt diagram. It’s a valuable tool for maintenance, troubleshooting, and repairs. Remember to prioritize safety and consult a professional if you're ever in doubt.
We have the complete, high-resolution serpentine belt diagram available for download. This resource will further assist you with your maintenance and repair needs. Contact us for download information.