2017 Ford Explorer Serpentine Belt Diagram
Understanding the serpentine belt system in your 2017 Ford Explorer is crucial for both preventative maintenance and troubleshooting issues. This article serves as a comprehensive guide to the 2017 Ford Explorer serpentine belt diagram, providing you with the knowledge needed to confidently diagnose problems, perform belt replacements, and understand the overall functionality of this essential engine component. We've got the full diagram available for download, and this guide will help you make the most of it.
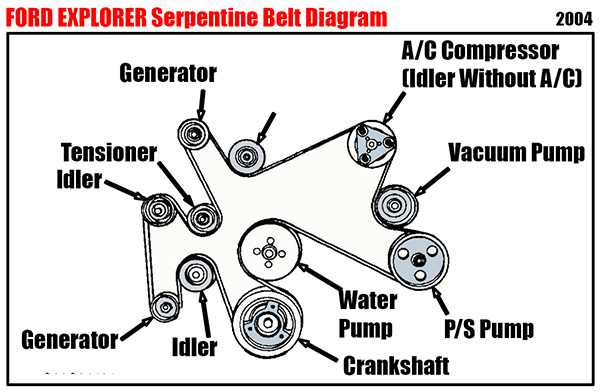
Purpose of the Serpentine Belt Diagram
The serpentine belt diagram is more than just a pretty picture; it's an indispensable tool for any DIY mechanic working on a 2017 Ford Explorer. Its primary purposes include:
- Diagnosis: A correct diagram helps you trace the belt path, identify misalignment issues, and pinpoint the source of squealing or other belt-related noises.
- Replacement: When replacing the serpentine belt, the diagram acts as a visual guide ensuring the new belt is routed correctly around all pulleys. An incorrectly routed belt can cause serious damage to components like the alternator, power steering pump, and AC compressor.
- Learning: Even if you're not actively working on your vehicle, studying the diagram helps you understand how different engine accessories are driven and interconnected. This knowledge contributes to a deeper understanding of your vehicle's mechanics.
- Troubleshooting: If an accessory stops working (e.g., power steering failure), the diagram allows you to quickly check if the serpentine belt is intact and properly routed.
Key Specs and Main Parts
Before diving into the diagram itself, let's define the key components of the serpentine belt system in the 2017 Ford Explorer. Understanding these parts is crucial for interpreting the diagram correctly.
- Serpentine Belt: The primary power transmission element. This single, long belt snakes around various pulleys, driving multiple engine accessories.
- Crankshaft Pulley (Damper Pulley): Bolted to the crankshaft, this pulley is the driving force of the entire system. Engine power is transferred to the belt via this pulley.
- Alternator Pulley: Driven by the serpentine belt, the alternator generates electrical power to charge the battery and run electrical components.
- Power Steering Pump Pulley: Powers the hydraulic power steering system, making it easier to steer the vehicle.
- Air Conditioning (AC) Compressor Pulley: Drives the AC compressor, which is responsible for cooling the cabin.
- Idler Pulley(s): Smooth, bearing-mounted pulleys that guide the serpentine belt and maintain proper tension. They don't drive any accessories.
- Tensioner Pulley: Spring-loaded pulley that automatically maintains the correct tension on the serpentine belt. It is critical for proper operation and belt life. A failing tensioner can cause belt slippage and component damage.
- Water Pump Pulley: Circulates coolant throughout the engine to regulate temperature. Note: In some 2017 Explorers, the water pump might be driven by the timing chain, not the serpentine belt. Check your specific engine configuration.
Symbols and Diagram Conventions
Serpentine belt diagrams use standard conventions to represent the different components and the belt path. Understanding these symbols is essential for accurate interpretation.
- Solid Lines: Indicate the main path of the serpentine belt. Follow these lines carefully to ensure correct routing.
- Dashed Lines: May represent alternative belt routing options or the back (smooth) side of the belt making contact with a pulley.
- Arrows: Show the direction of belt travel. This is critical for verifying that the belt is routed correctly.
- Circles/Discs: Represent pulleys. The diagram should clearly label each pulley with its corresponding accessory (e.g., "Alternator," "Power Steering").
- Icons: May be used to represent specific components, such as a battery icon for the alternator or a snowflake icon for the AC compressor.
- Tensioner Spring Symbol: Indicates the location of the tensioner assembly.
- Engine Component Labels: Pulleys connected to crucial engine components like the crankshaft or water pump will be clearly labeled to avoid confusion.
How It Works
The serpentine belt system's operation is relatively straightforward. The crankshaft pulley, driven by the engine's rotational force, spins. The serpentine belt wraps around this pulley and transfers the rotational force to the other pulleys connected to the alternator, power steering pump, AC compressor, and potentially the water pump. The tensioner pulley maintains the correct belt tension, preventing slippage and ensuring efficient power transfer.
A correctly tensioned belt ensures that all accessories receive adequate power. Too little tension leads to slippage, reduced accessory performance, and premature belt wear. Too much tension puts undue stress on the accessory bearings and can also shorten belt life.
Real-World Use – Basic Troubleshooting Tips
The serpentine belt diagram is invaluable for troubleshooting common issues. Here are some practical examples:
- Squealing Noise: A squealing noise, especially when the engine is cold or under load (e.g., turning the steering wheel), often indicates a slipping serpentine belt. Use the diagram to inspect the belt for cracks, wear, or glazing. Also, check the tensioner pulley for proper operation. A worn or weak tensioner may not be maintaining adequate belt tension.
- Accessory Failure: If an accessory suddenly stops working (e.g., the AC blows warm air), check the serpentine belt. Is it still intact? Is it routed correctly? Use the diagram to verify the belt path. If the belt is broken, it needs to be replaced. If it's still in place but loose, the tensioner may be faulty.
- Belt Misalignment: Misalignment can cause excessive belt wear and noise. Use a straight edge to check if the pulleys are properly aligned. If a pulley is wobbly or damaged, it may need to be replaced.
- Visual Inspection: Regularly inspect your serpentine belt for signs of wear, such as cracks, fraying, or missing chunks. Replace the belt proactively before it fails completely. The diagram helps you identify the full length of the belt and access all areas for inspection.
Safety Considerations
Working on the serpentine belt system involves potential hazards. Always disconnect the negative battery cable before starting any work to prevent accidental electrical shocks. The engine should be cool to avoid burns. Be extremely cautious around the rotating components of the engine while it's running. The serpentine belt and pulleys can cause serious injury if they catch clothing or body parts. Use appropriate tools and wear safety glasses.
The tensioner pulley stores significant spring energy. When releasing the tension on the belt, use the correct tools and follow the manufacturer's instructions carefully. Never attempt to release the tensioner without the proper tools, as the sudden release of tension can cause injury.
Finally, never start the engine with any tools left in the engine compartment. This is a common mistake that can lead to serious damage.
You now have a solid understanding of the 2017 Ford Explorer serpentine belt diagram, its components, and its role in maintaining your vehicle's performance. Remember to consult the actual diagram (available for download) when working on your vehicle. Good luck!