2017 Hyundai Santa Fe Serpentine Belt Diagram
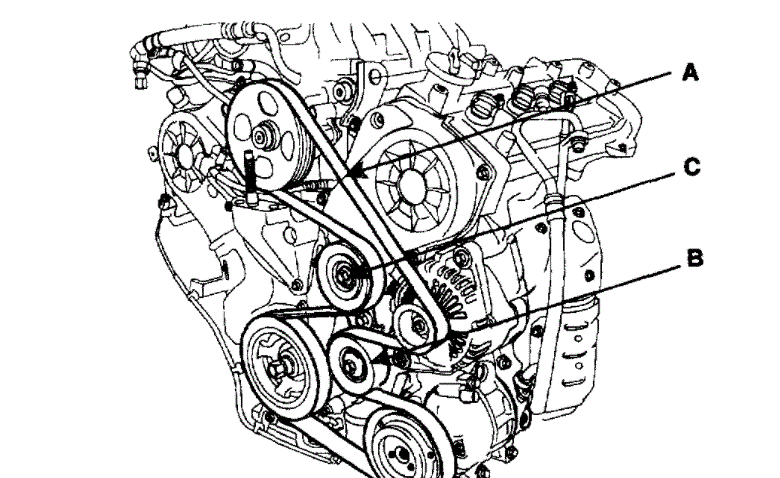
Let's dive into the serpentine belt diagram for a 2017 Hyundai Santa Fe. As an experienced DIYer, having a firm grasp of this diagram is crucial for a variety of tasks, from routine maintenance and troubleshooting to more complex repairs. This isn't just some schematic; it's your roadmap to understanding the heart of your Santa Fe's accessory drive system.
Purpose: Why You Need This Diagram
Why bother learning about the serpentine belt diagram? Simple. It's invaluable for:
- Belt Replacement: Knowing the exact routing ensures you install the new belt correctly, preventing slippage and potential damage to your accessories.
- Troubleshooting: Identifying the path helps pinpoint the source of squealing noises, belt wear, or accessory failures.
- Maintenance: Understanding the system allows for proactive inspections and preventative maintenance, saving you from costly repairs down the road.
- Learning and Diagnostics: A good understanding of this system is a great stepping stone for learning more about automotive repair and diagnostics.
Key Specs and Main Parts
The 2017 Hyundai Santa Fe typically comes with two engine options, each with a slightly different serpentine belt configuration. Let's consider both:
- 2.4L GDI Engine: This engine uses a specific belt length and routing. The belt typically drives the crankshaft pulley, alternator, power steering pump, air conditioning compressor, and potentially an idler pulley.
- 3.3L V6 Engine: This engine also has a dedicated belt, but the accessory arrangement and routing will differ from the 2.4L. Like the 2.4L it drives the crankshaft pulley, alternator, power steering pump, and air conditioning compressor.
Main Components and Their Roles:
- Crankshaft Pulley: The driving force of the system, powered directly by the engine. Its rotation transfers power to the belt.
- Alternator: Generates electricity to charge the battery and power the vehicle's electrical system. A failing belt can lead to a dead battery.
- Power Steering Pump: Provides hydraulic assistance for steering. A slipping belt results in hard steering.
- Air Conditioning Compressor: Compresses refrigerant for the air conditioning system. A faulty belt can disable your AC.
- Tensioner Pulley: Maintains the correct tension on the belt, preventing slippage and ensuring optimal performance. This is a spring loaded component that if failed can cause many issues.
- Idler Pulley (if present): Guides the belt around the system, often used to increase the wrap angle on other pulleys.
Symbols: Decoding the Diagram
Serpentine belt diagrams use a variety of symbols to represent different components and their relationships. Understanding these symbols is key to interpreting the diagram correctly. Here's a breakdown:
- Solid Lines: Represent the path of the serpentine belt. The thickness of the line might indicate the direction of the belt (though this isn't always consistent).
- Circles: Generally represent pulleys. The diagram will label each to identify what component is connected to the pulley.
- Arrows: Indicate the direction of rotation for each pulley. This is vital for understanding the belt's orientation.
- Text Labels: Identify each component, such as "ALT" for alternator, "P/S" for power steering, "A/C" for air conditioning, "CRANK" for crankshaft, and "TENSIONER" for the tensioner pulley.
- Color Coding (Less Common): Some diagrams use color to differentiate between different parts of the system or different belt routings. If used, a legend will be provided.
Understanding Wrap Angle: The wrap angle is the amount of contact the belt makes with each pulley. A larger wrap angle provides better grip and reduces slippage. Diagrams often implicitly show this, although it's something you'll primarily learn by visualizing the physical system.
How It Works: The Serpentine System in Action
The serpentine belt system is elegantly simple. The crankshaft pulley, driven by the engine's rotation, transfers power to the other accessories via the belt. The belt wraps around each pulley, transferring rotational force. The tensioner pulley maintains constant tension on the belt, ensuring a firm grip and preventing slippage.
Without proper tension, the belt will slip, leading to reduced performance of the accessories. A slipping alternator won't charge the battery effectively, a slipping power steering pump will cause hard steering, and a slipping AC compressor won't cool the cabin.
The arrangement of the accessories and the routing of the belt are carefully engineered to optimize power transfer and minimize belt wear. That's why following the diagram is so critical when replacing the belt.
Real-World Use: Basic Troubleshooting Tips
Here are some common issues and how the diagram can help:
- Squealing Noise: A squealing noise, especially on startup or during acceleration, often indicates a slipping belt. Check the belt tensioner and the belt itself for wear or damage. The diagram confirms correct routing so you know all components are properly engaged.
- Accessory Failure: If an accessory (like the alternator or AC compressor) isn't working, first verify the belt is intact and properly routed. Use the diagram to trace the belt path and check for any signs of slippage or damage. If the belt is okay, the accessory itself may be faulty.
- Belt Wear: Inspect the belt regularly for cracks, fraying, or missing chunks. Early detection can prevent a complete belt failure, which can leave you stranded. The diagram helps you check for wear on all sections of the belt.
- Incorrect Routing After Replacement: Did you do this job yourself but now the belt is making noise or one or more of the accessories isn't working? Use the diagram to double-check that you correctly routed the belt.
Example Scenario: You hear a squealing noise when you turn on the AC. Referencing the diagram, you can see the belt's path around the AC compressor pulley. This makes the AC system the first place you check.
Safety: Proceed with Caution
Working on the serpentine belt system involves inherent risks. Here are some crucial safety precautions:
- Disconnect the Battery: Always disconnect the negative battery terminal before working on any electrical components. This prevents accidental shorts.
- Hot Engine: Never work on the serpentine belt system when the engine is hot. Allow the engine to cool completely to avoid burns.
- Moving Parts: Never attempt to adjust or inspect the belt while the engine is running. This is extremely dangerous.
- Tensioner Spring: The tensioner pulley has a strong spring. Use the correct tools to relieve the tension safely. If you don't, you could pinch your fingers, or worse!
Risk of Flying Debris: If a belt breaks while the engine is running, pieces can fly off at high speed. Wear safety glasses at all times when inspecting or working on the belt system.
Remember, if you're not comfortable performing any of these tasks, consult a qualified mechanic.
We have the 2017 Hyundai Santa Fe Serpentine Belt Diagram available for download. This document provides a detailed visual representation of the belt routing and component locations. Download this diagram and keep it handy for all your future maintenance and repair needs. Having this diagram at your disposal can save you time and money when performing maintenance, troubleshooting, or replacing the serpentine belt on your 2017 Hyundai Santa Fe.