2017 Hyundai Santa Fe Sport Fuse Box Diagram
Alright, let's dive into the 2017 Hyundai Santa Fe Sport fuse box diagram. Understanding this diagram is crucial for various reasons, from simple repairs like replacing a blown fuse to more complex electrical troubleshooting and even for those of you looking to add aftermarket accessories. It's the roadmap to your Santa Fe's electrical system.
Purpose and Importance
Why bother with a fuse box diagram? Simple: it's indispensable for diagnostics and repairs. Without it, you're essentially poking around in the dark, risking further damage to your car's electronics. Consider these scenarios:
- Electrical Faults: Identifying the correct fuse for a malfunctioning component (e.g., a headlight, the radio, or a power window) is the first step in diagnosing electrical problems.
- Accessory Installation: If you're adding aftermarket equipment like a new stereo, auxiliary lights, or a dashcam, you need to tap into the correct circuits, and the fuse box is usually the most convenient access point.
- Preventing Further Damage: Replacing a blown fuse with one of the correct amperage (we'll get to that later) can prevent further damage to sensitive electrical components. Using the wrong amperage can lead to fires or destroyed components.
- General Knowledge: Even if you're not planning any immediate repairs, understanding the fuse box layout gives you a better overall understanding of your vehicle's electrical system.
Think of the fuse box diagram as the Rosetta Stone for your Santa Fe's electrical system. It decodes the language of circuits and amperage.
Key Specs and Main Parts
The 2017 Santa Fe Sport typically has two main fuse boxes:
Interior Fuse Box
This is usually located under the dashboard, often on the driver's side. You might need to remove a small panel to access it. This box primarily protects circuits related to interior components like the infotainment system, power windows, climate control, and interior lighting.
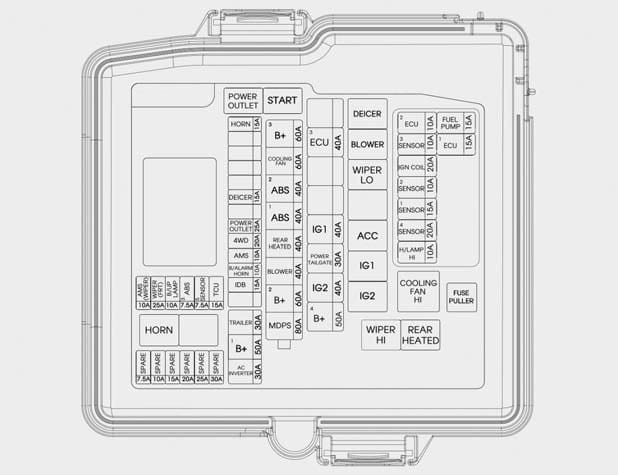
Engine Compartment Fuse Box
Located in the engine bay, usually near the battery, this box houses fuses and relays for critical engine components such as the fuel pump, ignition system, engine control unit (ECU), anti-lock braking system (ABS), and exterior lighting. It's often larger than the interior fuse box due to the higher amperage demands of these systems.
Key Specifications:
- Fuse Types: Blade-type fuses are the most common. You'll find various sizes, including mini, standard, and maxi fuses.
- Amperage Ratings: Fuses are rated in amps (A), indicating the maximum current they can handle before blowing. Common ratings include 5A, 7.5A, 10A, 15A, 20A, 25A, 30A, and higher. Always replace a blown fuse with one of the same amperage rating.
- Relays: These are electromechanical switches that control high-current circuits using a low-current signal. They're often used for components like headlights, the starter motor, and the horn.
Understanding the Symbols
Fuse box diagrams use a standardized set of symbols to represent different components and connections. Here's a breakdown of some common symbols:
- Fuses: Usually represented by a simple rectangle or a stylized "F." The diagram will indicate the amperage rating next to the symbol.
- Relays: Often depicted as a square with a diagonal line or a more complex symbol showing the coil and contacts.
- Lines: Solid lines represent wiring connections. Dashed lines may indicate optional or less common connections.
- Colors: Wiring diagrams (which are related to fuse box diagrams but more detailed) use different colors to identify wires. While the fuse box diagram itself may not be in color, knowing standard wiring color codes can be helpful:
- Red: Typically indicates a power wire (positive +12V).
- Black: Usually indicates ground (negative).
- Other Colors (e.g., Blue, Green, Yellow): These usually indicate signal wires or control wires for specific components.
- Icons: Small icons may represent the component protected by the fuse. For example, a headlight icon indicates the headlight fuse, and a radio icon indicates the radio fuse.
How It Works: The Electrical Circuit
To understand how a fuse box works, you need a basic grasp of electrical circuits. Electricity flows in a closed loop, from the battery (the power source) through a wire, to a component (e.g., a light bulb), and back to the battery. The fuse is placed in this circuit to protect the component and the wiring. The fuse contains a thin wire designed to melt and break the circuit if the current exceeds a certain level.
Overcurrent Protection: This is the core function of a fuse. An overcurrent can be caused by a short circuit (where a wire accidentally touches ground) or by a component drawing too much power. When an overcurrent occurs, the fuse "blows," interrupting the circuit and preventing damage. It's like a safety valve for your electrical system.
Real-World Use: Basic Troubleshooting
Let's say your 2017 Santa Fe Sport's radio suddenly stops working. Here's how you'd use the fuse box diagram to troubleshoot:
- Locate the Fuse Boxes: Find both the interior and engine compartment fuse boxes.
- Consult the Diagram: Refer to the fuse box diagram (the one you can download from us!). Identify the fuse labeled for the radio. It will typically be in the interior fuse box.
- Inspect the Fuse: Carefully remove the fuse using a fuse puller (usually included in the fuse box). Examine the fuse. If the thin wire inside the fuse is broken, the fuse is blown.
- Replace the Fuse: Replace the blown fuse with a new fuse of the exact same amperage rating.
- Test: Turn on the radio to see if it now works.
- If the Fuse Blows Again: If the new fuse blows immediately or shortly after being replaced, this indicates a more serious problem, such as a short circuit in the radio wiring or a faulty radio unit. Further diagnosis is required, and you may need to consult a professional mechanic.
Safety Precautions
Working with automotive electrical systems can be dangerous. Here are some crucial safety tips:
- Disconnect the Battery: Before working on any electrical components, disconnect the negative (-) terminal of the battery. This prevents accidental short circuits.
- Use Proper Tools: Use insulated tools to avoid electrical shock. A fuse puller is essential for removing fuses without damaging them or your fingers.
- Never Replace with Higher Amperage: Never replace a blown fuse with a fuse of a higher amperage rating. This can overload the circuit and cause a fire or damage components. It is unsafe and can void warranty.
- Identify High-Risk Components: Components connected to high-amperage fuses and relays, such as the starter motor and the alternator, can carry significant electrical current. Exercise extreme caution when working near these components.
- Consult a Professional: If you're not comfortable working with electrical systems, or if you encounter a persistent problem, consult a qualified mechanic.
Remember, safety is paramount. If you're unsure about any step, seek professional help. Incorrectly diagnosing or repairing electrical problems can lead to serious damage to your vehicle or even personal injury.
We have the 2017 Hyundai Santa Fe Sport fuse box diagram file available for download. This will be an invaluable resource for all your electrical troubleshooting and modification needs. Keep it handy!