2017 Nissan Altima 2.5 Belt Diagram
Okay, let's dive into the serpentine belt diagram for the 2017 Nissan Altima with the 2.5-liter engine. Understanding this diagram is crucial whether you're planning a simple belt replacement, diagnosing a noisy pulley, or just deepening your understanding of your car's engine. This isn't just a pretty picture; it's a roadmap to keeping your Altima running smoothly.
Why You Need This Diagram
The serpentine belt is a critical component, driving several vital engine accessories. A failing belt can lead to serious problems. Understanding the belt diagram allows you to:
- Correctly route a new belt: Essential after replacement to ensure proper accessory function.
- Diagnose accessory issues: If your power steering is weak, A/C isn't cold, or the battery isn't charging, the belt and its components are prime suspects. The diagram helps isolate the problem.
- Identify potential pulley failures: A misaligned or damaged pulley will accelerate belt wear and eventually lead to failure.
- Perform preventative maintenance: Knowing the layout helps you inspect the belt and pulleys for wear and tear, preventing breakdowns.
Key Specs and Main Parts
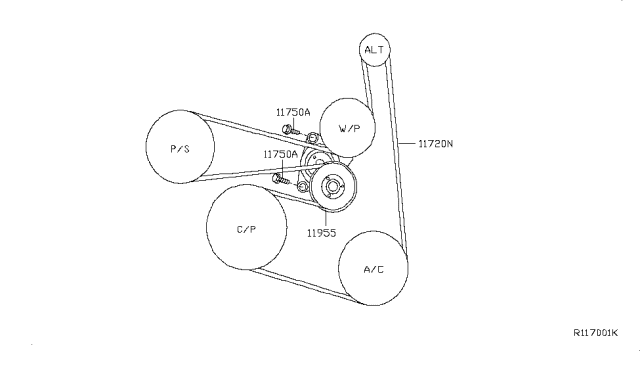
The 2017 Altima 2.5L engine uses a single, multi-ribbed serpentine belt. The belt's job is to transfer rotational power from the crankshaft to various engine accessories. Here's a breakdown of the main components in the belt system:
- Crankshaft Pulley: This is the driving pulley, directly connected to the engine's crankshaft. It's typically the largest pulley in the system.
- Alternator Pulley: Driven by the belt, the alternator generates electrical power for the car's systems and charges the battery.
- Power Steering Pump Pulley: This pulley drives the power steering pump, providing hydraulic assistance for steering.
- Air Conditioning (A/C) Compressor Pulley: Powers the A/C compressor, which circulates refrigerant to cool the cabin.
- Water Pump Pulley: The water pump circulates coolant through the engine to regulate temperature.
- Tensioner Pulley: This pulley maintains proper tension on the belt. It's spring-loaded and automatically adjusts for belt stretch and wear.
- Idler Pulley(s): Some Altimas may have one or more idler pulleys. These pulleys don't drive any accessories; they simply guide the belt around the engine and maintain the correct wrap angle on other pulleys.
Decoding the Serpentine Belt Diagram: Symbols and Markings
The diagram isn't just a picture; it's a coded representation of the system. Here's how to decipher it:
- Solid Lines: Represent the path of the outer surface of the serpentine belt. Follow these lines to trace the belt's route.
- Dotted Lines: Indicate the inner surface of the belt. This is especially helpful for understanding how the belt wraps around each pulley.
- Arrows: Show the direction of rotation for each pulley. Note that some pulleys rotate clockwise, and others counter-clockwise. This is important for understanding belt routing.
- Component Labels: Each pulley is labeled with its corresponding component (e.g., "ALT" for alternator, "P/S" for power steering).
- Tensioner Direction: The diagram usually indicates the direction in which to rotate the tensioner pulley to release tension on the belt. This is crucial for removing and installing the belt correctly.
How It Works: A Simple Explanation
The 2017 Altima's serpentine belt system operates on a relatively simple principle. The crankshaft pulley, driven by the engine's rotation, transfers power to all other accessories via the belt. The belt wraps around each pulley, providing the necessary friction to turn it. The tensioner pulley keeps the belt taut, preventing slippage and ensuring efficient power transfer. The correct routing ensures that each accessory receives the appropriate amount of power.
Think of it like a synchronized dance: if one dancer (pulley) is out of step (slipping or misaligned), the whole performance (engine operation) suffers.
Real-World Use: Troubleshooting Tips
Here are some common issues and how the belt diagram can help:
- Squealing Noise: Often indicates a slipping belt. Check the belt for wear, cracks, or glazing (a shiny, smooth surface). Also, inspect the tensioner pulley for proper function. A weak tensioner can cause the belt to slip.
- Battery Not Charging: Verify the alternator pulley is turning. If it's not, the belt might be broken or slipping severely. Use the diagram to trace the belt path and check for any obstructions.
- Weak Power Steering: Could be a slipping belt on the power steering pump pulley. Inspect the belt and tensioner.
- A/C Not Working: Similar to power steering, a slipping belt on the A/C compressor pulley can cause cooling problems.
- Overheating: Although less common, a slipping belt on the water pump pulley can lead to overheating.
Important: When troubleshooting, always visually inspect the belt and pulleys for damage. Look for cracks, fraying, missing ribs, and signs of misalignment. Use a belt dressing sparingly as a temporary fix for a squealing belt; it's not a long-term solution and can actually attract dirt.
Safety First: Handle with Care
Working on the serpentine belt system involves several potential hazards:
- Moving Parts: Never work on the engine while it's running. The belt and pulleys can cause serious injury.
- Hot Surfaces: The engine components can be extremely hot, even after the engine has been off for a while. Allow the engine to cool completely before working on it.
- Spring Tension: The tensioner pulley is spring-loaded and can snap back forcefully if not handled correctly. Use the correct tools and follow the manufacturer's instructions when releasing tension.
- Electrical System: The alternator is part of the electrical system. Disconnect the negative battery cable before working on any electrical components.
Specifically, be cautious around the tensioner pulley. The spring mechanism stores a significant amount of energy, and improper handling can lead to injury. Always use the correct size wrench or socket and apply slow, steady pressure when releasing the tension.
Pro Tip: Before removing the old belt, take a picture of the belt routing with your phone. This can be invaluable if you get confused during reinstallation. It is also useful to get the belt diagram!
Getting the Diagram
This article provides a solid understanding of the 2017 Nissan Altima 2.5L serpentine belt system. However, having the actual diagram on hand is essential for accurate repairs and diagnostics. We have a high-resolution PDF file of the diagram available for you to download. This diagram will give you the visual reference you need to confidently tackle any serpentine belt-related issue on your Altima.