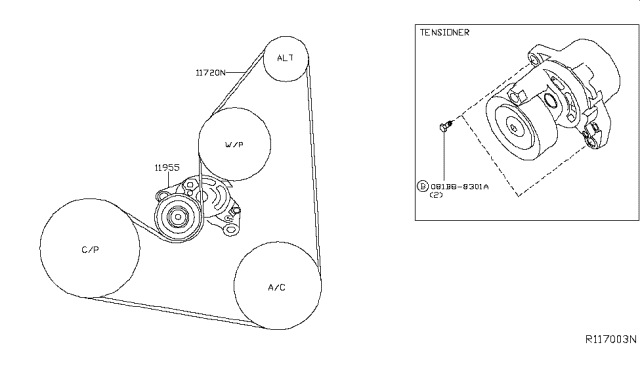
2017 Nissan Altima Serpentine Belt Diagram
Knowing your vehicle's serpentine belt layout is crucial for maintenance and repairs. This article focuses on the 2017 Nissan Altima's serpentine belt diagram, providing the information you need to understand, troubleshoot, and potentially replace this essential component yourself. Think of this as having your trusted mechanic walk you through the process, step by step.
Purpose of the Serpentine Belt Diagram
The serpentine belt diagram isn't just a pretty picture. It's a vital tool for several reasons:
- Diagnosis and Repair: When your 2017 Altima experiences issues like power steering failure, alternator malfunction, or A/C problems, the serpentine belt is often a prime suspect. The diagram helps you quickly identify the belt's routing and check for damage, slippage, or improper tension.
- Belt Replacement: Replacing a serpentine belt involves removing the old one and correctly routing the new one. The diagram is your roadmap to ensure proper installation, preventing future problems.
- Learning and Understanding: Understanding the belt's path helps you grasp how various engine accessories are driven. This knowledge can be invaluable for broader engine diagnostics and preventative maintenance.
- Accessory Replacement: Need to replace your alternator, power steering pump, or A/C compressor? Knowing the belt routing simplifies access and re-installation of the serpentine belt.
Key Specs and Main Parts
The 2017 Nissan Altima's serpentine belt system consists of several key components, all working in harmony. It is important to note that variations may occur between the 2.5L and 3.5L engines.
- Serpentine Belt: This is the star of the show – a long, continuous belt typically made of reinforced rubber. It's responsible for transferring rotational force from the crankshaft to the various engine accessories. Different belt lengths and materials may exist, so always check your vehicle's specifications (often found on a sticker under the hood) or with a reputable auto parts retailer.
- Crankshaft Pulley (or Harmonic Balancer): Located at the front of the engine, connected to the crankshaft, this pulley receives the engine's rotational power and drives the serpentine belt.
- Alternator Pulley: Driven by the serpentine belt, the alternator generates electricity to power the car's electrical system and charge the battery.
- Power Steering Pump Pulley: When equipped with hydraulic power steering (some Altimas may have electric power steering), this pulley drives the power steering pump, providing assistance for steering.
- Air Conditioning (A/C) Compressor Pulley: This pulley drives the A/C compressor, which is responsible for cooling the cabin.
- Idler Pulleys: These are smooth, non-driven pulleys that guide the serpentine belt and maintain its proper routing, preventing it from rubbing against other components. They often are a major source of noise when bearings fail.
- Tensioner Pulley: The tensioner pulley is spring-loaded and applies constant tension to the serpentine belt, preventing slippage and ensuring optimal accessory performance. This component is critical for proper belt operation and longevity.
Understanding Serpentine Belt Diagram Symbols
Serpentine belt diagrams use specific conventions to represent components and belt routing. Understanding these symbols is key to interpreting the diagram correctly.
- Solid Lines: These typically represent the serpentine belt itself, showing its path around the various pulleys. The thickness of the line usually doesn't have any significance.
- Circles: Circles represent pulleys. The diagram may also indicate the type of pulley (e.g., driven, idler, tensioner).
- Arrows: Arrows indicate the direction of belt travel. Follow these arrows carefully to ensure you're routing the belt correctly.
- Text Labels: These labels identify each pulley (e.g., "Crankshaft," "Alternator," "Tensioner").
- Dotted Lines (Less Common): Dotted lines might indicate the position of a component behind another, providing a sense of depth to the diagram.
- Spring Symbol: Indicates the location of the tensioner and spring mechanism.
How the Serpentine Belt System Works
The serpentine belt system is relatively simple in its operation. The crankshaft, driven by the engine's combustion process, turns the crankshaft pulley. This pulley then rotates the serpentine belt, which, in turn, drives the other pulleys connected to the engine accessories (alternator, power steering pump, A/C compressor). The tensioner pulley maintains proper belt tension to prevent slippage and ensure that all accessories receive adequate power. The idler pulleys guide the belt along its designated path, minimizing wear and tear.
Real-World Use and Basic Troubleshooting
Here are some scenarios where understanding the serpentine belt diagram proves invaluable:
- Squealing Noise: A squealing noise, especially when the engine is first started or when turning the steering wheel, often indicates a slipping serpentine belt. Check the belt tension and inspect the belt for cracks, glazing, or wear. Sometimes, a small amount of belt dressing can temporarily alleviate the squealing, but replacement is usually the best long-term solution.
- Accessory Failure: If your alternator, power steering, or A/C suddenly stops working, the serpentine belt could be broken or severely damaged. Visually inspect the belt for any signs of damage.
- Battery Light On: If the battery light comes on, it could mean the alternator isn't charging properly. Check the serpentine belt to ensure it's properly driving the alternator pulley.
- Routine Maintenance: Regularly inspect your serpentine belt for wear and tear. Replace it according to the manufacturer's recommended service interval (usually around 60,000 to 100,000 miles). Using the diagram, make sure the replacement belt follows the correct path.
Safety Considerations
Working around the serpentine belt system can be hazardous if you don't take proper precautions:
- Disconnect the Battery: Before working on any part of the serpentine belt system, disconnect the negative battery terminal to prevent accidental electrical shocks.
- Hot Engine: Never work on the serpentine belt system when the engine is hot. Allow the engine to cool down completely before starting any repairs.
- Moving Parts: Keep your hands, hair, and clothing away from the serpentine belt and pulleys when the engine is running. These components can cause serious injury.
- Belt Tensioner: The belt tensioner is spring-loaded and can snap back with considerable force if not handled correctly. Use the appropriate tools to relieve tension before removing the belt. Always wear safety glasses.
The serpentine belt system is an essential part of your 2017 Nissan Altima. By understanding its layout and function, you can diagnose problems, perform maintenance, and ensure the continued reliability of your vehicle. And because we have the diagram available, you can download it now to keep it handy for future reference.