2017 Nissan Titan Xd Fuse Box Diagram
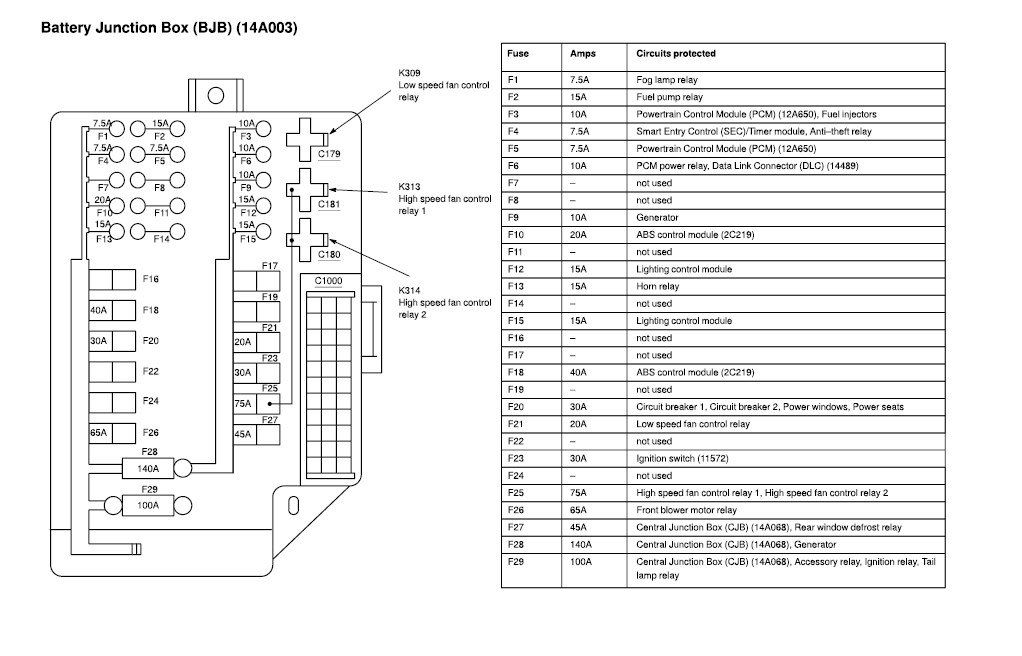
Alright, let's dive into the 2017 Nissan Titan XD fuse box diagram. Understanding this diagram is absolutely crucial whether you're tackling basic maintenance, diagnosing electrical issues, or planning some aftermarket modifications. It's essentially the roadmap to your truck's electrical nervous system.
Purpose of the 2017 Nissan Titan XD Fuse Box Diagram
Why bother with this diagram? Well, think of it as your first line of defense against electrical gremlins. Specifically, the diagram provides:
- Precise Fuse Identification: Quickly pinpoint the fuse associated with a specific circuit. No more guessing games!
- Circuit Protection Overview: Understand how different components are protected and how they relate to each other.
- Troubleshooting Aid: Efficiently diagnose electrical problems by isolating the affected circuit.
- Modification Foundation: Safely tap into existing circuits for aftermarket accessories without overloading anything.
- Learning Tool: Deepen your understanding of your truck's electrical system.
Key Specs and Main Parts
The 2017 Nissan Titan XD typically has multiple fuse boxes. We'll focus on the primary ones, understanding their locations and functions. Keep in mind that depending on the trim level and specific options your truck has, there might be minor variations.
Fuse Box Locations:
- Engine Compartment Fuse Box: Located under the hood, this box houses fuses and relays for critical engine and drivetrain components like the ECM (Engine Control Module), fuel pump, ignition system, and cooling fan. This is where you'll find higher amperage fuses.
- Instrument Panel Fuse Box: Usually found inside the cabin, often behind a small panel on the driver's side dashboard. This one manages fuses for interior accessories like the radio, power windows, lights, and climate control. These are typically lower amperage fuses.
Main Components:
- Fuses: These are sacrificial devices designed to protect circuits from overcurrent. They consist of a thin wire or strip that melts and breaks the circuit when the current exceeds a specified limit. They are rated in amperes (amps), which indicates the amount of current they can safely carry.
- Relays: These are electromechanical switches that control high-current circuits using a low-current signal. They're used to switch on headlights, the starter motor, and other power-hungry components. Relays prevent the need for heavy-gauge wiring and large switches in the cabin.
- Circuit Breakers: These are similar to fuses but can be reset after tripping. They're often used for circuits that experience occasional surges, like power seats.
- Wiring Harness: The organized bundle of wires that connect all the electrical components. The fuse box serves as a central distribution point within this harness.
Understanding Symbols: Lines, Colors, and Icons
The fuse box diagram isn't just a jumble of lines; it's a language! Here's how to decipher it:
- Lines: Lines represent wires connecting different components. Thicker lines usually indicate wires that carry higher current. Dashed lines may indicate ground connections or shielded wiring.
- Colors: Each wire in your truck is color-coded. The diagram will show these colors to help you trace the wire to its destination. Common colors include red (typically power), black (typically ground), blue, green, yellow, white, and brown. The wire color code helps identify where the wire runs to in the vehicle.
- Icons: Icons represent the electrical components being protected by each fuse or relay. Examples include:
- Headlight icon: Indicates the headlight circuit.
- Fuel pump icon: Indicates the fuel pump circuit.
- Horn icon: Indicates the horn circuit.
- Window icon: Indicates the power window circuit.
- Fuse Numbers: Each fuse is assigned a unique number, which corresponds to its location in the fuse box and on the diagram.
- Amperage Ratings: The amperage rating of each fuse is clearly indicated on the diagram, usually next to the fuse number. Using the correct amperage is critical for proper circuit protection. Never replace a fuse with one of a higher amperage rating!
How It Works: From Battery to Component
The electrical system starts at the battery, which provides the DC power needed to operate all the truck's electrical components. The power flows from the battery, often through a master fuse or fusible link, to the various fuse boxes. From the fuse boxes, power is distributed to individual circuits, each protected by its own fuse or relay.
When a circuit experiences an overload (too much current), the fuse blows, breaking the circuit and preventing damage to the components. The diagram helps you understand which fuse protects which circuit, allowing you to quickly identify the cause of the problem.
Relays act as remote-controlled switches. A low-current signal from a switch or control module activates the relay, which then closes a high-current circuit, powering the desired component. This prevents the need to run heavy-gauge wiring all the way to the switch in the cabin.
Real-World Use: Basic Troubleshooting Tips
Here's how you can use the fuse box diagram for basic troubleshooting:
- Identify the Problem: What's not working? (e.g., headlights, radio, power windows).
- Consult the Diagram: Locate the fuse or relay associated with the non-functioning component on the diagram.
- Inspect the Fuse: Remove the fuse and visually inspect it. Look for a broken filament or a darkened glass. A blown fuse indicates an overcurrent condition.
- Test the Fuse: Use a multimeter set to continuity mode to test the fuse. A good fuse will show continuity (a beep or a reading of 0 ohms). A blown fuse will show no continuity (no beep or an infinite reading).
- Replace the Fuse: If the fuse is blown, replace it with a new fuse of the same amperage rating.
- If the Fuse Blows Again: This indicates a persistent overcurrent condition. Don't just keep replacing fuses! You need to investigate the circuit for shorts, damaged wiring, or faulty components. Consult a qualified mechanic if you're not comfortable doing this yourself.
- Check Relays: If the fuse is good but the component still isn't working, the relay might be faulty. Relays can be tested using a multimeter, but it's often easier to swap it with a known good relay of the same type.
Safety: Identify Risky Components
Working with electrical systems can be dangerous. Here's what to be aware of:
- High-Voltage Components: Be extremely cautious around the ignition system (ignition coils, spark plugs), as these components can carry high voltage.
- Airbag System: Never probe or disconnect any wiring associated with the airbag system without first disconnecting the battery and waiting at least 10 minutes. Accidental deployment can cause serious injury.
- Battery: Always disconnect the negative battery terminal before working on any electrical system. This prevents accidental shorts and potential damage to the electrical components.
- Never Exceed Amperage: Never replace a fuse with one of a higher amperage rating. This can bypass the circuit protection and lead to a fire.
If you are working on any of these components it is best to consult with a professional mechanic.
We have the 2017 Nissan Titan XD fuse box diagram available for download. With this resource and a little know-how, you'll be well-equipped to tackle most electrical issues that come your way.