2017 Subaru Outback Serpentine Belt Diagram
The serpentine belt on your 2017 Subaru Outback is a critical component responsible for powering several essential accessories. Understanding its routing, tension, and condition is paramount for maintaining the reliability of your vehicle. This article provides a detailed overview of the 2017 Subaru Outback serpentine belt diagram, empowering you with the knowledge to perform inspections, replacements, and related troubleshooting tasks.
Purpose of the Serpentine Belt Diagram
Why bother with a diagram? Several reasons: Firstly, accurate belt routing is crucial. An incorrectly installed belt will not function properly, leading to accessory failure and potentially engine damage. Secondly, the diagram aids in identifying components. Knowing where each pulley is located and what it drives is essential for diagnosis. Thirdly, a diagram assists in preventative maintenance. Regular inspection, guided by the diagram, can help catch wear and tear before it leads to a breakdown. Finally, it's simply a valuable learning tool. Understanding the system gives you a better overall grasp of your Outback's mechanics.
Key Specs and Main Parts
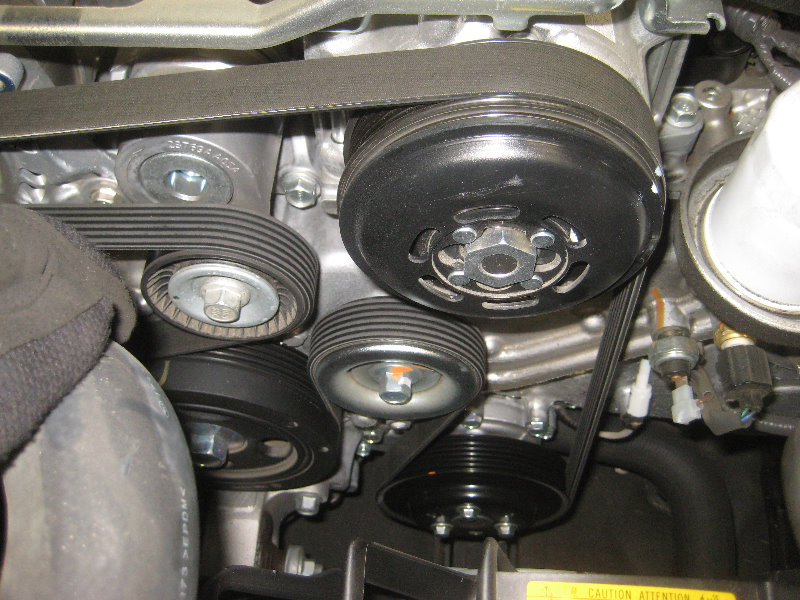
The serpentine belt in a 2017 Subaru Outback (both the 2.5L and 3.6L engines use a similar configuration) is a single, long belt that snakes around multiple pulleys. Here are the key components:
- Crankshaft Pulley (Crank Pulley): Driven directly by the engine, this pulley is the power source for the entire system.
- Alternator Pulley: The alternator generates electrical power for the vehicle. The belt spins this pulley, driving the alternator.
- Power Steering Pump Pulley: This pulley drives the power steering pump, which provides hydraulic assistance for steering.
- Air Conditioning Compressor Pulley: The A/C compressor circulates refrigerant to cool the cabin.
- Idler Pulleys: These are smooth pulleys that guide the belt and maintain proper tension and routing. They don't drive any accessories.
- Tensioner Pulley (Automatic Belt Tensioner): This spring-loaded pulley automatically maintains the correct tension on the serpentine belt. This is a critical component; failure can lead to belt slippage or damage.
The belt itself is typically made of EPDM (Ethylene Propylene Diene Monomer) rubber, known for its durability and resistance to heat and cracking. Exact belt length varies slightly depending on the engine and specific accessory configuration, so always verify the correct part number for your vehicle's VIN.
Understanding the Serpentine Belt Diagram: Symbols and Conventions
Serpentine belt diagrams, while seemingly complex at first glance, use a standardized set of symbols:
- Solid Lines: The solid line represents the path of the serpentine belt. Carefully follow this line to ensure correct routing.
- Dashed Lines: Dashed lines usually indicate the *back* of the belt. That is, the section of the belt that doesn't directly contact the pulley groove. This is crucial for understanding how the belt wraps around certain components.
- Arrows: Arrows indicate the direction of belt travel. These are essential for ensuring the belt is routed in the correct orientation around each pulley.
- Pulley Icons: Each pulley is represented by a circle. Some diagrams might include labels indicating the pulley's function (e.g., "ALT" for alternator, "P/S" for power steering). Pay attention to the size of the circle, which can sometimes indicate the relative size of the pulley.
- Tensioner Icon: The tensioner pulley is usually indicated with a unique symbol, often including an arrow showing the direction of tension.
Colors, if present, might be used to distinguish between different sections of the belt or to highlight specific components. However, black and white diagrams are more common. The diagram will typically include a legend explaining any colors used.
How the Serpentine Belt System Works
The serpentine belt system is relatively straightforward. The engine's crankshaft drives the crankshaft pulley, which in turn drives the serpentine belt. As the belt rotates, it spins all the other pulleys connected to it, powering the various accessories. The automatic belt tensioner maintains the correct tension on the belt. Too little tension causes the belt to slip, reducing accessory performance (e.g., weak power steering, poor A/C cooling). Too much tension can prematurely wear out the belt and bearings in the driven accessories.
The tensioner is crucial for managing the varying loads placed on the belt by the accessories. When the A/C compressor kicks on, for example, it increases the load on the belt. The tensioner compensates for this increased load by automatically increasing the belt tension.
Real-World Use and Basic Troubleshooting
Here are some common problems and how the diagram can help:
- Squealing Belt: A squealing belt often indicates slippage. Check the belt tensioner for proper operation. Use the diagram to verify the correct belt routing. A worn belt might also cause squealing; inspect for cracks, glazing, or fraying.
- Accessory Failure: If an accessory (e.g., alternator, power steering) stops working, first check the belt. Is it still intact? Is it routed correctly? Is the tensioner functioning properly? The diagram helps you quickly isolate the problem.
- Belt Damage: Regularly inspect the belt for signs of wear and tear. Cracks, fraying, missing chunks, or a glazed appearance indicate the need for replacement. The diagram reminds you of the entire belt path, so you don't miss any sections during inspection.
- Installing a New Belt: The diagram is your roadmap! Carefully follow the routing instructions to ensure the belt is installed correctly. Incorrect routing is a common mistake that can lead to serious problems. Always use a wrench to relieve tension on the tensioner pulley when installing a new belt, and ensure the belt is properly seated in all pulley grooves before releasing the tensioner.
When troubleshooting, remember to listen for unusual noises. A rhythmic ticking sound could indicate a worn idler pulley bearing. A grinding noise might suggest a problem with one of the driven accessories.
Safety Considerations
Working around the serpentine belt system involves inherent risks. Always disconnect the negative battery terminal before starting any work to prevent accidental starting of the engine. Never put your hands or tools near the belt while the engine is running. The rotating belt and pulleys can cause serious injury. Be especially careful around the tensioner pulley, as it is spring-loaded and can snap back with considerable force.
The engine compartment can be hot, especially after the engine has been running. Allow the engine to cool down before working on the serpentine belt system to avoid burns.
Finally, use proper tools. A serpentine belt tool set makes it easier to release the tensioner pulley and remove/install the belt without damaging components.
We have the 2017 Subaru Outback Serpentine Belt Diagram available for download. It provides a clear visual guide for belt routing and component identification, assisting you in maintenance and repairs. Download the file and keep it handy for future reference.