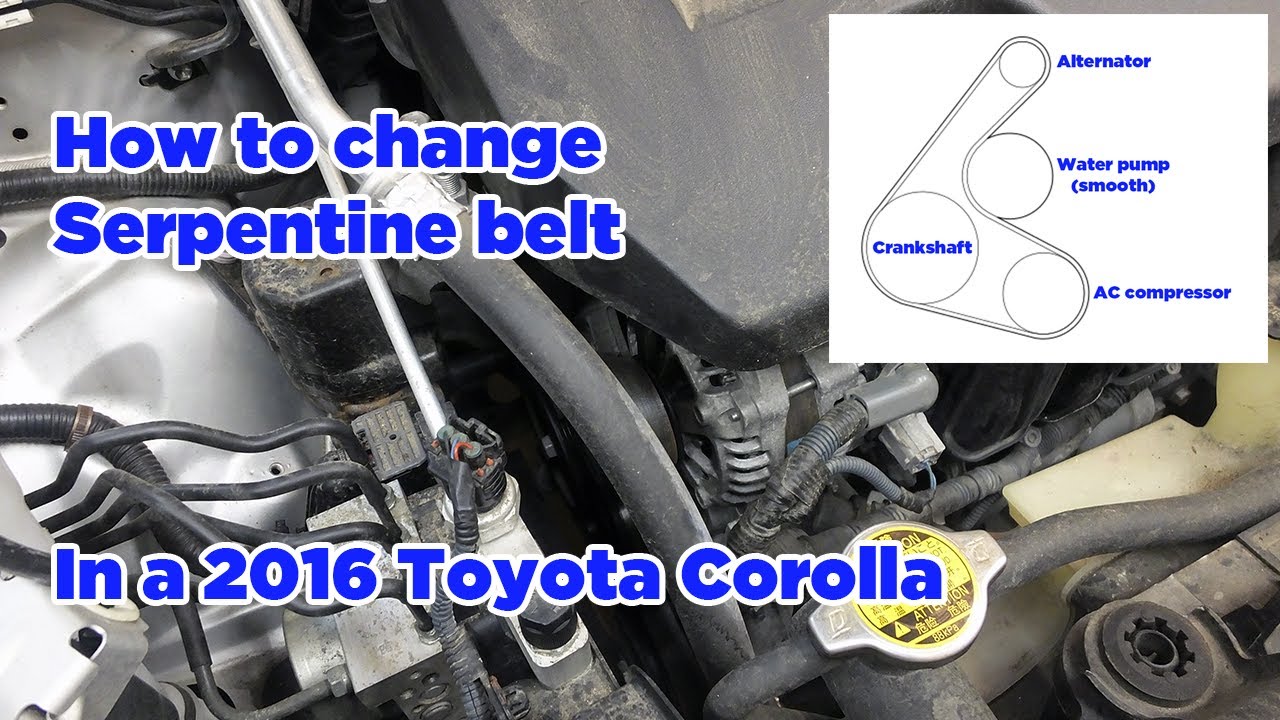
2017 Toyota Corolla Serpentine Belt Diagram
For the experienced DIYer, tackling serpentine belt replacement or troubleshooting on a 2017 Toyota Corolla can be a satisfying and cost-effective project. However, navigating the engine bay without a clear understanding of the serpentine belt's routing can quickly lead to frustration and potential engine damage. That's where the serpentine belt diagram comes in. This article will serve as your comprehensive guide to understanding the 2017 Corolla's serpentine belt diagram, ensuring you can confidently perform maintenance and repairs.
Purpose of the Serpentine Belt Diagram
The serpentine belt diagram isn't just a pretty picture; it's a crucial tool for several reasons:
- Repair and Replacement: The most obvious use is to guide the correct installation of a new serpentine belt. Improper routing can cause premature wear, belt slippage, and damage to the accessories driven by the belt.
- Troubleshooting: If you're experiencing issues like squealing noises, power steering failure, or alternator problems, the diagram helps you visually inspect the belt's condition and the functionality of the pulleys.
- Learning and Understanding: Even if you're not actively working on your car, studying the diagram provides a deeper understanding of how the engine's accessory drive system operates.
Key Specs and Main Parts
Before diving into the diagram itself, let's identify the key components involved in the 2017 Corolla's serpentine belt system. While slight variations might exist depending on specific sub-models, the general layout remains consistent.
Main Components:
- Crankshaft Pulley: This pulley, driven directly by the engine's crankshaft, is the driving force behind the entire serpentine belt system.
- Alternator Pulley: The alternator generates electrical power for the car. It's driven by the serpentine belt.
- Water Pump Pulley: The water pump circulates coolant through the engine to prevent overheating.
- Power Steering Pump Pulley: This pulley drives the power steering pump, which provides hydraulic assistance for steering.
- Air Conditioning (A/C) Compressor Pulley: The A/C compressor is responsible for cooling the cabin air.
- Tensioner Pulley: This spring-loaded or hydraulically adjusted pulley maintains the correct tension on the serpentine belt. It's absolutely critical for proper operation.
- Idler Pulley(s): Smooth, bearing-equipped pulleys that provide a guide for the belt, changing its direction and ensuring optimal wrap angle around other pulleys.
- Serpentine Belt: The continuous belt itself, made of reinforced rubber, that transmits power from the crankshaft to all the accessory pulleys.
Key Specs:
While the specific belt length varies between model years and options packages, a typical replacement belt for a 2017 Corolla is around 82-84 inches in length. Always consult your owner's manual or a reliable parts catalog (like those from Gates or Dayco) to determine the exact length and part number for *your* specific vehicle. Belt width is also important. Using the wrong width belt will result in poor performance and rapid wear.
Symbols and Diagram Interpretation
A serpentine belt diagram isn't just a jumble of lines; it's a carefully crafted representation of the belt's path. Understanding the symbols used is essential for proper interpretation.
- Solid Lines: Indicate the path of the *outer* surface of the serpentine belt. The belt is in contact with the pulleys on the side represented by solid lines.
- Dashed Lines: Typically represent the *inner* surface of the serpentine belt where it's not in contact with a pulley. Think of it as showing the "back side" of the belt.
- Arrows: Indicate the direction of rotation for each pulley. This helps visualize how the belt transfers power.
- Pulley Symbols: Each pulley is represented by a circle. The size of the circle doesn't necessarily correlate to the actual pulley size, but it helps visually distinguish each component. Labels usually appear near each pulley identifying the component it's attached to (ALT for Alternator, WP for Water Pump, etc.).
- Tensioner Symbol: The tensioner pulley is often represented with a spring symbol or an arrow indicating its range of motion. This highlights its adjustable nature.
Color coding is not standard in serpentine belt diagrams, but some aftermarket diagrams might use different colors to highlight specific sections or components. However, relying on line type (solid vs. dashed) and labels is the most reliable approach.
How It Works
The serpentine belt system operates on a simple principle: the engine's crankshaft drives the belt, which in turn spins the pulleys attached to various accessories. The tensioner pulley plays a crucial role in maintaining the correct amount of tension on the belt. Too little tension results in belt slippage and reduced performance, while too much tension can damage bearings and shorten belt life.
The serpentine belt snakes around each pulley in a specific order, determined by the engine's design and the location of the accessories. This routing is critical. Following the diagram ensures that each accessory receives the correct amount of power and that the belt doesn't rub against other engine components.
Real-World Use and Basic Troubleshooting
Here are a few common scenarios where the serpentine belt diagram becomes invaluable:
- Squealing Noise: A squealing noise, especially when the engine is cold or under load, often indicates a slipping serpentine belt. Check the diagram to ensure the belt is routed correctly and that the tensioner is functioning properly. Examine the belt for signs of wear, cracks, or glazing. If the belt looks worn, replacing it is often the best course of action.
- Accessory Failure: If your power steering suddenly stops working, or your A/C blows warm air, the serpentine belt could be the culprit. Verify that the belt is still intact and properly routed. If the belt has broken, the diagram will be essential for installing a new one correctly.
- Belt Inspection: Periodically inspect your serpentine belt for signs of wear and tear. Cracks, fraying, or missing chunks of rubber are all indicators that the belt needs to be replaced. Use the diagram to identify the belt's routing before removing the old belt to make reinstallation easier. Consider taking a picture of the belt's path with your smartphone before removal.
Safety Considerations
Working on the serpentine belt system involves several potential hazards:
- Hot Engine Components: Allow the engine to cool completely before working on the serpentine belt system. Exhaust manifolds and other engine parts can remain extremely hot for a significant time.
- Moving Parts: Never start the engine with your hands or tools near the serpentine belt or pulleys. These parts move rapidly and can cause serious injury. Disconnect the negative battery terminal before beginning any work.
- Tensioner Spring: The tensioner pulley is spring-loaded and can snap back with considerable force when released. Use the correct tools to relieve tension on the belt. Most tensioners have a square hole designed for a socket wrench or breaker bar to allow you to rotate the tensioner and release the belt.
- Sharp Edges: Be careful of sharp edges on engine components and tools. Wear gloves to protect your hands.
Replacing the serpentine belt can be messy, so lay down some cardboard or rags to protect the engine compartment from spilled coolant or oil. And always dispose of used belts responsibly.
With a clear understanding of the serpentine belt diagram and the proper tools, replacing your 2017 Toyota Corolla's serpentine belt can be a straightforward DIY project. Remember to prioritize safety and take your time to ensure the belt is routed correctly. A properly installed serpentine belt will ensure optimal performance and reliability for years to come.
We have the full resolution 2017 Toyota Corolla Serpentine Belt Diagram file available for you to download. With the diagram in hand, you will be well prepared for any serpentine belt job.