2017 Toyota Highlander Serpentine Belt Diagram
Welcome, fellow gearheads! Let's dive into the serpentine belt system of a 2017 Toyota Highlander. Understanding this system is crucial for preventative maintenance, troubleshooting common issues, and even tackling some repairs yourself. I've got a detailed diagram that we'll refer to throughout this discussion. This isn't just a pretty picture; it's a roadmap to keeping your Highlander running smoothly. We have the file, and you can download the diagram at the end of this article.
Purpose of Understanding the Serpentine Belt Diagram
Why bother with a diagram? Well, a clear understanding of the serpentine belt's routing is indispensable for several reasons:
- Preventative Maintenance: A visual check using the diagram can help identify potential problems *before* they become major headaches. You can spot signs of wear, misalignment, or improper tension.
- Accurate Replacement: When the time comes to replace the belt (and it will!), having the diagram ensures correct routing. An incorrectly routed belt can lead to component failure and damage.
- Troubleshooting: Is your power steering acting up? Air conditioning not blowing cold? The diagram helps you quickly pinpoint which components are driven by the serpentine belt and narrow down potential causes.
- Learning & DIY Repairs: If you're venturing into more advanced repairs, such as replacing the alternator or power steering pump, the diagram is your reference for properly reinstalling the belt.
Basically, this diagram is your silent partner, guiding you through a key system in your Highlander.
Key Specs and Main Parts of the Serpentine Belt System
The serpentine belt system isn't just a belt; it's a complex interplay of components. For the 2017 Toyota Highlander, the following are the key parts you'll encounter:
- Serpentine Belt: The continuous belt itself, typically made of reinforced rubber. Its job is to transmit rotational power from the crankshaft to various accessories.
- Crankshaft Pulley (Damper): Attached to the crankshaft, this pulley is the driving force of the entire system. The serpentine belt wraps around it.
- Alternator Pulley: The alternator generates electricity to power the car's electrical system and charge the battery.
- Power Steering Pump Pulley: This drives the power steering pump, providing hydraulic assistance for steering.
- Air Conditioning Compressor Pulley: This engages and drives the A/C compressor, which circulates refrigerant for cooling.
- Water Pump Pulley: Drives the water pump, which circulates coolant through the engine to prevent overheating.
- Tensioner Pulley: This spring-loaded pulley maintains proper tension on the serpentine belt, preventing slippage and extending belt life. Crucially important for proper function.
- Idler Pulley(s): Smooth pulleys that guide the belt and provide the necessary wrap angle around other pulleys.
Key Spec: While belt length varies based on engine configuration and specific model options (like with or without rear AC), it's crucial to use the *exact* specified belt length for your 2017 Highlander. Consult your owner's manual or a reliable parts catalog for the correct part number. Using the wrong length can cause improper tension or component damage.
Symbols and Markings on the Serpentine Belt Diagram
A good serpentine belt diagram uses symbols and conventions to convey information clearly. Here’s what you’ll likely find:
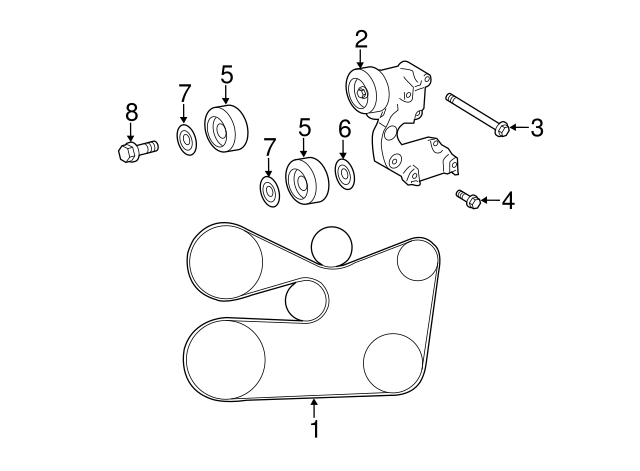
- Solid Lines: Represent the path of the serpentine belt itself. Pay close attention to the direction of the line as it indicates the belt's routing around the pulleys.
- Dotted Lines (Less Common): Sometimes used to show the belt's path behind other components, indicating where it's not directly visible.
- Arrows: Indicate the direction of rotation for each pulley. This is crucial for understanding how the belt transmits power.
- Component Icons: Small icons that visually represent each component (alternator, power steering pump, etc.).
- Text Labels: Each component is typically labeled with its name (e.g., "ALT" for alternator, "P/S" for power steering pump).
- Tensioner Indicator: Often, the tensioner pulley will have a marking indicating the acceptable range of movement. This shows if the tensioner is operating correctly and the belt isn't stretched beyond its limit.
Some diagrams might also use color-coding to highlight specific sections or components, but this is less common. The key is to understand the standard conventions of lines, arrows, and labels.
How the Serpentine Belt System Works
The principle is simple: the rotating crankshaft drives the serpentine belt, which in turn drives the accessory components. The crankshaft pulley, connected directly to the engine's crankshaft, is the power source. As the engine runs, the crankshaft pulley spins, and the belt, wrapped tightly around it, rotates. This rotational force is then transferred to the pulleys of the alternator, power steering pump, A/C compressor, and water pump. The tensioner pulley maintains the necessary tension to prevent slippage and ensure efficient power transfer.
The serpentine belt's routing is strategically designed to maximize wrap angle around each pulley. Wrap angle refers to the amount of contact the belt has with the pulley surface. A larger wrap angle provides more friction and prevents slippage, especially for components that require significant power, like the A/C compressor.
Real-World Use: Basic Troubleshooting Tips
Here's how you can use the diagram for basic troubleshooting:
- Squealing Noise: A common symptom is a squealing noise, often more pronounced when the engine is first started or when accessories like the A/C are turned on. Use the diagram to visually inspect the belt for cracks, glazing (a shiny, smooth surface), or fraying. Also, check the tensioner pulley. If it's bouncing excessively, it might be failing. Slippage is a likely cause.
- Power Steering Issues: If your power steering feels heavy or unresponsive, check the belt's routing around the power steering pump pulley. Ensure the belt is properly seated and not slipping. A loose belt can prevent the power steering pump from generating sufficient pressure.
- Charging Problems: If your battery is constantly dying or the charging system warning light is on, the alternator might not be getting enough power. Inspect the belt's condition and routing around the alternator pulley.
- Overheating: While not always directly related to the serpentine belt (cooling system issues are primary), a slipping belt on the water pump pulley can reduce coolant circulation and contribute to overheating. Verify the belt's condition and tension.
Pro Tip: When inspecting the belt, use a flashlight to get a good view of the inner surfaces and hidden areas. Also, feel the belt for any signs of unusual wear or damage. A worn or damaged belt should be replaced immediately.
Safety Precautions
Working on the serpentine belt system involves some inherent risks. Never work on the system while the engine is running. The rotating components can cause serious injury. Always disconnect the negative battery cable before starting any work to prevent accidental starting.
The tensioner pulley stores a significant amount of spring force. When releasing the tension, be extremely careful to control the movement of the tensioner arm. Use the correct tools to relieve the tension and prevent the tensioner from snapping back unexpectedly. Eye protection is always recommended. Avoid wearing loose clothing or jewelry that could get caught in the belt or pulleys.
Components like the alternator can get hot, so allow them to cool down before touching them.
Finally, double-check your work before starting the engine. Ensure the belt is properly routed around all pulleys and that the tension is correct. A mistake here could lead to serious damage.
Remember, if you're not comfortable performing any of these tasks yourself, it's always best to consult a qualified mechanic.
You can download the detailed 2017 Toyota Highlander Serpentine Belt Diagram [here - Placeholder for link/file]. Good luck, and happy wrenching!