2017 Toyota Tacoma Serpentine Belt Diagram
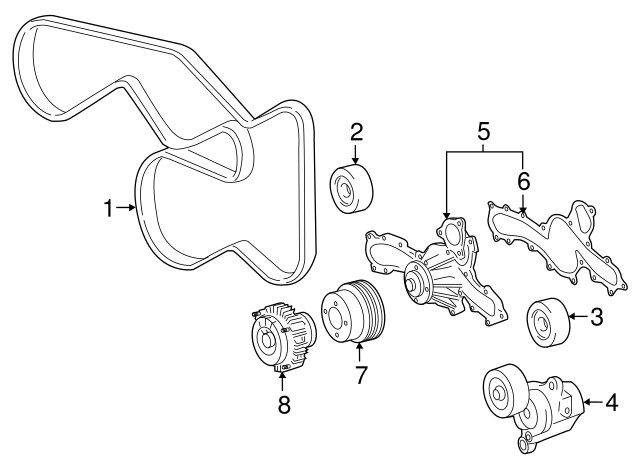
Okay, let's dive into the serpentine belt diagram for your 2017 Toyota Tacoma. This isn't just some pretty picture; it's your roadmap to understanding and maintaining a vital part of your truck's engine. Whether you're tackling a replacement, diagnosing a squeal, or simply want a deeper understanding of your Tacoma's inner workings, knowing how to read this diagram is essential.
Purpose of the Serpentine Belt Diagram
The serpentine belt diagram serves several crucial purposes. Primarily, it's a visual guide for routing the serpentine belt correctly. The correct routing is critical. An improperly installed belt can lead to catastrophic engine failure. Think about it: this single belt powers multiple essential components like the alternator, power steering pump, air conditioning compressor, and sometimes even the water pump. An incorrectly routed belt can slip, leading to reduced or complete loss of function for these systems, ultimately causing damage. The diagram also aids in:
- Repairs and Maintenance: Guiding belt replacement and related repairs.
- Troubleshooting: Identifying potential issues based on belt wear patterns or component failures.
- Understanding Engine Layout: Providing a visual representation of component placement and drive system dynamics.
- Preventative Maintenance: Allowing for accurate inspection of belt condition and pulley alignment.
Key Specs and Main Parts
Before we dissect the diagram itself, let's identify the key components involved. Understanding what each part does is crucial to interpreting the diagram effectively.
- Serpentine Belt: This is the star of the show – a single, long belt that snakes around multiple pulleys to drive various engine accessories. It's typically made of reinforced rubber compounds for durability and heat resistance.
- Crankshaft Pulley (Harmonic Balancer): Connected directly to the crankshaft, this pulley transfers the engine's rotational power to the serpentine belt. It also helps dampen engine vibrations.
- Alternator Pulley: Driven by the serpentine belt, the alternator generates electrical power to charge the battery and run electrical accessories.
- Power Steering Pump Pulley: The power steering pump provides hydraulic assistance for steering, making it easier to turn the wheels.
- Air Conditioning (A/C) Compressor Pulley: The A/C compressor circulates refrigerant to cool the cabin.
- Idler Pulleys: These smooth, bearing-mounted pulleys guide the serpentine belt and maintain proper tension.
- Tensioner Pulley: This spring-loaded pulley automatically adjusts belt tension, ensuring optimal performance and preventing slippage. Maintaining proper tension is critical for belt longevity and proper operation of driven accessories.
The specific length and width of the serpentine belt for your 2017 Tacoma will vary slightly depending on engine configuration (e.g., 2.7L inline-4 or 3.5L V6). Always consult your owner's manual or a reputable parts retailer to ensure you obtain the correct replacement belt.
Symbols and Diagram Conventions
Serpentine belt diagrams use a standardized set of symbols and conventions to convey information efficiently. Let's break down some of the common ones:
- Solid Lines: Typically represent the path of the serpentine belt itself. The thickness of the line doesn't usually hold any special meaning, it is just for visibility.
- Dashed Lines: May indicate the backside (smooth side) of the belt contacting a pulley. This can be important for understanding the direction of rotation.
- Arrows: Show the direction of rotation for each pulley. Pay close attention to these arrows, as they indicate which direction the belt must move to drive each accessory.
- Component Labels: Abbreviations and labels identify each component (e.g., ALT for alternator, P/S for power steering, A/C for air conditioning).
- Tensioner Indication: A symbol (often a square with an arrow) denotes the location of the tensioner pulley.
- Routing Overlays: Some diagrams include multiple views or overlays to clarify complex routing paths, especially around closely spaced pulleys.
Colors are typically not standardized across all diagrams but can be used for emphasis or to distinguish different belt paths in more complex setups.
How It Works: Serpentine Belt System
The serpentine belt system is a relatively simple yet ingenious design. The crankshaft pulley, driven by the engine's combustion process, provides the rotational force. This force is transferred to the serpentine belt, which then drives all the other accessory pulleys. The tensioner pulley is the unsung hero, constantly adjusting to maintain optimal belt tension as the engine speed varies and the belt stretches slightly over time. Without the tensioner, the belt would either slip at high speeds or be too tight, causing premature wear on the pulleys and accessories. Proper tension is crucial for efficient and reliable operation.
Real-World Use: Troubleshooting Tips
Here are some common problems you might encounter and how the serpentine belt diagram can help:
- Squealing Belt: Often caused by a worn belt, misalignment, or a failing tensioner. The diagram helps you inspect the belt's routing to ensure it's properly seated on all pulleys. Check for signs of wear, cracking, or glazing on the belt itself. A failing tensioner will often exhibit excessive vibration or noise.
- Loss of Power Steering or A/C: If one or more accessories stop working, it could indicate a broken or slipped serpentine belt. The diagram will show you if the belt is still routed correctly and if it's driving the affected component.
- Battery Not Charging: A faulty alternator is the primary suspect, but a slipping serpentine belt can also prevent the alternator from spinning fast enough to generate sufficient power. Use the diagram to verify proper belt routing and tension.
- Unusual Wear Patterns: Uneven wear on the belt can indicate misalignment or a faulty pulley. The diagram allows you to visually inspect the alignment of all components. A pulley that's out of alignment can cause the belt to wear prematurely on one side.
Safety Precautions
Working on the serpentine belt system involves potential hazards. Always disconnect the negative battery terminal before beginning any work. This prevents accidental starting of the engine, which could cause serious injury. The engine compartment is full of moving parts and high-temperature components.
- Hot Engine: Allow the engine to cool completely before working on the belt system. Exhaust manifolds and other components can reach extremely high temperatures.
- Moving Parts: Keep your hands and tools clear of the belt and pulleys when the engine is running. Even at idle, the belt spins at a considerable speed.
- Spring Tension: Be extremely careful when working with the tensioner pulley. It's spring-loaded and can snap back with considerable force. Use the appropriate tools to relieve the tension before removing the belt.
Replacing the serpentine belt is usually a straightforward job, but it's crucial to follow the diagram carefully and use the correct tools. If you're unsure about any step, it's always best to consult a qualified mechanic.
Now that you have a better grasp of the 2017 Toyota Tacoma serpentine belt diagram, you're better equipped to understand, maintain, and troubleshoot your vehicle's engine.
We have the complete serpentine belt diagram file available for download. This will provide you with a high-resolution image to reference while working on your Tacoma.