2018 Chevy Colorado Serpentine Belt Diagram
The serpentine belt diagram for your 2018 Chevy Colorado is an essential tool for anyone tackling engine maintenance or repairs. Whether you're replacing a worn belt, diagnosing a squealing noise, or simply trying to understand your truck's engine layout, this diagram is your roadmap. This article will walk you through understanding the diagram, its components, and how to use it effectively. We'll cover key specs, symbols, operational principles, and real-world troubleshooting, empowering you to work confidently on your Colorado. Furthermore, we have the diagram file available for download; you can access it at the end of this article.
Purpose of the Serpentine Belt Diagram
The serpentine belt diagram is a visual representation of the belt's routing path around various engine components. Its primary purpose is to illustrate how the serpentine belt should be installed correctly. This is critical for several reasons:
- Correct Installation: The belt must follow the specified path to ensure proper tension and avoid slippage, which can damage components.
- Troubleshooting: The diagram helps you identify which components are driven by the belt, aiding in diagnosing issues like a failing alternator or power steering pump.
- Part Replacement: When replacing the belt or any of the driven components, the diagram is vital for reassembling everything correctly.
- Understanding Engine Layout: Even for those unfamiliar with engine mechanics, the diagram offers a clear overview of how different accessories are powered.
Key Specs and Main Parts
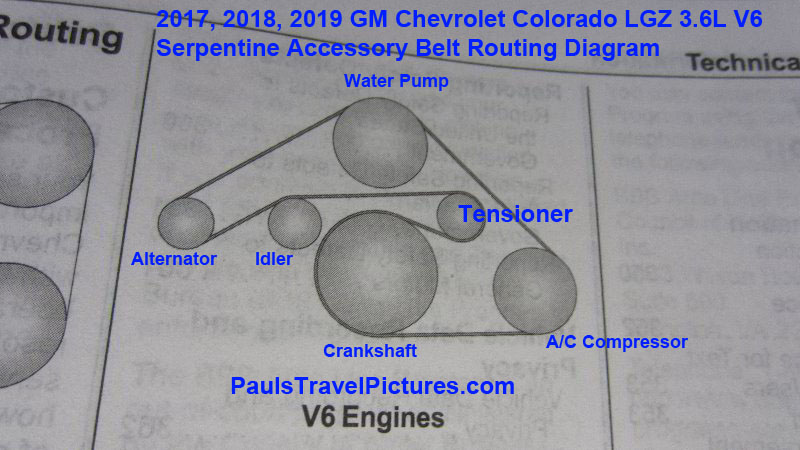
The 2018 Chevy Colorado's serpentine belt system varies slightly depending on the engine. It's important to note which engine you have (2.5L I4, 3.6L V6, or 2.8L Duramax Diesel) as the belt routing will differ. While this article provides general information, always consult the diagram specific to your engine for accurate information. Here are the main parts involved:
- Crankshaft Pulley (Crank Pulley): This pulley, connected to the crankshaft, is the driving force of the entire system. It's generally the largest pulley in the system.
- Alternator Pulley: The alternator converts mechanical energy into electrical energy to power the vehicle's electrical system and charge the battery.
- Power Steering Pump Pulley: This pulley drives the power steering pump, which provides hydraulic assistance for steering.
- Air Conditioning Compressor Pulley: This pulley drives the A/C compressor, responsible for cooling the vehicle's cabin.
- Idler Pulley(s): These pulleys provide additional support and guidance for the belt, ensuring proper routing and preventing excessive vibration. They often have a smooth surface.
- Tensioner Pulley: This is a spring-loaded pulley that maintains the correct tension on the serpentine belt. Proper tension is crucial for efficient operation and preventing slippage.
- Water Pump Pulley: This pulley drives the water pump, which circulates coolant through the engine to regulate its temperature.
- Serpentine Belt: The heart of the system, this continuous belt transmits power from the crankshaft pulley to all the other driven components. Typical belts are made of EPDM rubber for durability.
When consulting the diagram, you'll typically find specifications such as the belt length. These specifications are crucial when purchasing a replacement belt. Using the wrong size can lead to improper tension, slippage, and damage to components.
Symbols and Diagram Conventions
Serpentine belt diagrams use specific symbols and conventions to represent different components and their relationships. Understanding these symbols is essential for interpreting the diagram correctly.
- Lines: Solid lines indicate the path of the serpentine belt. Dotted lines might represent hidden portions of the belt or the location of the belt tensioner.
- Pulleys: Pulleys are typically represented as circles. The diagram might label each circle with the component it's associated with (e.g., ALT for alternator, AC for air conditioning compressor).
- Arrows: Arrows indicate the direction of belt rotation around each pulley. This is important for understanding the power flow within the system.
- Tensioner Symbol: The tensioner is often depicted with a spring or a symbol representing its spring-loaded mechanism. This highlights its adjustable nature.
- Labels: Clear labels are crucial. Look for abbreviations like CKP (crankshaft pulley), ALT (alternator), PS (power steering), AC (air conditioning), WP (water pump), and IDL (idler pulley).
Color coding is less common on serpentine belt diagrams than on electrical schematics, but if used, the color key will be explained within the diagram's legend.
How It Works
The serpentine belt system is a relatively simple yet critical system. The crankshaft, powered by the engine's combustion process, rotates the crankshaft pulley. This rotating pulley then drives the serpentine belt, which in turn spins all the other accessory pulleys. The belt's tension is maintained by the spring-loaded tensioner pulley, ensuring adequate grip on all the pulleys. This grip is vital for transferring power effectively. Slippage reduces the efficiency of all connected components and adds heat, quickly deteriorating the belt.
Each component driven by the serpentine belt performs a specific function. The alternator generates electricity, the power steering pump assists with steering, the air conditioning compressor cools the cabin, and the water pump circulates coolant. If the serpentine belt fails or slips, these components will cease to function correctly, leading to potential issues such as a dead battery, difficulty steering, lack of air conditioning, and engine overheating.
Real-World Use and Basic Troubleshooting Tips
The serpentine belt diagram is invaluable for troubleshooting various issues. Here are some common problems and how the diagram can help:
- Squealing Noise: A squealing noise is often caused by a loose or worn serpentine belt. Check the belt's tension using the tensioner pulley. Use the diagram to confirm the correct belt path. Inspect the belt for cracks, glazing, or missing chunks. Also, examine the pulleys for damage or wear. Slippage of any component can cause noise.
- Accessory Failure: If the alternator, power steering pump, or A/C compressor stops working, verify that the serpentine belt is intact and properly routed. If the belt is slipping or broken, the affected component won't be driven. Use the diagram to identify the belt's path and look for any obstructions or damage to the pulleys.
- Belt Replacement: When replacing the serpentine belt, the diagram is crucial for ensuring correct installation. Refer to the diagram to determine the correct routing path around all the pulleys. Make sure the belt is seated properly in all the pulley grooves before releasing the tensioner.
When troubleshooting, always visually inspect the belt and pulleys first. Look for signs of wear, damage, or misalignment. Use a belt tension gauge to verify proper tension if available. Replacing a worn belt proactively can prevent more serious issues down the road.
Safety Considerations
Working on the serpentine belt system involves certain safety risks. Always disconnect the negative battery cable before working on the engine. This prevents accidental electrical shocks. The engine should also be cool to the touch before beginning any work to avoid burns.
The tensioner pulley stores significant spring energy. Use the correct tool to relieve the tension on the belt before removing it. Releasing the tensioner without proper control can cause injury. Also, keep fingers, clothing, and tools clear of moving parts when the engine is running. The spinning belt and pulleys can cause serious injury.
Working around the crankshaft pulley can also be dangerous due to its direct connection to the engine. Never attempt to stop the crankshaft pulley by hand while the engine is running. It's also beneficial to wear safety glasses to prevent debris from entering your eyes.
Following these safety precautions will minimize the risk of injury while working on the serpentine belt system.
Download the Diagram
Now that you understand the importance and use of the 2018 Chevy Colorado Serpentine Belt Diagram, you can download a copy for your reference. Click on the link below to access the file. Remember to confirm it matches your specific engine type. Good luck with your repairs!
[Insert download link here - Placeholder for actual link]