2018 Chevy Silverado 2500 Hd L5p Nox Sensor Locations Diagram
Alright, let's dive into the NOx sensor locations on a 2018 Chevy Silverado 2500 HD with the L5P Duramax engine. Understanding this system is crucial for maintaining optimal engine performance, reducing emissions, and preventing those dreaded check engine lights. This article will equip you with the knowledge to identify these sensors, understand their function, and perform basic troubleshooting.
Why This Diagram Matters
Why bother learning about NOx sensor locations? Simple: diagnostics and repair. When you encounter a P2200 series code (or similar) related to NOx sensor performance, knowing precisely where these sensors reside is paramount. This knowledge allows you to:
- Accurately diagnose sensor failures.
- Efficiently replace faulty sensors.
- Inspect wiring and connectors for damage.
- Understand the overall exhaust aftertreatment system.
Having a diagram (which, by the way, we have available for download at the end of this article) acts as a roadmap, saving you time and preventing misdiagnosis, which can lead to unnecessary expenses. Plus, for those of you interested in modifying your exhaust system (perhaps adding a downpipe), knowing the location of these sensors is absolutely critical to avoid damaging them during the process.
Key Specs and Main Parts
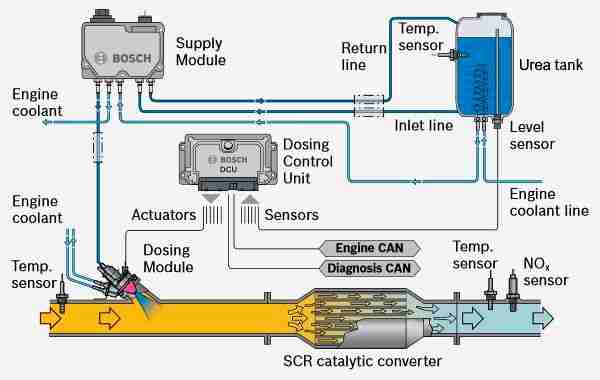
The 2018 Silverado 2500 HD with the L5P engine utilizes two NOx sensors as part of its Selective Catalytic Reduction (SCR) system. These sensors are critical components in reducing harmful nitrogen oxides (NOx) emissions from your diesel engine. They work in conjunction with the Diesel Exhaust Fluid (DEF) system. Here's a breakdown of the key components related to NOx sensing:
- NOx Sensor 1 (Upstream Sensor): Located before the SCR catalyst. It measures the NOx concentration in the exhaust gas entering the SCR system. This sensor provides feedback to the Engine Control Module (ECM) about the effectiveness of the engine's combustion process in minimizing NOx formation.
- NOx Sensor 2 (Downstream Sensor): Located after the SCR catalyst. It measures the NOx concentration in the exhaust gas exiting the SCR system. This sensor provides feedback to the ECM about the effectiveness of the SCR catalyst in reducing NOx emissions. This feedback loop allows the ECM to adjust DEF injection rates to optimize NOx reduction.
- SCR Catalyst: The heart of the NOx reduction system. It uses DEF to convert NOx into nitrogen and water.
- Diesel Exhaust Fluid (DEF) Injector: Sprays DEF into the exhaust stream upstream of the SCR catalyst.
- Engine Control Module (ECM): The brain of the operation. It monitors the NOx sensor readings, controls DEF injection, and monitors overall system performance.
Important Note: The L5P engine utilizes a Bosch Denoxtronic 2.2 SCR system, which is known for its efficiency. These sensors are integral parts of this system and are not interchangeable with sensors from other systems or vehicles.
Understanding the Diagram: Symbols and Conventions
A good NOx sensor location diagram will use specific symbols and conventions. Here's what to look for:
- Sensor Representation: Typically, the sensors will be represented as small, rectangular boxes or circles with a label indicating their function (e.g., "NOx Sensor 1," "NOx Sensor 2").
- Exhaust Pipe Representation: The exhaust system itself will be depicted as lines or shaded areas. The direction of exhaust flow is usually indicated by arrows.
- Wiring Harnesses: These are often represented as lines connecting the sensors to the ECM. Different colored lines might indicate different circuits (e.g., power, ground, signal).
- Connectors: Look for small icons or symbols where the wiring harness connects to the sensor or other components.
- Ground Points: Ground points may be represented as a filled triangle symbol connecting a wire to the vehicle's chassis.
A well-drawn diagram will include labels indicating the location of other relevant components, such as the SCR catalyst, DEF injector, and the ECM. The diagram may show the approximate location of these components relative to the vehicle's frame or other easily identifiable landmarks.
How It Works: A Deeper Dive
The NOx sensors are sophisticated electrochemical devices. They function by measuring the concentration of nitrogen oxides in the exhaust gas stream. Here's a simplified explanation:
- Exhaust Gas Exposure: The sensor is exposed to the hot exhaust gas.
- Electrochemical Reaction: A chemical reaction occurs within the sensor based on the NOx concentration. This reaction generates a small electrical current or voltage.
- Signal Transmission: The sensor transmits this electrical signal to the ECM.
- Data Interpretation: The ECM interprets the signal and uses it to adjust the DEF injection rate.
The ECM constantly monitors the signals from both NOx sensors. By comparing the upstream and downstream readings, the ECM can determine the efficiency of the SCR catalyst. If the catalyst is not performing as expected, the ECM will adjust the DEF injection rate to optimize NOx reduction. If the ECM detects a persistent problem with the NOx sensors or the SCR system, it will illuminate the check engine light and store a diagnostic trouble code (DTC) in its memory.
Real-World Use: Basic Troubleshooting Tips
So, you've got a check engine light and a NOx sensor-related code. Where do you start? Here are some basic troubleshooting tips:
- Visual Inspection: Start with a thorough visual inspection of the sensors and their wiring harnesses. Look for any signs of damage, such as frayed wires, cracked connectors, or corrosion.
- Connector Inspection: Disconnect the sensor connectors and inspect the pins for corrosion or damage. Clean the pins with electrical contact cleaner if necessary. Ensure the connector locks securely when reconnected.
- Wiring Harness Testing: Use a multimeter to check the continuity of the wiring harness between the sensor and the ECM. Look for any open circuits or shorts to ground.
- Sensor Testing (Advanced): Using a scan tool that can read live data, monitor the NOx sensor readings while the engine is running. Compare the upstream and downstream readings to see if they are within expected ranges. Some advanced scan tools can also perform sensor actuation tests.
- DEF System Check: Ensure the DEF tank is full and the DEF injector is functioning properly. A malfunctioning DEF injector can cause NOx sensor codes.
Remember: Always consult the vehicle's service manual for specific diagnostic procedures and troubleshooting tips.
Safety First: Highlighting Risky Components
Working on the exhaust system can be hazardous. Here are some safety precautions to keep in mind:
- Hot Surfaces: The exhaust system gets extremely hot. Allow the engine to cool completely before working on it.
- Electrical Hazards: Disconnect the battery before working on any electrical components.
- Exhaust Fumes: Work in a well-ventilated area to avoid inhaling exhaust fumes.
- DEF Fluid: DEF is a corrosive substance. Wear gloves and eye protection when handling it. Avoid contact with skin and eyes.
Caution: The NOx sensors themselves can be sensitive. Handle them with care and avoid dropping them. Also, avoid using excessive force when tightening the sensor mounting bolts. Over-tightening can damage the sensor.
By understanding the system, its components, and the diagnostic approach, you can confidently tackle NOx sensor issues on your 2018 Chevy Silverado 2500 HD with the L5P engine. This knowledge empowers you to save money on repairs and keep your truck running smoothly and efficiently for years to come.
Ready to get your hands on that diagram we mentioned?
Click HERE to download the 2018 Chevy Silverado 2500 HD L5P NOx Sensor Location Diagram!
Happy wrenching!