2018 Chevy Silverado Front Bumper Parts Diagram
Alright, let's dive into the 2018 Chevy Silverado front bumper parts diagram. Whether you're patching up your Silverado after a fender-bender, planning some aftermarket upgrades, or just trying to understand how all those plastic and metal pieces fit together, this guide will walk you through the ins and outs.
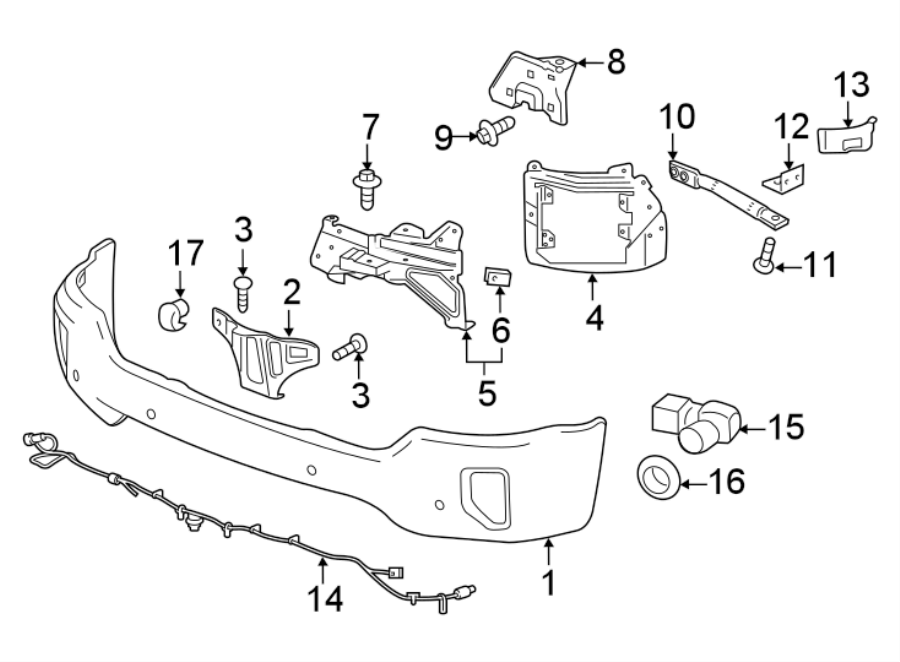
Purpose of the Diagram
Think of this parts diagram as your roadmap to the front of your truck. Its primary purpose is to illustrate the exact location, orientation, and part number of every component that makes up the front bumper assembly. This is incredibly valuable for several reasons:
- Repairs: Identifying damaged parts and ordering the correct replacements becomes significantly easier. No more guesswork or ordering the wrong bracket!
- Upgrades/Modifications: Planning a bumper replacement, adding a winch, or installing fog lights? The diagram shows you what you're working with and helps you anticipate potential issues.
- Understanding Assembly: Even if you're not actively working on the bumper, the diagram provides a clear visual representation of how everything fits together. This knowledge can be helpful for diagnosing noises or issues related to the front end.
- Part Number Identification: The diagram provides the OEM part numbers to ensure you are ordering the correct parts for your truck.
Key Specs and Main Parts
The 2018 Silverado front bumper isn't just one big piece of metal or plastic; it's a carefully engineered assembly of various components. Here’s a breakdown of the main players:
- Bumper Cover: This is the outermost, usually painted, part of the bumper. It's often made of a flexible plastic polymer to absorb minor impacts.
- Bumper Reinforcement Bar (Impact Bar): Located behind the bumper cover, this is a crucial structural component typically made of high-strength steel. Its primary job is to absorb and distribute impact forces in a collision. This is a critical safety component.
- Bumper Brackets: These brackets attach the bumper assembly to the truck's frame. They are designed to crumple in a controlled manner during a collision to further absorb energy. You'll find upper, lower, and side brackets.
- Fog Lights (if equipped): Many Silverado models come with integrated fog lights. The diagram will show their mounting points and wiring connections.
- Tow Hooks (if equipped): Another option found on many Silverados. The diagram will identify their mounting locations.
- Air Dams/Deflectors: These are typically plastic pieces located below the bumper. They help improve aerodynamics and fuel efficiency by directing airflow.
- License Plate Bracket: A small, but necessary, piece that securely holds your license plate.
- Filler Panels: These small trim pieces fill in gaps between the bumper cover and other body panels.
- Fasteners: Don't underestimate the importance of bolts, screws, and clips! The diagram will show you the size, type, and quantity of each fastener used in the assembly.
Symbols and Conventions
Understanding the symbols used in the diagram is essential for accurate interpretation. Here's a guide to common conventions:
- Solid Lines: Typically represent the visible outlines of parts.
- Dashed Lines: Indicate hidden parts or features located behind other components.
- Arrows: Show the direction of assembly or the flow of fluids (in related systems).
- Numbers/Callouts: Each part in the diagram is labeled with a unique number or callout. This number corresponds to a part number in a separate parts list or catalog. Always cross-reference the diagram with the parts list to ensure you're ordering the correct component.
- Color Coding: While not always present, some diagrams use color to differentiate between different types of materials (e.g., steel vs. plastic) or different components within the assembly. Check the diagram's legend for color-coding information.
How It Works: Bumper Assembly and Function
The front bumper is more than just a cosmetic addition; it's a crucial safety feature designed to protect the vehicle and its occupants in a collision. Here's how it works:
- Minor Impacts: The bumper cover, being made of flexible plastic, can absorb low-speed impacts, preventing damage to the underlying components.
- Moderate Impacts: In a more significant collision, the bumper reinforcement bar comes into play. It's designed to distribute the impact force across the frame rails, reducing the severity of the impact on the vehicle's structure.
- Severe Impacts: The bumper brackets are designed to collapse in a controlled manner, further absorbing energy and preventing the impact forces from being transmitted directly to the passenger cabin.
It's important to note that the effectiveness of the bumper system depends on the integrity of all its components. Damaged or missing parts can significantly reduce its ability to protect the vehicle in a collision.
Real-World Use: Troubleshooting Tips
Here are some common issues and troubleshooting tips related to the front bumper assembly:
- Loose Bumper: Check the bumper brackets and fasteners. Ensure they are properly tightened. Damaged or rusted brackets should be replaced.
- Misaligned Bumper: This could be due to damaged brackets, a bent reinforcement bar, or loose fasteners. Carefully inspect the bumper assembly and frame rails for signs of damage.
- Fog Light Issues: Check the wiring connections and bulbs. Use the diagram to trace the wiring harness and identify any damaged wires or connectors.
- Rattling Noises: Loose air dams, filler panels, or the license plate bracket can cause rattling noises. Tighten the fasteners or replace any damaged components.
Pro Tip: When disassembling the bumper, take photos or videos of each step. This will help you remember how everything goes back together. Also, label all fasteners and components to avoid confusion during reassembly.
Safety Considerations
Working on the front bumper can involve some safety risks, particularly if you're dealing with damaged components or electrical systems. Here are some precautions to take:
- Disconnect the Battery: Before working on any electrical components (e.g., fog lights), disconnect the negative terminal of the battery to prevent electrical shocks.
- Wear Safety Glasses: Protect your eyes from flying debris, especially when working with power tools or removing rusted fasteners.
- Use Jack Stands: If you need to raise the vehicle to access the bumper, always use jack stands to support the weight of the vehicle. Never work under a vehicle supported only by a jack.
- Be Aware of Airbag Sensors: Some vehicles have airbag sensors located in the front bumper area. Handle these sensors with care and avoid damaging them. Consult the service manual for specific instructions on how to work around airbag sensors.
- Damaged Reinforcement Bar: If your vehicle has been in an accident, the reinforcement bar may be damaged even if it's not immediately visible. Replacing a damaged reinforcement bar is critical for restoring the bumper's safety function. A damaged reinforcement bar can compromise the vehicle's performance in a subsequent accident.
Working on your vehicle can be rewarding, but it's essential to prioritize safety. If you're not comfortable performing a particular task, it's best to seek the help of a qualified mechanic.
We have the complete 2018 Chevy Silverado front bumper parts diagram file available for you to download. This will give you a high-resolution, detailed view of all the components and their corresponding part numbers, allowing for precise repairs and modifications.