2018 Ford Explorer Serpentine Belt Diagram
The serpentine belt, also known as the accessory drive belt, is a critical component in your 2018 Ford Explorer. It's responsible for powering numerous essential systems, including the alternator (which charges your battery), the power steering pump, the air conditioning compressor, and sometimes even the water pump. Understanding the serpentine belt diagram for your vehicle is crucial for performing routine maintenance, diagnosing problems, and carrying out repairs. This article will provide a comprehensive overview of the 2018 Ford Explorer serpentine belt diagram, helping you keep your Explorer running smoothly.
Purpose of the Serpentine Belt Diagram
Why bother with a diagram? Several reasons:
- Proper Belt Routing: The most common use is to ensure correct belt routing when replacing the serpentine belt. A misrouted belt can lead to improper function of accessories, causing damage to components or even belt failure.
- Troubleshooting: The diagram helps you identify the components driven by the belt, which can aid in diagnosing issues. For example, if your power steering isn't working, you can check if the belt is properly engaged with the power steering pump pulley.
- Maintenance: The diagram visualizes the system, allowing you to inspect the belt's condition and identify potential wear points or misalignment issues.
- Learning: Even if you're not actively working on your vehicle, understanding the belt system can improve your overall knowledge of automotive mechanics.
Key Specs and Main Parts of the 2018 Ford Explorer Serpentine Belt System
Before diving into the diagram itself, let's familiarize ourselves with the key components:
- Serpentine Belt: The main component, a long, winding belt made of reinforced rubber. Its length and width are specific to the 2018 Explorer and engine type (often a six-rib belt for most configurations, but it's important to verify the exact specifications for your particular engine).
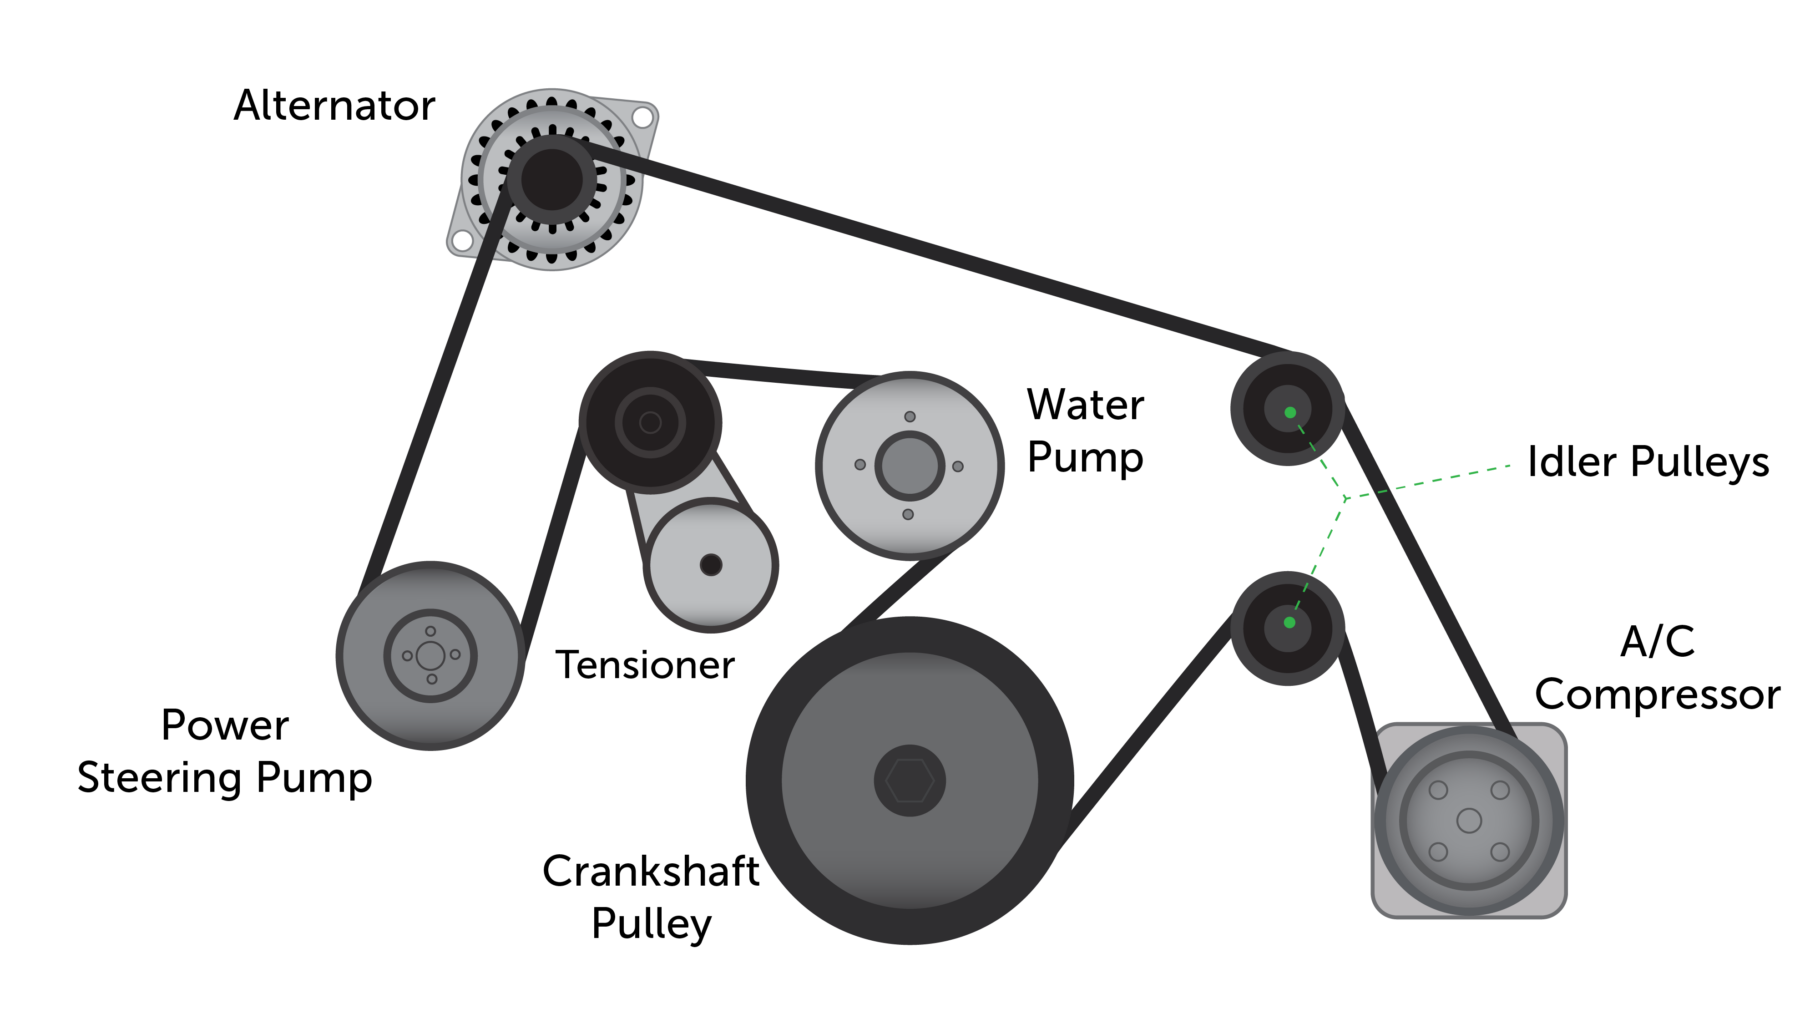
- Crankshaft Pulley: Attached to the crankshaft, this pulley is the driving force of the serpentine belt.
- Alternator Pulley: Driven by the belt, the alternator generates electrical power for the vehicle.
- Power Steering Pump Pulley: Drives the power steering pump, providing hydraulic assistance for steering.
- Air Conditioning (A/C) Compressor Pulley: Powers the A/C compressor, responsible for cooling the cabin air.
- Idler Pulley(s): Smooth, bearing-mounted pulleys that guide the belt and maintain proper tension. They don’t drive any specific accessory.
- Tensioner Pulley: Spring-loaded pulley that maintains the correct tension on the serpentine belt. A properly functioning tensioner is crucial for belt life and accessory performance.
- Water Pump Pulley: On some configurations, the water pump is driven by the serpentine belt. If so, you need to make sure the water pump is turning.
It is important to note that the exact configuration and placement of these components can vary slightly depending on the specific engine type (e.g., 2.3L EcoBoost, 3.5L V6, or 3.5L EcoBoost) installed in your 2018 Ford Explorer. Always refer to the diagram specific to your engine.
Symbols and Notation on the Serpentine Belt Diagram
The serpentine belt diagram uses various symbols to represent different components and belt routing:
- Solid Lines: Represent the serpentine belt itself. The thickness of the line might sometimes indicate the relative size or importance of the belt section.
- Arrows: Indicate the direction of belt rotation. Pay close attention to these, as they're essential for proper routing.
- Circles or Ovals: Represent pulleys. These might be labeled with abbreviations or symbols indicating the component they belong to (e.g., "ALT" for alternator, "P/S" for power steering).
- Shading or Coloring: Some diagrams might use different shades or colors to highlight the belt path or distinguish between different sections. This is not always consistent, but if present, a legend will usually explain its meaning.
- Abbreviations: Common abbreviations include ALT (Alternator), P/S (Power Steering), A/C (Air Conditioning), CRANK (Crankshaft), TENS (Tensioner), IDLER.
- Diagram Orientation: Most diagrams orient the engine as viewed from the front of the vehicle.
How the Serpentine Belt System Works
The engine's crankshaft is the source of power. As the crankshaft rotates, it turns the crankshaft pulley. The serpentine belt, wrapped around the crankshaft pulley and the other accessory pulleys, transfers this rotational energy to each of the driven components. The tensioner pulley applies constant tension to the belt, ensuring it maintains a firm grip on all the pulleys and prevents slippage. Without sufficient tension, the belt will slip, leading to reduced performance of the accessories and potential overheating of the belt itself. Think of it as a well-choreographed dance – each pulley plays a crucial role, and the belt is the dancer connecting them all.
Real-World Use and Basic Troubleshooting
Here are a few practical scenarios where understanding the serpentine belt diagram can be invaluable:
- Belt Replacement: This is the most common scenario. Before removing the old belt, carefully study the diagram and make note of the belt's routing. Take pictures or make a sketch to help you remember. Use a wrench or socket on the tensioner pulley's bolt to relieve the tension and remove the old belt. Install the new belt following the diagram, ensuring it's properly seated in all the pulley grooves. Release the tensioner and double-check the routing before starting the engine.
- Squealing Noise: A squealing or chirping noise from the engine bay is often a sign of a slipping serpentine belt. Use the diagram to check the belt's condition. Look for cracks, fraying, or glazing (a shiny, hardened surface). Also, inspect the tensioner pulley for proper function. If the tensioner is weak or the belt is worn, replacement is necessary.
- Accessory Malfunction: If you experience issues with the alternator, power steering, or A/C, check the serpentine belt. Ensure it's properly routed and has adequate tension. A broken or severely damaged belt will prevent the associated accessory from functioning.
- Visual Inspection: Regularly inspect the serpentine belt for signs of wear and tear. Early detection of problems can prevent more significant issues down the road. Use the diagram to locate and visually inspect all pulleys along the belt path.
Safety Considerations
Working around the serpentine belt system can be dangerous, so take the following precautions:
- Disconnect the Battery: Before working on any part of the electrical system, including the alternator driven by the belt, disconnect the negative battery cable. This prevents accidental shorts or electrical shocks.
- Engine Off and Cool: Never work on the serpentine belt system with the engine running or hot. Allow the engine to cool completely to avoid burns.
- Keep Hands Clear: The serpentine belt is under significant tension and can cause serious injury if it snaps or if your hand gets caught in the pulleys. Be extremely careful when releasing the tensioner.
- Eye Protection: Wear safety glasses to protect your eyes from debris.
- Proper Tools: Use the correct tools for the job. Attempting to release the tensioner with improper tools can damage the tensioner or cause injury.
The 2018 Ford Explorer Serpentine Belt Diagram is an invaluable tool for maintaining and repairing your vehicle's accessory drive system. By understanding the diagram and following proper safety procedures, you can confidently tackle serpentine belt-related tasks and keep your Explorer running smoothly.
We have the 2018 Ford Explorer Serpentine Belt Diagram file available for download. Please contact us if you'd like to receive it. This will greatly help you when working on your vehicle.