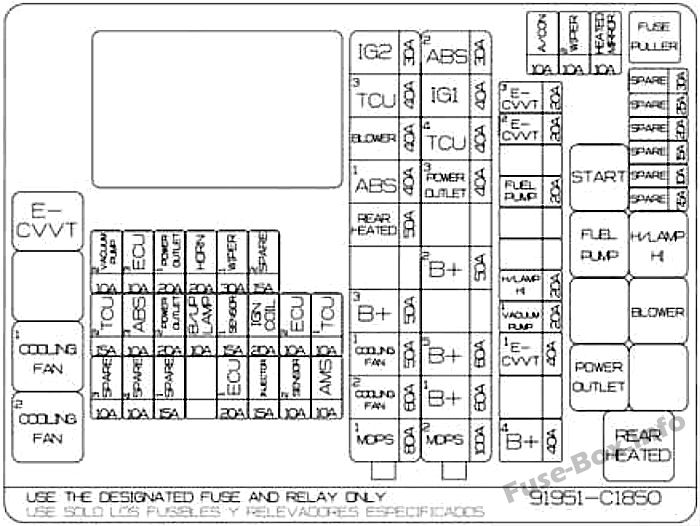
2018 Hyundai Sonata Fuse Box Diagram
Welcome, fellow automotive enthusiasts! Today, we're diving deep into the 2018 Hyundai Sonata's fuse box diagram. This seemingly simple piece of paper (or digital file, which we happen to have ready for you to download!) is actually a critical tool for anyone tackling electrical repairs, troubleshooting issues, or even customizing their Sonata. Understanding this diagram can save you time, money, and a whole lot of frustration.
Why Understanding the Fuse Box Diagram Matters
The fuse box diagram is your roadmap to the electrical heart of your Sonata. Without it, you're essentially poking around in the dark when dealing with electrical problems. The diagram has several key purposes:
- Troubleshooting Electrical Problems: When a component stops working – a headlight, a power window, the radio – the first thing you should check is the fuse. The diagram tells you exactly which fuse corresponds to that component.
- Preventing Further Damage: Replacing a blown fuse with one of the correct amperage protects the electrical system from overloads, preventing potentially serious (and expensive) damage to wiring and components.
- Modifying Your Vehicle: Planning to install aftermarket accessories like a new sound system, fog lights, or a dashcam? You'll need to know which circuits you can safely tap into, and the fuse box diagram is essential for that.
- General Understanding of Your Car: Even if you're not actively working on your car, understanding the fuse box layout gives you a better overall picture of how the electrical systems are designed.
Key Specs and Main Parts of the 2018 Sonata Fuse Box
The 2018 Sonata, like most modern vehicles, has multiple fuse boxes. The primary ones are usually located in the following places:
- Inside the Cabin: Typically found under the dashboard on the driver's side, behind a small access panel. This box houses fuses for interior components like the radio, lights, power windows, and other comfort features.
- Under the Hood (Engine Bay): Located near the battery, this box contains fuses and relays for critical engine management components, headlights, and the ABS system.
Each fuse box contains a variety of fuses and relays, each serving a specific purpose. The fuse box diagram identifies:
- Fuse Number/Identifier: A unique number or code assigned to each fuse.
- Amperage Rating: The maximum current (measured in Amperes, or Amps) that the fuse can handle before it blows. Common ratings include 5A, 7.5A, 10A, 15A, 20A, 25A, 30A, and higher. Never replace a fuse with one of a higher amperage rating, as this could damage the circuit.
- Component Protected: A description of the component or system that the fuse protects (e.g., "Headlight (Left)," "Power Window (Driver)," "ECU," "ABS Pump").
- Relays: These are electromagnetic switches that control higher-current circuits. The diagram will identify the relay's function (e.g., "Headlight Relay," "Fuel Pump Relay").
Understanding the Symbols and Conventions
Fuse box diagrams use standardized symbols and conventions to convey information clearly. Here's a breakdown:
- Lines: Lines connect the fuse or relay to the component it protects or controls. A solid line usually indicates a direct connection.
- Colors: Colors are sometimes used to differentiate between different types of circuits or fuse ratings. Refer to the legend on your specific diagram (the one we have for you!) for color-coding information. Commonly, colors can also indicate the amperage, such as blue for 15A, yellow for 20A, and red for 10A.
- Fuse Symbols: A rectangular box with a zig-zag line inside usually represents a fuse.
- Relay Symbols: A square or rectangular box with internal markings represents a relay. The diagram may indicate the relay's terminal numbers (e.g., 30, 85, 86, 87).
- Component Icons: Simple icons may be used to represent the component being protected (e.g., a headlight symbol for the headlight circuit).
Important Note: There can be minor variations in the fuse box layout and fuse assignments depending on the specific trim level and options of your 2018 Sonata. Always consult the diagram that specifically corresponds to your vehicle.
How It Works: A Fuse's Simple but Vital Role
A fuse is a simple safety device designed to protect an electrical circuit from overcurrent. It consists of a thin wire or strip of metal designed to melt and break the circuit if the current exceeds its rated amperage. This "blowing" of the fuse interrupts the flow of electricity, preventing damage to the protected component and the wiring in the circuit.
Think of it like a weak link in a chain. If the chain is subjected to excessive force, the weak link will break, preventing the rest of the chain from snapping. In an electrical circuit, the fuse is that weak link.
Relays, on the other hand, are used to switch high-current circuits using a low-current control signal. This is important because it allows you to control things like headlights or the fuel pump with a small switch on the dashboard, without having to run high-current wires all the way to the switch. The relay acts as an intermediary, using the low-current signal to activate an electromagnet that closes the high-current circuit.
Real-World Use: Basic Troubleshooting Tips
Here’s a basic troubleshooting scenario using the fuse box diagram:
- Problem: Your driver's side power window isn't working.
- Consult the Diagram: Locate the fuse box diagram (remember, we have one ready for you to download). Find the fuse labeled "Power Window (Driver)" or something similar.
- Locate the Fuse: Find the physical fuse in the fuse box that corresponds to the diagram's identifier.
- Inspect the Fuse: Carefully examine the fuse. If the thin wire or strip inside is broken, the fuse is blown.
- Replace the Fuse: Replace the blown fuse with a new fuse of the exact same amperage rating.
- Test: Turn the ignition on and try the power window. If it works, you've solved the problem. If the new fuse blows immediately, there's a deeper problem in the circuit (e.g., a short circuit in the wiring or a faulty window motor) that requires further investigation.
If a fuse continues to blow repeatedly, do not simply replace it with a higher amperage fuse. This is a fire hazard and can cause serious damage to your vehicle's electrical system. Instead, take your car to a qualified mechanic to diagnose and repair the underlying problem.
Safety First: Identifying and Avoiding Risky Components
Working with electrical systems can be dangerous if you're not careful. Here are some key safety precautions:
- Disconnect the Battery: Before working on any electrical components, disconnect the negative (-) terminal of the battery. This will prevent accidental shorts and shocks.
- Use Insulated Tools: Use tools with insulated handles to protect yourself from electric shock.
- Never Work on Live Circuits: Always disconnect the power before working on any electrical circuit.
- Identify High-Current Circuits: Pay close attention to the fuse box diagram to identify high-current circuits (e.g., starter motor, alternator). These circuits can deliver a dangerous shock.
- Be Careful with Relays: Relays can control high-voltage components. Handle them with care and follow the diagram's instructions.
Components like the airbag system and the ABS system should be approached with extreme caution. Incorrectly tampering with these systems could lead to serious injury. If you're not comfortable working on these systems, leave it to a professional.
We have the 2018 Hyundai Sonata Fuse Box Diagram file, and you can download it by clicking the link below. This diagram will provide you with a detailed view of the fuse box layout and fuse assignments, making your troubleshooting and repair tasks easier.
[**Download the 2018 Hyundai Sonata Fuse Box Diagram Here** - *Link to be inserted here*]
By understanding your 2018 Hyundai Sonata's fuse box diagram, you're empowering yourself to tackle basic electrical repairs and modifications with confidence. Remember to prioritize safety, consult the correct diagram for your vehicle, and don't hesitate to seek professional help when needed. Happy wrenching!